Automate Kitchen.co Project Folders when Clients Sign Contracts
What's inside this post: Hide
Stop manually creating project folders in your client portal every time a client signs on the dotted line. 🤭
You've got a CRM that handles your contracts and payments like a boss, but you're absolutely obsessed with Kitchen's client portal (because honestly, who isn't?). The problem is, you're wishing it integrated with your CRM so you're not doing manual tasks every time someone becomes an official client—jumping between apps, copying names, creating folders, setting up templates...
Been there. Done that. Might soon have the carpal tunnel to prove it. 🫠
That said, now there's finally a way to automate that part of the process, so that when a client signs their contract in your CRM, a brand new templated project folder appears in Kitchen with all your templates, tasks, and folders ready to go!
And even better, ...what if I told you this automation even works on Zapier's free plan?
Yeah, I thought that might get your attention! 👏🏻
This Automation Is a Game-Changer for Solo Creative Business Owners
I've been in the design industry for about 20 years now, and I've watched solopreneurs burn themselves out doing repetitive admin shit that could easily be automated. Creating project folders manually might only take 5-10 minutes, but when you're booking multiple clients a month (hello, growth!), those minutes add up fast.
Plus, there's the mental load of doing that step manually when other parts are automated, so you are either not sure WHEN to make the folder, or you might actually forget to make it until you're trying to hit a deadline that matches up with the workflows in your CRM. Oops.
And by "mental load," you probably know what I'm talking about—that nagging feeling that you still need to "set up Jane's project folder", so the task is intermittently sitting in the back of your brain while you're trying to focus on the rest of your work.
This simple zap automation eliminates that completely. Contract signed → folder created & waiting for you to invite the client when it's ready (though actually, on paid plans of Zapier you could automate adding them to the portal also!).
Using Zapier to integrate your CRM with Kitchen, is kinda like having a really efficient assistant who almost never takes sick days or forgets to do stuff. #worthit
What You'll Need to Set This Up
Before we dive into the step-by-step setup, let's talk about what you actually need in order to follow along with this tutorial:
A CRM of some kind. I use Dubsado*, but this should work with pretty much any CRM that plays nice with Zapier, including HoneyBook, Bonsai, Bloom, Indy, Moxie—whatever you're using to manage your client relationships & booking services.
A Kitchen* account. Free or paid doesn't matter for this automation. (If you haven't tried Kitchen yet and you're managing client projects manually with PayPal or Square and... *gasp* emails + Adobe Sign... you're missing out. Their client portal is stellar, their project management features actually make sense for client service collaboration, AND their software is available with an affordable lifetime payment. ie: pay once, use it forever!)
A Zapier account. You can do this simple automation on Zapier's free plan. The free plan lets you create basic "if this, then that" automations, which is exactly what we need here.
That's it! Three tools you probably already have accounts in, and if you don't then you'll thank me after you do.
Dubsado’s* Plan Options
CRM: Client Relationship Management software
Dubsado’s plans are affordable and their free trial is VERY generous! BUT you can SAVE 20% OFF your first payment (month or year) with my affiliate code DAMN, or use this link to save when you sign up.
On the free trial, you get access to all the features with no time limit and you can use all of that for your first 3 clients. After that, you won’t be forced to upgrade to a paid plan, but can pick one when/if you’re ready.
On the lower paid plan at $20/mo (or $200/year), you get access to:
Unlimited projects & clients
Invoicing & payment plans
Form & email templates
On the higher paid plan at $40/mo (or $400/year), you get access to everything in the Starter plan, plus:
Scheduling
Automated workflows
Public proposals
Multiple lead captures at once
Zapier integration
Kitchen's* Lifetime Pricing
Client Portal: "pay once, use it forever!"
I can't speak for you, but I hate monthly subscriptions and prefer paying annually if I have to pay recurring fees at all. So it was an incredible bonus to realize Kitchen does not charge recurring subscription fees, and offers a lifetime price at an affordable rate.
This summer, they're running a 20% OFF deal on top of that, with code SUMMER20, so you can save even more IF you sign up with that code at checkout (offer valid during summer of 2025).
For solopreneurs and small creative businesses, this is HUGE. It means you can factor the cost into a single project or two, and then it's pure profit after that, with each additional client you use Kitchen's portal.
Plus, their free plan is actually pretty useful (unlike other tools that tend to give you just enough features to get frustrated, and force you to upgrade). So you can actually just start with the free version, test out how it works & how to set it up, and upgrade to a paid plan later if you need more features. The main limitations on the free plan are file upload size limits and lack of customization in your account (custom domain, custom email address to send notifications from, etc).
Zapier's Plan Options
Automation Tool
Zapier's free plan does have limitations, as most free plans do, but for this particular automation they're not deal-breakers.
On the free plan, you get:
Unlimited zaps
2-step zaps only (no filters, other steps, or conditional logic, etc)
One trigger (the thing that's being watched, which, when it happens, starts the automation)
One action (the thing that happens after the watched item happens)
What this means is whatever you choose as your trigger is going to create a folder in Kitchen every single time it happens. There's no "only do this if the project type is X" or "skip this if the client already has a folder." But if you choose your trigger smartly, this isn't actually a problem, and if the zap does accidentally create folders you don't want you can just delete them in Kitchen. Not the end of the world! Since it doesn't also invite the client to the folder, no one will know that extra/unnecessary folder was created but you.
If you want the fancy multi-step automation with filters and other steps in the automated workflow, you'll need a paid Zapier plan. But honestly? Start with the free version, see how you like it, and upgrade later if you decide you want the extra bells and whistles.
On the paid plans, you get everything in the free plan PLUS unlimited multi-step zaps, access to premium zaps (connect to apps like Quickbooks which requires more security, etc), plus email & live chat support.
Choosing the Right Trigger
This is probably the most important decision you'll make in this whole setup, so let's talk strategy.
You want to pick a trigger that happens only one time per client's booked service/project. Most of the time, that's going to be a contract signature. Why?
It doesn't matter if you're doing quick two-week projects or year-long retainers. A client typically only signs one contract per project or service agreement. They might make payments every month, but they only sign that contract once.
It happens at the exact right moment in your process. By the time someone's signing a contract, they're almost officially a client. (Officially, once they've signed AND paid, but you get my meaning.) Not a lead, not a prospect—a real, serious client who needs a project folder.
The 'contract signature' trigger is available in pretty much every CRM I checked. Whether you're using Dubsado, HoneyBook, or something else, contract signatures are a standard trigger option with Zapier.
What you probably don't want to use as triggers, are steps like:
Form submissions or inquiries (these happen way too early in the process)
Proposal views or completions (proposals don't always turn into actual paying projects)
Payments received (these can happen multiple times per project, but you only need 1 project folder to be created)
Trust me on this— the contract signature is your best bet for most creative businesses!
Not sure what trigger to choose?
Go to Zapier.com/apps and search for the software you’d like to use, then scroll down & look through their triggers list to see if it offers the one that will work best with your processes.
Here’s the Zapier info for the CRMs mentioned: Dubsado, Honeybook, Bonsai, Moxie, Indy, and Bloom.
Available CRM Options and Their Zapier Triggers
Since I know not everyone uses Dubsado, let's also take a quick peek at the triggers available for other popular CRMs:
HoneyBook* – Their "New Project Booked" trigger is probably perfect for this. It fires when an agreement is signed or a retainer is paid, which is exactly what we want.
Bonsai* – You've got options here—"Contract Signature" or "Proposal Accepted" if you don't use contracts. Skip the "Invoice Paid" trigger for the reasons I mentioned earlier.
Moxie – Moxie has a shit-ton of Zapier integrations! There's "Agreement Signed" plus about fifty other options. If you're using Moxie, you're spoiled for choice.
Bloom – "Contract Countersigned" (when you co-sign the agreement after the client) or "Contract Signed" (when the client signs the agreement) —take your pick based on your workflow.
Indy – a simple and straightforward option of when "Contract Signed."
Whatever CRM you're using probably has the trigger you need, so just look for something related to contracts, agreements, or the final step of your booking process.
Kitchen's Action Options in Zapier
On the Kitchen side of things, in Zapier’s Kitchen z/app info, you're looking for the "Create Folder" action. As of summer 2025, Kitchen has added about 40 new Zapier actions. The automation possibilities are getting pre-tty wild, which means you could add more steps to this zap IF you want!
For this particular setup though, we're focused on just creating a folder from our account's template, which means all your project structure, tasks, and content will be automatically set up exactly how you want it, –or close to it. If each project is a little different, it's easier to delete parts of the templated new folder than to create them from scratch when needed, so just delete whatever isn't relevant to that client before you send them their invite.
Now you don't 'need' to manually create folders anymore! No more forgetting to add steps in your own project tasks, no more "oh shit, I forgot to set up their upload folder!" moments. 🫠
Step-by-Step Zap Setup
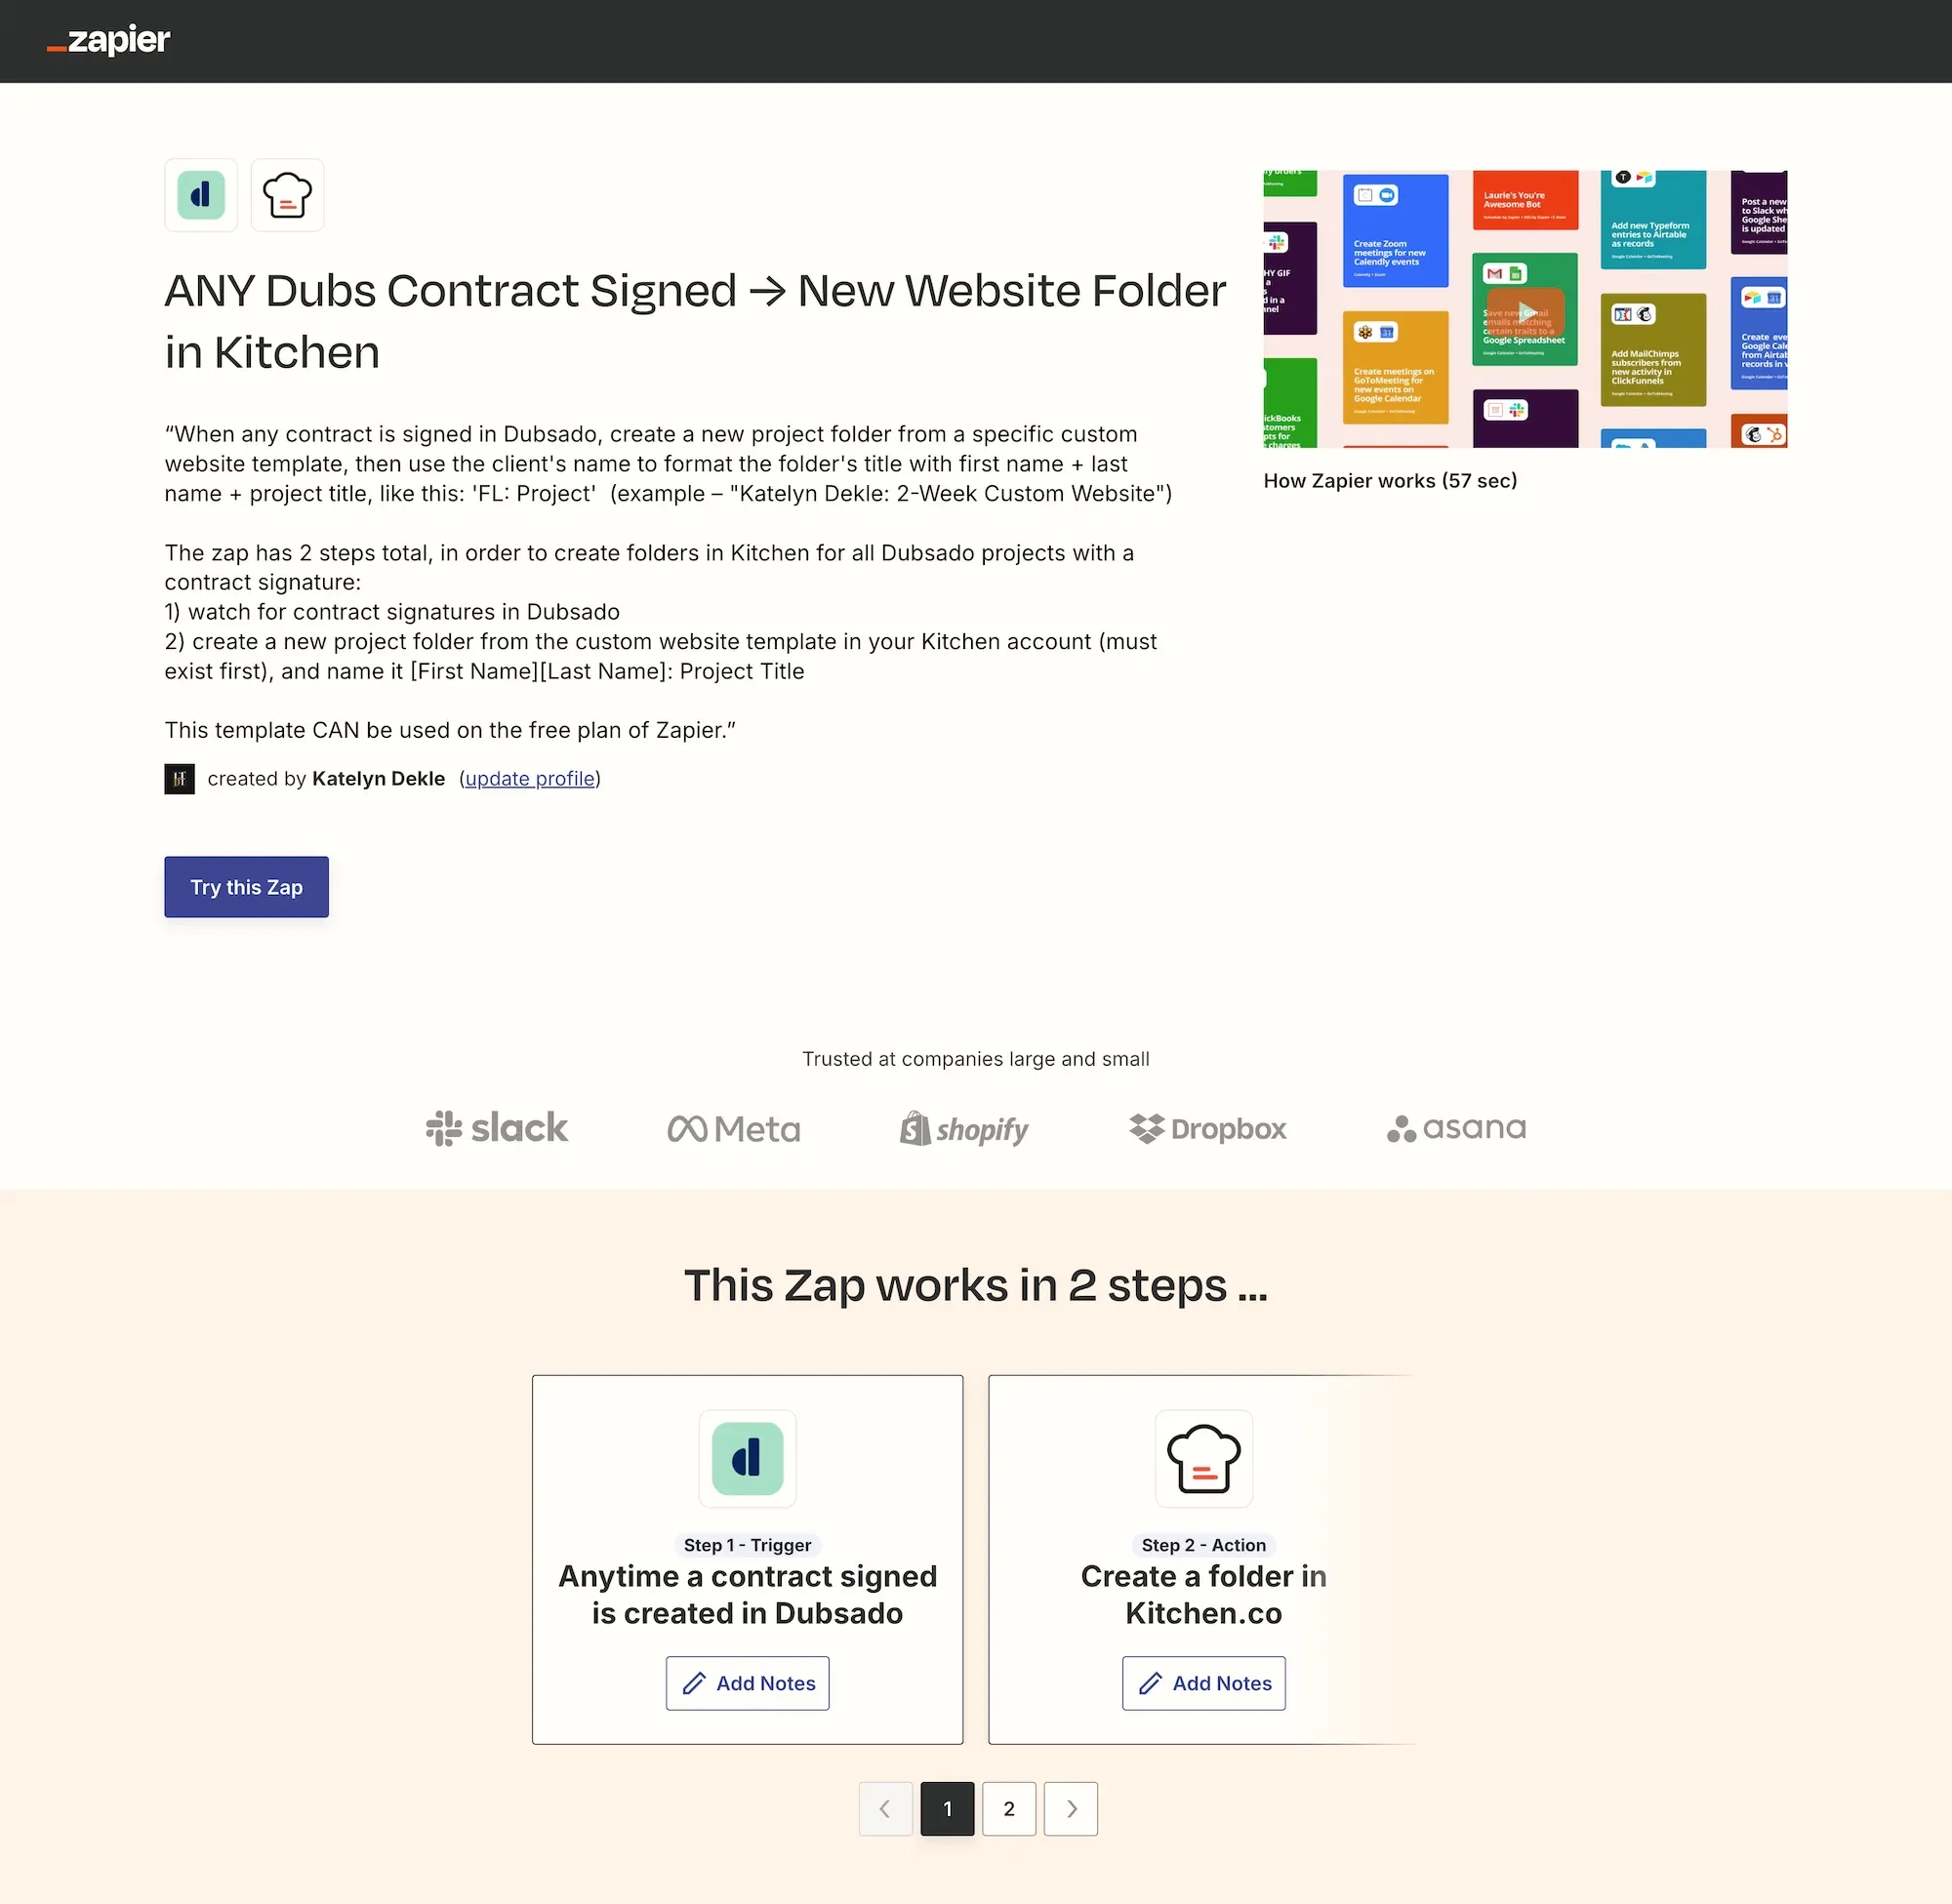
Now it's time to build this automation (or edit mine, together). I'm going to walk you through this using Dubsado as the example, but the process is basically identical for other CRMs.
Step 1: Access the Template
I've created a free Zap template that you can start with, and copy directly to your Zapier account. When you click the template link, you'll see a "Try this Zap" button. Click that, and it'll open in edit mode.
Step 2: Set Up Your Trigger
If you're using something other than Dubsado, click on the trigger step, then choose "Change" under Setup. Search for your CRM and select it.
For Dubsado users, "Contract Signed" will already be selected in the Setup tab here, but if you swap Dubsado for something else, you may need to select a different trigger if it's worded differently.
Then you'll just need to connect your Dubsado (or other CRM) account to Zapier by logging in and giving Zapier permissions access to that account.
Step 3: Test Your Trigger
Hit the "Test" button to make sure everything's connected properly. You're looking for that little green checkmark next to the name of your CRM in step 1.
When Zapier tests the trigger, it may pull in a few recent contract signatures from your account, if there are any. Pick one to use as your test data.
ℹ️ Pro tip: you can actually edit the info in each test record Zapier pulls in from the test data, including the email address; you can edit any of those record details before you test the action in the second step, in case you're nervous about accidentally sending something to the client during testing! I like to swap out the email address and other basic business info just be certain ––though, the zap template is NOT setup to contact your client so they should never get anything from you as part of this automation.
Step 4: Set Up the Kitchen Action
The "Kitchen" app will already be selected in the second step.
Now, choose "Create Folder" as your action.
After that, make sure you're using the latest version of Kitchen's API (it's v3 as of when I'm publishing this tutorial). If you're not sure, you can disconnect your Kitchen account & connect a newer one, from your Zapier account settings.
Once you're sure you've connected the latest version of their API, then connect your Kitchen account to this zap, the same way you did with your CRM.

Step 5: Configure the Folder Settings
This is the fun part! 🤓 The fields with the red asterisk* are required to fill in, but at least as of publishing, the Template field isn't required (optional).
To set it up:
Check your Kitchen account: make sure you already have a project/folder template ready to use in your Kitchen account. If you don't have one yet, my course gives you step-by-step, copy/paste EVERYTHING to create it fast! Including onboarding steps, website specific tasks, project folder subfolder structure, and a lot more!
Template: Pick which Kitchen template you want to use for new folders created with this zap. If you've got different templates for different types of projects, you might want to set up multiple Zaps with filters so each one will only run when it needs to. If you're not sure where to start with that, those templates are in my Ultimate Client Portal System course.
Folder Name: You can get creative with the data from your CRM in this step, if ya want. You can use the project name, the client's name, their company name, or any combination of that.
For example, if you want folders named after the client's business, use the variable field type (from Dubsado's first step) labeled "Client Company Name." If you prefer first and last names, use "Client First Name" + a space + "Client Last Name."
The backslash (/) is your friend here, —it lets you open a menu that shows all the dynamic information pulled in from the trigger step's data. Using that variable data will mean each time the zap runs, the project folder's name will match the unique project in your CRM.
Step 6: Test the Action
Hit "Continue" from that part of Step 2, and then "Test" to actually test-create a folder in Kitchen using your test data. If everything's set up correctly, you'll get another green checkmark on Step 2 in the visual preview of the zap (center of the page).
Step 7: Check Your Work
Now it's time to hop over to Kitchen and see if your new folder has appeared. It should already be there, and should also have all the template's original content in it, including tasks, and folder structure, etc.
Step 8: Publish the Zap
When the zap test fires successfully, it can see the trigger in your CRM, and the folder gets created in Kitchen. If both things worked successfully, now you PUBLISH that zap! After it’s published, it’ll perform this magic trick for you for each new project starting now. (It’s not retroactive, so it won’t run for all the past contracts that have been signed, FYI. 🤭)
What Happens After the Automation Runs?
Now what? You'll probably get or see notifications in Kitchen about new tasks being assigned to you (if your template includes tasks with assignments for yourself). Great!
The next step is to check the template for anything that needs to be edited before you invite your client, ...and then actually inviting your client to the project. In Kitchen, go to the top-level folder in their project, then click "Share," and add your client's email.
From there you've got a few permission options for Folders in Kitchen:
Viewer: They can see & open everything but can't interact/engage.
Commenter: They can see, open, and comment on stuff in the folder.
Uploader: They can see, open, comment on, and upload new files (this is what I usually go with)
Creator: They can create and manage their own content in the folder (probably overkill for most projects)
Set Up Task Board Permissions (Don't Skip This Extra Step!)
Something that could trip people up are folder permissions vs task board permissions, because they are separate things in Kitchen since you may want to give clients different levels of collab access in each area.
If you want your client to be able to create their own tasks (like support tickets during a maintenance period), make sure they have Creator status on the task board specifically.
If you'd rather they just comment on existing tasks without creating new ones, give them Commenter status in the task board.
Most of the time, I go with Uploader for the overall project and Creator for tasks. It gives them enough access to be useful without letting them go wild with changes & causing confusion.
The Onboarding Process
Creating the folder is just the beginning. When you invite your client to the folder, you can include a custom message & decide whether or not to notify them (send them an invitation email to 'View Folder').
After I add the client permissions to the folder (and check the box to notify the client so they will get that emailed invite), I open their project's Messenger page (called "Conversations" in the menu) and use my saved reply template to write them a welcome message that's more specific than the plain-text one they'll see in the invite email. This lets me send a personalized onboarding message that includes direct links to their specific task board, project folder, and any other important areas that need their attention.
This way, you can essentially give them a guided tour instead of just throwing them into the deep end of your project portal & hoping they'll do things the way you want them to.
The message you send through that 'Conversations' page stays in the thread permanently until the page (or message inside it) is deleted, so you both can reference it later if needed. And if they reply to that emailed message notification, their reply shows up right in Kitchen's messenger. Pretty slick; it's one of my favorite features in Kitchen!!
Why This Beats Manual Folder Creation Every Time
I get it. Setting up automations may feel like work upfront, or confusing if your process isn't nailed down yet (ie: "so, when do I do what now? 🤔"), and maybe creating folders manually doesn't seem like that big of a deal, because honestly it's not!
But let's do some math:
Manual folder creation takes about 5-10 minutes per project (if you're fast and don't get distracted, and you use a template to create it with minimal edits each time). If you book 5 clients a month, that's 50 minutes. Over a year, that's
10 hours of your life spent on repetitive admin work that could easily be completely automated.
10 hours you could spend on actual client work, business development, or—crazy thought—taking a damn break.
Plus, automation is consistent in a way humans generally can't be. It never forgets to add the content guide folder. It never accidentally skips the task template setup. It doesn't have off days or get distracted by Instagram. And if there's an error, Zapier will email you & let you know about it!
Your clients get the same seamless experience every single time, you save hours on menial admin BS, and all of that makes you look more professional and organized than you probably actually are. (No judgment—we're all winging something!)
Get the Free Zap Template
I've created a complete Zap template that connects Dubsado to Kitchen, but you can easily modify it for your CRM of choice! It includes all the settings I walked through in this post, so you don't have to build it from scratch.
This template is part of my thank-you for reading this far. (Seriously, this post is long and on a maybe-boring topic, but you stuck with it—so, mad respect! 😂)
And if you want to dive even deeper into Kitchen automation and get my full multi-step Zap templates with filters pre-installed, that's included in my Ultimate Client Portal System course. Kitchen is doing some seriously cool stuff with their integrations and automation options, and with all their triggers & actions, this Dubsado connection could be just the beginning of what's possible when you start thinking about your business systems as a connected ecosystem versus of a bunch of separate tools.
Give it a try, break some stuff if ya need to, figure out what works for your specific workflow. And if you love it as much as I do, tell other creative business owners about it! We're all just trying to build sustainable businesses without losing our minds in the process.
⚡️ Grab the free template here 👇🏼
Automation Troubleshooting Tips
Automation is super useful, and if used correctly it can feel like hiring employees to help you do the work (at much cheaper rates!), ––but it's not magic. Sometimes shit breaks, and when or if it does, here are some tips to help you troubleshoot:
The Zap isn't triggering:
Double-check that your trigger event is actually happening in your CRM. If you set it up to trigger on contract signatures, but your test client hasn't actually signed anything yet, nothing's going to happen. Zapier won’t run the action unless the trigger has happened first.Folders are getting created but they're empty:
This usually means there's either an issue with your template selection in Kitchen, or in your zap’s action step (part 2 of the zap). Make sure the template you chose actually exists in Kitchen and it actually does have content in it. If your internal Kitchen template does have content, then contact Kitchen’s support team to find out why the template contents aren’t applying when using the template to make new folders in Kitchen; let them know this is triggered by their API in Zapier so they can look at the correct details on the backend.Client information isn't pulling through correctly:
Check your field mapping (those variable fields) in the Zap. If your CRM has changed their field names or data structure recently, it could break the connection. You may also try selecting a different field in those variables, to see if you get different results.Too many folders are being created:
This happens if you chose a trigger that fires more often than you expected. Switch to a more specific trigger (like contract signature instead of payment received), or upgrade your Zapier account to a paid plan so you can add a filter step, in between the trigger & action steps, to reduce how frequently the action is run (ex: only create new folders for specific project types).Seeing error messages in Zapier:
Ask ChatGPT or Zapier support for help to troubleshoot. ChatGPT has actually been very helpful when I run into errors or have questions about Zapier. You can even take a screenshot & upload it to ChatGPT, describe what’s happening vs the goal, and it can understand the context. Definitely worth using to help double check your set up & more!
With a simple two-step zap, most issues are pretty easy to fix once you figure out what's actually going wrong, and errors are unlikely to happen. The more steps you add, the more complex the automation becomes, though. Don't be afraid to test things and break stuff while you’re testing, —that's how you learn!
Advanced Tips for Power Users
Once you've got the basic automation running smoothly, there are some next-level tricks you can try:
Multiple Zaps for different project types:
If you offer different services with different Kitchen templates, set up separate Zaps for each and add a filter step in between the trigger & the action, asking Zapier to look at the Dubsado/CRM project it found, and check whether it matches a specific criteria before performing the action step. (This requires a paid Zapier plan.)Next step automations:
If you're feeling super comfortable with Zapier and with Kitchen, you can add steps to the zap for whatever happens after the folder is created, such as inviting the client to the folder, sending the onboarding message, etc.
The Impact of Automations in Your Business
Here's what actually happens when you implement this kind of basic automation:
You onboard booked clients a little faster. There's less friction between "yes, I want to work with you" and "here's your project portal where everything lives." Clients can get started immediately instead of waiting for you to manually set things up.
You look more professional. Clients can get their project access within minutes of signing their contract, depending on your setup. It feels seamless and organized, which reflects well on your business & reassures them that you are going to do what you said you would, building trust.
You reduce mental load. No more sticky notes reminding you to set up project folders. No more "oh shit, I forgot to create Jane's workspace" moments at 11 PM while you're laying in bed.
You could scale your workload more easily. When you're ready to take on more client work, your systems can handle it without you necessarily working more hours on the admin side.
You make fewer mistakes during onboarding & projects are more repeatable. Automation is consistent. You won't accidentally forget to include important folders or templates, because the template + automated zap is doing that part for you. Make it once, reuse it over and over, in exactly the same way.
This isn't just about saving time (though that's nice), it's more about creating systems that let your business grow without burning you out or building a desire to burn down the whole business.
Common Questions & Concerns
"What if I need different setups for different types of clients?"
Set up multiple Zaps with different triggers AND filters for each action. Or start with one general Kitchen template and customize the contents of the project folder per client after the folder is created in Kitchen.
"What if my client signs multiple contracts for different projects?"
Each contract signature will create a new folder, which is probably what you want anyway. If not, you might need to adjust your trigger or use a paid Zapier plan with filters before the action step. However, if each project needs its own folder, remember that folders in Kitchen are drag and droppable just like they are on your computer, so you can always create a new top-level folder for that client, and nest all their project folders inside that, to keep them organized together ––vs loose in the sidebar of your Kitchen account & becoming a messy string of project-named folders.
"What if I want to review projects before clients get access?"
Then this zap will work perfectly for you, because the free template I'm helping you set up does NOT also invite your client to the folder, which means you have a chance to review & edit before they gain access when you decide it's ready.
"What happens if I change CRMs later?"
You'll need to update your Zap, but the process is basically the same. Most CRMs have similar trigger options too, as we covered earlier!
Building systems that actually serve you
Here's what I want you to remember: automation isn't about being lazy or cutting corners or buying yet another software subscription. It's actually about creating a trusted group of tools & systems that free you up to do your best work while they HELP you with the backend admin stuff ––the busywork.
Every minute you spend on repetitive admin tasks is a minute you're not spending on strategy, creativity, or actually serving your clients (& making money in that process). This automation gives those minutes back to you.
Your future self—the one who's booking more clients and sleeping better at night because your systems just work—is going to thank you for setting this up along with me today!
Now stop reading blog posts and go set this up, if ya haven't already! 😉
Want more automation ideas and business systems that actually work for creative entrepreneurs? Save this post and follow along for more practical tips that'll help you build a business that runs itself.