

9+ unexpected ways to use a Blog Collection in Squarespace
What's inside this post: Hide
I often work with clients that run online businesses by themselves or with a very small team, that use their websites to house quite a bit of information beyond the usual 3-5 pages: home, about, services, contact, etc.
During those larger projects, it’s up to me to figure out how to organize all of that useful info on their website in a user-friendly way, so that viewers will actually be able to use it and find what they need.
Many times, I wouldn’t be able to do this so efficiently without the blog collection.
Surprise! It’s NOT just for blogs, –even though that’s literally part of the name of that page type.
Why? It’s technically more of a content management system (or CMS for short).
The Blog Collection page is not a plugin, and unlike Showit, it doesn’t use an external CMS like Wordpress. Thankfully, Squarespace built their own CMS right into the platform; it’s really easy to learn, simplistic yet powerful, –and I love putting it to good use!
Before I dive in, here’s a few key tips I’ve learned from using Squarespace in general and their blog collection since 2016.
PRO TIPS:
These resource hubs can take a while to produce content for, depending on how much content you’re starting out with, so keep these things in mind for smoother sailing:

▪️ Quick access to post settings
While you’re in Edit Mode for any “blog” entry, adding content to the “post,” you can access the entry’s settings any time by clicking the name of the post in the very top middle part of your screen (as shown in the screenshots), just outside the editor preview. If clicked, the settings menu will pop up allowing you to adjust & save your changes, then go right back to editing the content of your entry.
▪️ Save changes frequently
Especially for longer “posts” with a lot of content. Better yet, if it’s a text-heavy post, write it in Google Docs then cut/paste it in when you’re done. That way you have a natural backup outside of your website for those worst-case scenarios!
▪️ Log out after every Squarespace session
The longer you’ve been logged into Squarespace in general, the more buggy it can be and you don’t want to accidentally lose all your hard work! Technology is great, but it can malfunction at the wrong times.
9+ other uses for the blog collections on Squarespace
Blog Collections, obviously...
I’ve built my business on content marketing. If you’re not familiar with that term, it just means that I’ve been posting helpful content consistently, which generates traffic without the need for advertising OR social media posting.
Blogging (ie: writing posts) has been my favorite type of content creation for years, and it works really well for me!
Some tips for getting started, or picking it up again if you stopped:
Google seems to like about 2,000 words per post, give or take (mostly give)
Put relevant topic keywords in the headings and subheadings –naturally (“keyword stuffing” is a no-no)
Post consistently, in whatever timeframe works for you RIGHT NOW; you can change it as you get better at writing & as it gets easier, but it’s important to pick a posting schedule you can actually stick to for a while.
Over time and with consistency, if you have proper keyword usage, you’re creating content people are looking for on the internet AND writing it in a digestible way that’s easy/fun to read, Google will “give” you organic traffic to those posts.
If you make each post work for your business, by putting some sort of “ask” in each one, whether it’s to book your service, build your email list, or buy your products, these posts in turn do actual “work” for your business by collecting fans, clients and customers!
❶ Testimonials
This is a very popular one! If each entry is a person who has given you permission to use their review, then you can create a library of testimonials and display them easily throughout your website.
You can display a shortened testimonial in their “excerpt” for simple one-liner circumstances along with the thumbnail image for the “entry” which is ideally of the reviewer. You can show the title (the reviewer’s name, for example) or hide it and place the name under the one-liner in the excerpt with a dash in front of it like this: “Katelyn was great to work with! – Jane S.”
If you want to take it a step further, inside each entry you could use that space as a sort of case study for the work you did for them. Add photos, videos, and text explaining the job and you took it from A to B.
Testimonials on a Client Site via Blog Collection
Testimonials on My Website via Blog Collection
Testimonials on My Website via Summary Block (+ SquareKicker styling)
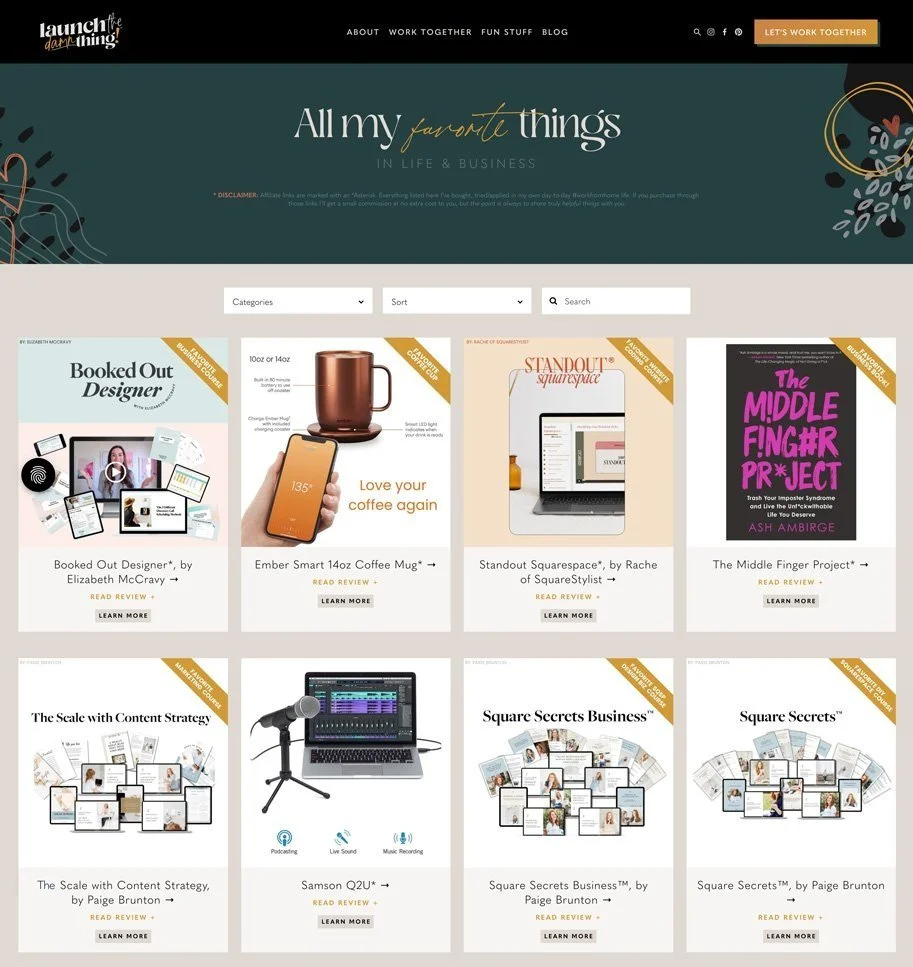
❷ Product Collections
If you have a list of your favorite tools & resources, courses, products, affiliations, etc, you can house them in a “blog collection” to keep them organized & give you space to talk about each one, while keeping them in a searchable and organizable database on your website.
If you don’t have many, you can use an Auto List section for this, but that data stays in that section. Meaning, if you ever want to reference it elsewhere –summary blocks won’t work and you will have to manually paste in the info again. Not the end of the world, but if you do that enough times, you’re leaving room for errors.
You’re also potentially making it harder on yourself if that affiliate code/program changes down the road because you’re talking about it everywhere in random places, making it hard to track down every instance when you need to.
With a blog, however, you CAN use Summary blocks to bring that one instance of info into multiple other places, giving you ONE place to update that information & keep things accurate across your website!
Curious about it?
❸ Audio & Video Libraries
Podcasts
Blog collections also work great for other content mediums!
In the collection’s page settings (per collection) you can set up your podcast to work with your Squarespace blog page. For more specifics on how to set up your blog collection to syndicate your podcast, read Squarespace’s setup tutorial here.
Simple Podcast Episode Library
Video Libraries
You can also link to your YouTube videos within posts and share a companion article that goes with those videos. Squarespace’s built-in video blocks work really well with YouTube and do not need to “host” the video (ie: you won’t need to upload it in 2 places!) on your website. All you need is the video share link from your post on YouTube.
Using a blog collection for video libraries is ideal, IF your videos are companions to your blog posts. Even though Squarespace now has built-in standalone video libraries, those don’t have the content functionality that blogs do and your video posts in that video library will be limited to the video itself, some categories, and a simple title & description area, much like YouTube’s.
For SEO purposes, it’s great to have the content of your video in written form, as a companion to the video so that Google knows it can send people who are hoping to READ or WATCH the content, depending on how they searched for it.
Squarespace’s built-in Video Library Collection page
Using a Blog Collection page + Summary block to display all “posts” with the Video category
❹ Job Listings
If you know you want a simple way to list Job openings for your industry or your company, use these same principles to set up a collection page with each entry being one position.
Assign a Tag for the position title of each entry and a Category as either Seasonal, Available, or Position Filled. That way, as each position’s availability changes, you can update the post’s Category, which will auto-update the Summary Block that perhaps only displays “Available” positions (ie: filtered to only show the “Available” category).
If you’re ready to get really fancy, hire a pro to install SquareWebsite’s “Universal Filter” plugin with it and allow for sorting & filtering + a search bar that’s built into the block.
USE-CASE (EXAMPLE)
I used this method when I built Fred & Emma’s Job Listings page, shown below:
Public Job Listings Board
❺ Resource Libraries
Resource can be anything from recommended places to call for help such as the Resource Library set up at Cotton & Crown Co, a library of online forms, and more!
When I worked with Fred & Emma at FredsOralPrep, we used blog collection pages for a few different things, one of which was a student resource library. When their students buy a course, they get access to a secret page on their website where they can find all the downloads, quiz links, forms, ebooks, and other resources relevant to learning online with Fred.
Pair the collection’s home page with a customized section above it (you can add sections above or below collection pages on 7.1!) with a title or description of the collection, links to categories (use the Archive block to automatically do this!) and a Search block for the search bar, to create a good user-experience!
USE-CASES (EXAMPLES):
Private Student Resource Library
A Public Resource Library
❻ News Articles & Case Studies
Aside from the traditional use of blogs as “articles,” you can also use them as deep dives on individual topics (ie: case studies).
While Portfolio Collection pages can do this well too, arguably better if you need a more index-style page (multiple visually distinct sections with varying backgrounds, pagination, etc), –Portfolio sections have a few big drawbacks, like:
every “entry” is always live as soon as you create it
so any edits to the content inside the collection are made in real-time as long as the main Portfolio page is live & publicly accessible
there are no “drafts” so you can’t create a placeholder entry to use (& duplicate) as a template
you can’t schedule any entries to publish at a later date
they don’t work with Summary Blocks,
so the information can only exist inside that collection & nowhere else without manually duplicating it
Those drawbacks can make Blog Collections a better choice, depending on your needs.
Local News, Articles & Editorials
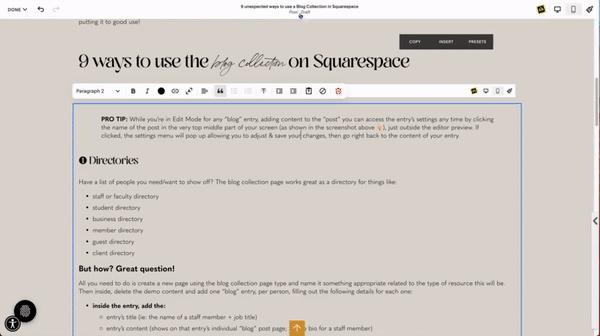
❼ Directories
Have a list of people you need/want to display on your website? The blog collection page works great as a directory for collections of people like:
staff or faculty
teams
students
businesses
members
guests
clients
Especially when each entry (staff member, student, member, guest, client, etc) may have a bio attached or some sort of resume of sorts. Or maybe the “entry” itself could instead link to their LinkedIn profile via the Source URL in the “post” settings per entry.
As you’ll see further down, this Source URL is going to come in handy for a lot of these so I’ll leave that further explanation to those other use-cases below!
❽ Ads & Opt-ins
Advertisements
This is one I thought of while working with Tré Magazine owner, Stephanie. She wanted to eventually be able to sell ad spots that she could display on her site so I started thinking outside the box.
To my knowledge (& after scouring the interwebs) Google Ads doesn't work with Squarespace blogs for this purpose, ––which, if I’m honest, I can’t say I’m sad about (anyone else hate those WordPress blogs with all the flashing & moving ad spots that make the page jump as soon as ya start reading or start playing some unknown audio you can’t find?!)
After thinking about it, it seems that Squarespace’s blog collection should work well for this too!
In this case, all you need to do is create 1 entry per ad spot. Doesn’t matter when they’re dated, but they must be “published,” and it won’t need any content “inside the entry.”
In the settings for each ad spot (entry) you’re only going to need the following:
thumbnail image will be the ad graphic itself
the Source URL will be the link the graphic is intended to go to, and the toggle “Link Post Title to Source URL” must be turned on
the Category should be something somewhat generic, such as
the size of the graphic (ie: 50x500p, 1x5, portrait, or landscape)
the type of ad (ie: services or products; or jewelry vs apparel, etc)
the Tag will need to be something(s) more specific, such as:
the company or person who purchased the spot,
the page on your site it’s intended to display on
the length of time it will display (ie: 30 days, 6 months, etc)
the number of the ad spot on any page (ie: if 1 page has 3 ad spots, one in each section of the page then section 1’s spot is #1, section 2’s spot is #2, etc)
Summary blocks can have no filters or multiple filters, and different selections per Summary Block across your website.
Think of a creative system of tags & categories so you can filter those Summary Blocks to only show the ad you want to show in each one, in any given area of your website, and write it down somewhere as a key!
If you select “Auto” in the block settings instead of something like “1:1 Square,” the image will display in full at whatever size you make it before uploading to Squarespace, with no cropping.
With the Source URL linked in the original “ad spot” any time someone clicks on the graphic displayed in that spot’s Summary Block will be taken to the external website page associated with that ad, just like you would with any other ad you click on throughout the web.
EASY UPDATES!
This is the best part! With your Ads as a collection group, each entry in the collection represents a placeholder(s) on your website that can auto-populate with that ad’s graphic.
If your Summary blocks are strategically set up, placed, and filtered to show only the right “posts” with particular categories and tags for each spot you’ve placed the block, –you will never have to update each one manually!
All you have to do is swap out the graphic & URL within the Ads collection page entry when it’s time to update the spot with a new ad & when you save your changes all instances of that entry will auto-update with that change –across your whole site!
USE-CASES
If you have multiple ad spots across your site, you could display one in a ‘fake’ sidebar on your blog, one at the bottom of related articles or case studies in another collection, one in your pre-footer, one on related shop product pages, ––wherever you can add a Summary Block on your website!
I’ll make sure to show you how this turns out with my client’s site once we’ve implemented it!
Opt-ins
The same system we’re using for Ads can work for your freebies, too! One collection for your opt-ins, each entry has a category named for the type of opt-in (if they’re all different) or something more generic (& just write down what each means if you think you’ll forget).
At the end of each blog post you can add a Summary Block to display the “ad” for whichever related opt-in goes with the post.
And again –the great thing is, you only have ONE place to update the graphic & the URL for each opt-in, –inside this collection. Once you’ve saved that change, any Summary Blocks filtering to that tag and/or category will auto-update across your entire blog!
Check out this post’s video to see this one in action… or scroll down the bottom of this post & see the GIF at the bottom of most posts across this blog!
❾ Basic Course & Members’ content
(Lessons + Chapters or Modules as Categories)
Need to host a very simple course on your site in a Members Area? Maybe you just want a place to organize members-only content. Blog collections are a great way to do this too!
Categories can be like Chapters or Modules in the content, and Tags can be like the lessons or individual topics within. If organized well, you’ll have a great collection of valuable information to share with your members!
For a few pro-tips you might want to consider before hosting your course on Squarespace, check out this post’s video.
✦ Bonus! Mapped Locations
With the SquareWebsites Advanced Map Block* code plugin, you can turn any blog collection page into a list of mapped locations. Check out the video to see that in action!
But how? Great question!
How to Create It
All you need to do is create a new page using the blog collection page type and name it something appropriate related to the type of resource this will be. Then inside, delete the demo content and add one “blog” entry, per person, filling out the following details for each one.
We’ll use the Directory as an example:
inside each entry, add the:
entry’s title (ie: the name of a staff member + job title)
entry’s content (shows on that entry’s individual “blog” post page; ie: the bio for a staff member)
you can skip this part at first if you need to, just name the “post” and save your changes; you can add/edit/remove content any time
inside each entry’s settings, add:
a thumbnail image (ie: a photo of the staff member)
an excerpt if you need one (ie: short bio or preview text of what’s inside the “post”)
a URL for that entry
appropriate tags (ie: job title, staff member’s name, year hired) – DON’T SKIP!
appropriate categories (ie: staff member’s department) – DON’T SKIP!
a published date (this date & time will dictate the order of how each entry is displayed in the collection!)
a SEO title & description (if you want this directory to be Google-able)
a “source URL” if you want the title or “read more” link to go to an external web page, such as the staff member’s LinkedIn page)
if you set this, also turn on the toggle for “Link Post Title to Source URL” which will make that redirect work!
a social sharing image (ie: this is what displays when the link to this post is shared online)
enabled sharing options if you want the “post” to be shared to LinkedIn, Pinterest, Google Search Console, Facebook, etc
Once you’re done adding this for everyone, your main “blog collection” page will now show all the people you just added! Each one will have a click-through bio page where more information can be housed.
Exceptions & Use-Cases
You don’t even have to create content in each person’s “post!” Simply add an entry for each one, and make sure you’ve put the collection page in the Not Linked section in your Pages menu. Then add a Summary block on whatever page, in whatever section you want to display that information automatically.
Inside the Summary Block’s settings:
you can choose the collection page type you want to display there AND you can choose any filters in case you want to display only key items
you can add or remove a read more button; without it, there won’t be a visual cue to encourage viewers to click through and with the help of a plugin like SquareKicker (or a pro like me) code can be added to remove links to the “post” associated with those entries so that no one can click through.
Tags & Categories will be integral to organizing & filtering these ‘libraries’ –both for you and your viewers. This is why we DON’T SKIP that part of the entry settings! If you have a great system of tags & filters (which can be specific to each collection; they do not mingle & are unique to each of your collection pages), then you will always be able to filter OUT parts of the collection in the summary blocks wherever you put them.
For example:
If you want to display that Staff Directory, but in one spot you only want to display Upper Management, you can add a Summary Block and filter to a select group of categories by selecting the departments you want to show there. You can add a separate Summary Block elsewhere on that page or another page and filter that one to only show the employees in a specific department, or recent hires if you have tags for the year they were hired, etc.

📌 Pin it!
Get creative with it!
Templatize It
Once you create an entry in each type of collection you’re adding to your website, copy an entry that’s working well for you & save it as a Draft. That way, next time you need to add a new entry, all you have to do is duplicate the draft that’s already set up & laid out, then fill in/replace the info inside.
For more on creating “blog post” templates, check out this post too!
Plugins
I mentioned using these plugins in the video. These are not Affiliate links; just good plugins I’ve purchased myself & use all the time:
SquareWebsite’s
Universal Filter* (includes numbered pagination)
Numbered Pagination* (just that, with no filters)
Will Myer’s