My YouTube tech stack might surprise you!
What's inside this post: Hide

Starting a YouTube channel & why is a whole other topic that could be covered in a post by itself, but suffice it to say that part of why I hesitated to do it was because I didn’t know what equipment to use as a beginner & assumed it’d be expensive to get started.
Think about the channels you love to watch: the video is super crisp, the audio is very clear & the video itself is full of titles, intro or outro animations, sound effects, closed captions, fancy end screens & more. Oh, and let’s not forget those fancy chapter markers so people can skim through the video if they want.
😳😰 How can so many people be that good?
But, ––I was wrong!
It doesn’t have to be expensive to start making video content. You can get started with WAY less than you think and still produce videos you’re proud of.
Don’t get me wrong, we’ll still be embarrassed by those first “high quality” videos later, but that’s because our skills increase as we practice, and so with practice, we actually DO get better.
I know, right? Who would’ve guessed that we could learn while doing, at the same time everyone watches us do it? 😂🤷🏼♀️
The top 3 things you need to get started on YouTube
I’ll start with the most important things, a microphone, a camera, and video editing software. But don’t freak out, because these beginner-friendly choices aren’t what you’d expect!
I suppose I should also note that you’ll really want good lighting. My office has 2 windows and a tin ceiling that reflects light awesomely, and I have a bright lamp by my desk with two 100w bulbs in addition to the overhead lighting in the room, so I don’t need a ring light, but you may! Because I don’t have/use any unusual extra lighting, I’ve not listed options for that here, but you can find all kinds of very affordable gear for that on Amazon.

❶ Beginner Camera: your phone (iPhone/Android) or a really good webcam
Yep! That’s right. You heard me! You can use the camera on your MOBILE PHONE, –or a really good webcam if you have the budget (~$200).
But, –and this is really important–use the BACK camera, not the selfie camera on the front. The camera on the back of our phones is actually pretty good, often way better than the built-in webcams on our computers.
In fact, once I was casually video chatting with my little sister while I still had it set up & connected to my computer; her husband asked if I was using a 4K camera bc it was so clear compared to the resolution of her webcam. 😄
The 2021 or later MacBook Pro’s built-in webcams are now 1080p but it still looks fuzzy compared with the footage taken from an iPhone 12 (or later) camera.
I used my iPhone to record most of my YouTube videos from 2022 - early 2025.
Would you have guessed that based on what you’ve been watching? Probably not.
Prior to that, I was using either an external webcam (Logitech C920X HD Pro) or my 2021 MacBook Pro M1’s built-in 1080p webcam.
Why did I stop using those (Logitech + MBP) webcams? While they are 1080p, and better than the 720p resolution we were all used to prior to that, they’re still a bit fuzzy, blurry, or unfocused and I wanted a clearer, more professional quality image for YouTube specifically.
Let me step back for a moment & say, we (& by “we” I mean “my husband”) have a really nice intermediate-level Pentax camera that can use to record higher-resolution video. But it’s my husband’s camera, and all I *actually* know about it is that it’s a Pentax. He, however, did a LOT of research on cameras before he chose that one & the separate lenses he bought for it.

my cat, Willow, politely requesting treats while I work
So, while I have access to a camera that could record in hi-def, I don’t use it because…
Issue #1: my office at the time was right between the kitchen and the back door, probably where a dining room is supposed to be, and there are no doors to close off a “messy” room. Since my office is not “private,” I don’t want to have it set up for filming all the time because it looks messy and I don’t love clutter –it harshes my creativity vibes & puts me in a bad mood. 😂
Issue #2: Having an “official” normal-to-large size camera on a tripod with ring lights & shit is A LOT to put up & take back down every week. So if I am ever going to have or use a setup like that, I will want either a separate desk for it or a much larger desk to accommodate both a work & recording space.
I’ll also want doors that can close & shut out my mischievous orange tabby cat so she doesn’t knock things over or chew on exposed wires to spite me. 😆
What did I upgrade to, when I’m not filming at my desk? I was influenced (happily) to buy the DJI Osmo Pocket 3*. Again, I wanted something easily portable that could be used for personal or work & for me, that fit the bill without costing me an absolute fortune!
How to wirelessly use an iPhone with your Mac!
Phone stand or mount:
My iPhone’s Magsafe case works great with a Belkin phone mount/ring stand which both props up my phone on the ledge of my thin laptop screen so my iPhone’s camera lenses are positioned directly above my Macbook’s webcam, while also capable of becoming a ring stand to prop up my phone on my desktop or hold it more steadily in my hand. For about $30, it’s a great multi-purpose solution!
You can also opt to buy a cheap tripod with a magsafe (magnetic) phone mount for about the same price if you’re using a desktop screen that’s not thin enough to use the Belkin phone mount. That Belkin works great with my MacBook Pro screen, but not at all with my Samsung M8 external screen, so I have both (a tripod mount & Belkin clip-on phone mount)!
Software to connect your iPhone to your computer for recording:
Continuity Camera:
For users of Apple’s newer operating systems (OS) there’s a new feature called Continuity Camera which allows your iPhone to connect wirelessly to your MacBook (when they’re nearby) as a webcam in basically everything that uses a webcam: Zoom, Whereby, FaceTime, Facebook, etc. The setup is easy, and it gives you access to a few visual settings like Portrait (where the background can be blurred) and Center Stage (where it keeps you in the center of the video feed).Reincubate Camo:
For everyone else, there’s an app for that! With a one-time payment of less than $100 USD + a cheap phone stand, you can turn your iPhone into a pretty badass webcam with all kinds of additional effects & overlay graphics. You can also use this app + your iPhone/Android with everything that uses a webcam: Zoom, Google Meet, Facebook Lives, etc
Here are a few (affiliate) links to the items I have/use or almost bought from my wishlist:


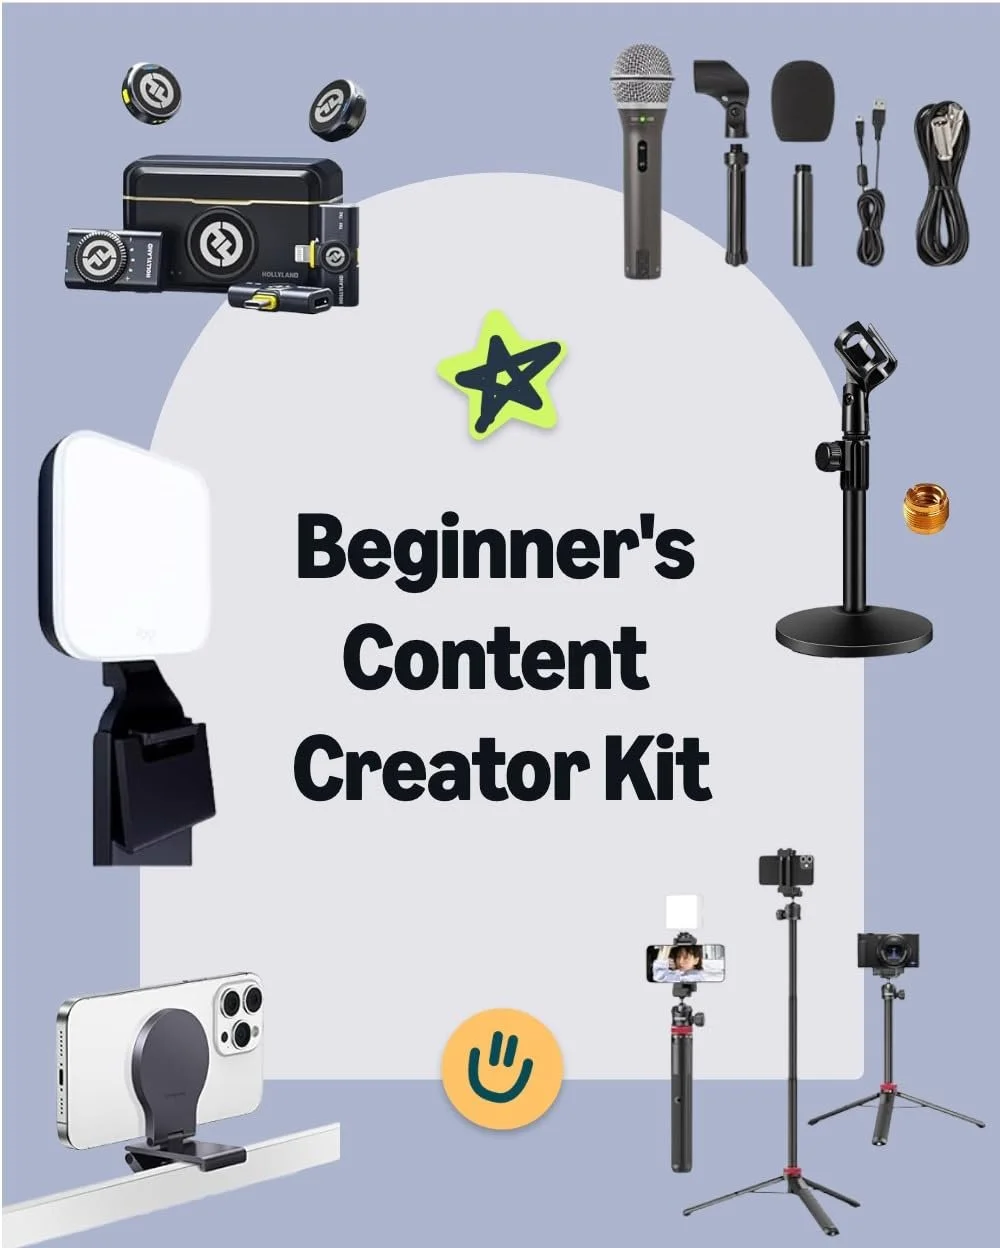
❷ Beginner Microphone: Samsung Q2U
This is a great starter mic & I used it for about 3 years without a single issue & few complaints (no dealbreakers)! There’s no drivers or software are required to use it. You literally can just plug it in & use it with whatever software you’re using to record! See my full review for that mic here.
That’s an affiliate link! (Amazon 👉🏼 )
What’s included
It comes with 2 cables (1 USB cable to simply plug into your computer, and 1 XLR cable for more intermediate setups), a basic tripod stand, and a pop filter (or wind screen) that goes over the wire mesh to help block the air from your mouth from making unwanted noises while you talk during your recording.
At the base of the microphone, it also has an audio jack so you can plug in wired headphones to the mic and hear yourself speak as you record if you should need it.
Where (else) I use this mic
I bought this microphone in early 2022 and have used it for ALL KINDS of things since then, including recording better sound quality in Zoom calls, in Loom calls, recording tutorial lessons with Descript, Vimeo or Loom, recording my YouTube content, as a guest on podcast interviews, etc.
Upgraded Accessories
STAND
The basic microphone stand that comes with the mic has a 3-legged tripod bottom, which works fine for a while, but the microphone can be adjusted upward or downward while clipped into the stand, and if too far in the downward position, the stand isn’t heavy enough & loses its balance, promptly tipping over on your desk. Not the end of the world and perfectly useable despite this, as long as ya don’t need the mic to be tilted too far downward while ya use it.
That said, after about a year of use, I did decide to get a different stand for it* that’s more of a pedestal with a heavily weighted bottom, and I like it a lot better than the stand that came with the microphone. For about $15-20 on Amazon, it’s MUCH more sturdy and it won’t tip over anymore while I’m using it, if I knock it by accident.
ADAPTER
For Apple users, the mic’s USB cable fits into a traditional USB port, so you will probably also need the adapter for UBC to USB-C*in order to plug it into newer devices like MacBooks post-2019. You don’t have to use Apple’s adapter, but that’s what I chose for mine.
How long will the Q2U last for beginners?
These are all affiliate links! (Amazon)
Honestly, after a little more than 3 years, I’ve been really happy with this choice! It’s been high on the list of starter mics from ‘big players’ like Pat Flynn (a podcaster, course creator & educator for 10+ years), and many others –often beating out the Yeti mics which have way more brand recognition & a higher price tag.
I will say, this is a great starter mic for SOLOpreneurs. It’s not an omnidirectional mic, in that it doesn’t pick up sounds as well from anywhere other than directly in front of it. So if you want 1 mic to record a two-person, in-person interview, then this probably isn’t going to be the right fit. But for people like me who don’t do in-person interviews with 1 or more other people besides myself, it works great.
Plus, I don’t actually want it to pick up noises from anywhere other than my voice talking directly into it, because sometimes I’m doing laundry while I’m recording & the washer or dryer are running in another room, sometimes my cat walks into the room with her jingling collar, or my dog whines at the back door wanting to go outside… 🙄
In early 2024, I tried a couple of wireless lapel mics to try out, so if you’re curious about that decision, check out this review post next. I got the Hollyland Lark M2* for a more budget-friendly lapel mic, with options for using it with cameras, laptops or computers, &/or phones ($139 - $179 USD). There’s also an older version that’s more budget-friendly (the Hollyland Lark M1* which is about $107 USD) and works with cameras or phones & comes in several color options.
And when I bought the Osmo Pocket 3 Creator Combo*, it also came with a great wireless lapel mic which I added a wired lapel mic attachment for, so now I have a few options!
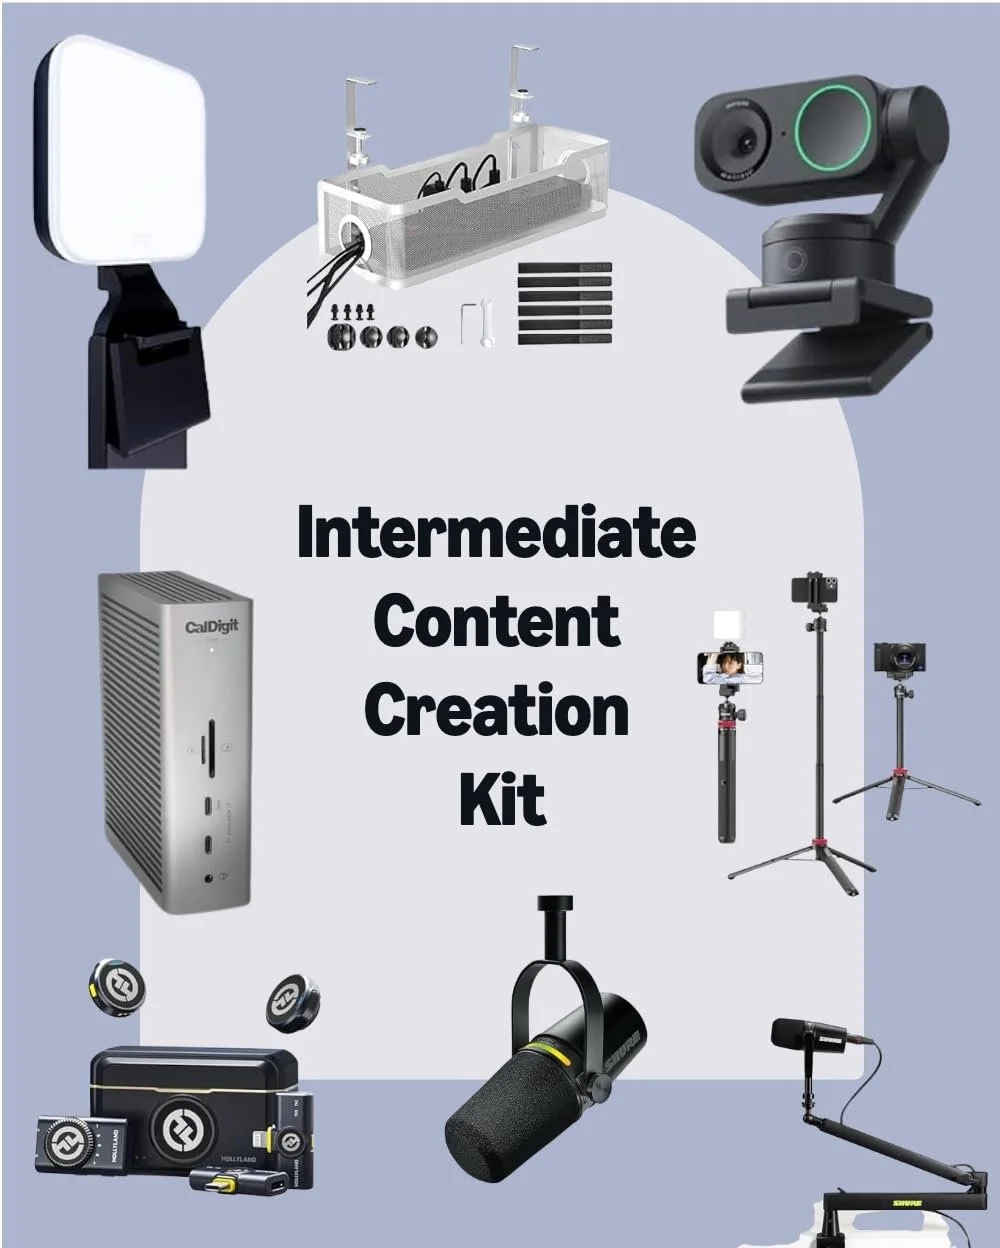
In early 2025, I was finally ready for a more professional mic setup, and for that I upgraded to the Shure MV7+* from the following mics I had on my wishlist:
What I bought:
the Shure MV7* microphone($200 USD), and the Gator Low Profiledesktop boom arm* that sits on the desk but can pivot out of the way (~$150 USD)
Other options on my wish/maybe list:
the RODE Wireless Go II* for a great lapel mic with a great rep ($150+ USD)
the Sony ECM-W3* is a newer & very lightweight lapel mic set, also with a great rep ($400+ USD)
Rode, Shure & Sony mics are all $200 - $500+ USD, each, not including any extra accessories to use with it, like the boom arm, extra batteries, or a charging docks, so if that’s not in your budget try the Samson Q2U first!
How much does the Q2U cost & what about other options?
When I bought it on Amazon, it was about $80 USD, so very reasonably priced! Now I think it runs closer to $60 USD.
Want to know what else Pat Flynn suggests (ya know, as a podcaster & YouTuber for like 10-15 years?!), check out his list of the 6 best microphones from 2021 here or watch the starter microphone comparison video here –both are still quite relevant!
❸ Video Editing Software
When I first started making ‘professional videos’ with the intention of creating more interesting content for my blog & whatever, I literally used Loom to record them and their basic trimmer, then used Canva’s new video editor or iMovie to edit them if I need a little more editing power. That worked for the first few months, just fine!
The easiest video editor for simpler videos
For talking head videos, tutorials that share your screen, and videos that do both of those things, ––Tella* is your best bet! It works on both Apple and Microsoft, as a desktop app or from your web browser, and it feels very easy to use. It’s very similar to Loom, but it’s actually better and offers a LOT more editing power.
With Tella, you can record your video in different clips which allows you to separate a 20 minute video into segments, with maybe 1 clip for your intro, 1 clip for the meat of the video, and 1 final clip for the outro ––just as an example. The clips are not separate videos, but they can be edited individually while in the video’s edit mode.
You can also apply different layouts to move your camera view anywhere on the screen, changing it up at any time, which is great for screen-share tutorials when your ‘head’ gets in the way. You can also add zooms where you click to make tutorials engaging and easier to follow. You can even add blurs for sensitive information that shows on the screen, and add highlights to darken everything on the screen except a specific area to draw attention to it! All layout features, zooms, blurs, and highlights are automatically animated too, so the changes on screen don’t feel jarring to the viewer.
The video is also editable via its transcript, so you can automatically cut all filler words, silences, and buffers (silence at the beginning & end of any video clip), and also manually trim/cut words, phrases, or entire sections of the transcript if you want.
Not only that, but you can also adjust/crop the screen-shared video to remove anything you don’t want to see in the video, you can add your logo & brand color on certain plans of Tella, and even add audio (music) that loops automatically for the whole video!
As of 2026, you can also upload your own B-roll, images, or even use the built-in AI to generate something you can’t find.
And of course you can download any video (or any clip(s) from any video) and import it into another software if you want to do final edits elsewhere, like Descript or Final Cut Pro, DaVinci Resolve, etc.
––Like I said, WAY more powerful than Loom!! And their support team is excellent, because they’re a much smaller company that actually care about their customers.
My 1st “real” video editing software
When I found Descript*, I was HOOKED. It’s truly a great video editor for basics, beginners, and intermediate editors, because it includes a host of features that most other tools can’t give you without added complication.
Descript is primarily a text-based video editor, so it also transcribes your video and allows you to edit the video by editing the transcription.
In other words, when it transcribes your “uh… in today’s, um, video” stuttered statements, you can literally select the “uh…” and “um” and delete them from the transcript which ALSO deletes them from the video you recorded. 🤯
On top of that, you can also edit the video clips the normal way with splits and trims, etc, drag & drop to rearrange them, etc, and they also give you free access to B-roll video (stock video clips), GIFs, and GIF stickers, images, and you can add in your own files.
It can also resize your videos to display in different formats like portrait for Instagram Reels, Tik Tok posts or YouTube shorts, or horizontal for YouTube, square, ––whatever size you want.
There are tons of settings you can adjust as well, such as adding “Studio Sound” to your recordings and adjusting the level of that, adding elements like arrows, text for titles, basic animations, fancy animated captions, video player progress bars, and a lot more!
I’ve used Descript for a couple years now, starting with the free plan, then switching to their Creator plan (~$12 USD/mo) within days or so of using the free trial.
About 6-8 months later, I switched to the Pro plan (~$24/mo), which offers more options for B-roll, stickers & GIFs, more overdubbing, etc.
The video editing software for intermediates to professionals
After using Descript heavily for 12+ months, I reached a point where I was comfortable using it and felt like I’d reached the limit of what I could do with it and wanted more options, so I started researching other video editing software.
As a long-time Adobe user, obviously, there’s Premier Pro but I didn’t have the time to learn another new software THAT complicated ––plus I cancelled my Adobe Creative Cloud subscription in 2024 to switch to Affinity, so that’s out.
Next, I looked into Final Cut Pro –because obviously, Apple– and Davinci Resolve, etc.
I landed on Final Cut Pro because it FEELS like iMovie on steroids, and I’ve used iMovie through all the generations of it since about 2005. So I was able to pick it up really easily with a few YouTube tutorials. Anytime I ran into something I wanted to do, but didn’t know how, a quick Google search solved my problem & taught me how to do it.
Which software am I using now?
I’m primarily using Tella* these days for recording client tutorials, video replies to anyone, YouTube videos, summit presentations with or without a slide deck, and more. IF I need more editing power, I’ll pay for Descript for a month just to do whatever quick project I want to use it for, but I no longer need it year-round anymore.
For streaming to YouTube, for live streams, I’m using E-Camm Live, which is a Mac based software that is perfect for streaming live videos, especially if you don’t love StreamYard (or their price point), and want to stream your live to multiple different channels/locations.
These days, I rarely need to whip out Final Cut Pro anymore!
4 things I’ve tried along the way

❶ a cheap wireless lapel mic: $100 - $200
When I can’t (or don’t want to) record at my desk with the regular mic stand setup, the Samson mic doesn’t work and I need a wireless mic. For that, I opted to try a cheap lapel mic first by Maybesta ($20-ish USD), but I quickly outgrew its functionality and wanted something better.
I chose the newer generation Hollyland Lark M2 option (listed on my Favorites page here with 2 video reviews I watched before buying) that plugs into my laptop when I record video, and it works great. For about $179 USD I got 2 mics which are rechargeable and 1 receiver that plugs into my phone, laptop, or camera.
For about $100 USD, you can get the first generation Lark M1; the mics are a bit larger though, so if you’re worried about their weight on your shirt while clipped on, the M2 will be the better (smaller) choice.
It’s not a RODE or Sony, but it’s a really great next step without spending a fortune when I already have a good desk mic that I’m still happy with (my Samson mic). 😁
That’s an affiliate link! (Amazon 👉🏼 )
If you already have a DJI Osmo Pocket 3, & ya got the Creator Combo/Kit which comes with 1 wireless DJI mic, then you can also grab this $40 wired lapel clip-on mic* that connects to the wireless mic if you don’t like how heavy the DJI mic is but want to stay wireless & use a mic that auto-syncs with your OP3.

a screenshot of one of my recent recording projects in Screen Studio app
❷ ScreenStudio - $100-ish
If you do a lot of tutorial videos, this could be an exciting find! When I first started using this it was a one-time payment of about $100 USD. Now they have a subscription, and Tella* can do all the same thing, so Tella is my preference now!
But, with ScreenStudio you can record your screen, mic & camera, and (like Tella) it will fancify your tutorials by zooming in on things you click on, adding a background graphic behind the part of the screen you’re recording, adding drop shadows to the window you recorded, moving your camera around & resizing it on Zoom, make your cursor bigger, and a lot more.
It’s incredibly easy to use, and prior to finding Tella, I’ve enjoyed using it to make my tutorials more engaging without adding manual arrows, lines, and highlight boxes, or zooming in to show details with extra manual labor while editing my tutorial videos. It also really easily creates GIFs from these recordings too.
It’s a simplistic but ‘fancy’ tool to have in your video-editing tool belt, especially if you don’t want to use or switch to Tella, because ScreenStudio works great alongside Loom and Descript users, since you can export from SS and import into either Loom or Descript.
❸ Creator’s Best Friend - $10
To get chapters in Final Cut Pro, without manually typing them out after you’ve finished editing, I’ve found an app in the app store called Creator’s Best Friend, which allows you to import the exported XML file from Final Cut and generate the chapter timestamps & titles for you to copy/paste into YouTube’s description, –as long as you’ve actually added chapter markers to the video (which I do as I edit it).
Read Apple’s quick help guide to learn how to create chapter markers in Final Cut Pro.
❹ TubeBuddy or VidIQ - $100/yr or less
I used TubeBuddy first, for about a year, and bought their lowest-tiered plan a few months after installing the free option.
I absolutely loved having it & the features it adds are super helpful for new YouTubers. Then I found VidIQ and realized I liked VidIQ's UI better, plus it has a few extra options TubeBuddy didn’t have, so I just switched to VidIQ in 2023 and will not be renewing TubeBuddy.
What are these softwares?
Both TubeBuddy and VidIQ are Chrome extensions that overlay your YouTube experience, adding additional options & data to the YouTube interface, including realtime stats updates, help with finding keywords when you post new videos, and more.
Both are extremely useful IF you plan to become a YouTuber in any capacity and they’re both are great options! Just try them out & see which one you prefer!
…but why YouTube?
YouTube is a search engine, owned & run by Google & the content on it has a KILLER shelf-life. Plain and simple!
My marketing strategy has always been to get found in searches from organic content (no ads!), and YouTube doubles my return on this investment from my efforts because my content now has the chance to show up in 2 of the most popular search engines in the world. Two birds, ––one stone!
In the first 400 subscribers, I’d already gotten both clients and customers from my tiny YouTube channel, something which I NEVER saw when I invested time & effort (even after taking courses on the topic) in Pinterest marketing (which is also a search engine). Though I was able to get my Pinterest account up to 100,000+ views monthly, I never got clients or customers from all those views so my effort wasn’t worth anything and eventually I dropped that marketing strategy altogether.
Since picking up YouTube, my reach has expanded in ways I couldn’t have imagined, and I’m able to connect better with my audience in a more personable way.
While it was NOT comfortable at first, with a lot of practice, and a whole lot of imposter syndrome along the way, I’ve become comfortable filming myself for YouTube videos, and am happy to report that it’s not an issue anymore! …But that’s a whole other topic for another post. 😁
If you're not ready to jump into video marketing yet, then up your SEO game with SEOSpace*! The Yoast-equivalent Chrome extension built JUST for Squarespace websites.