My Kitchen.co Client Project Template: Behind the Scenes of My 10-Minute Setup Process
What's inside this post: Hide
I wanted to give you a peek inside my Kitchen account today so you can see that part of the process!
There have also been some exciting new changes coming down the pipeline lately, and I wanted to show you just how ridiculously easy it is to get a client project set up—even if it's not connected to your CRM or task management tool.
This is literally the exact process I use with basically every single client, just using different project templates each time.
Quick note before we dive in:
I am an affiliate for Kitchen.co*, which means if you purchase through my link, I may receive a small commission at no extra cost to you. This post is not sponsored though—I'm just sharing a tool that I genuinely love and my experience using it in my business!
Why am I sharing my process for using Kitchen*?
If we haven't met before, my name is Katelyn. I run Launch the Damn Thing® and I've been a graphic designer since 2006 (chyeah, –long time!), so I've worked with a TON of clients on countless projects over the years.
That means I've tried a LOT of tools & software, and have developed a LOT of systems and processes, both of which are topics I could happily talk about all day—and that's exactly what I'm sharing today.
So let's peek into my Kitchen account and I'll show you exactly how I start new client projects in Kitchen, which is my client portal software, in case you weren't aware. Okay? Okay! 😁
Kitchen’s “Home” menu, inside my account
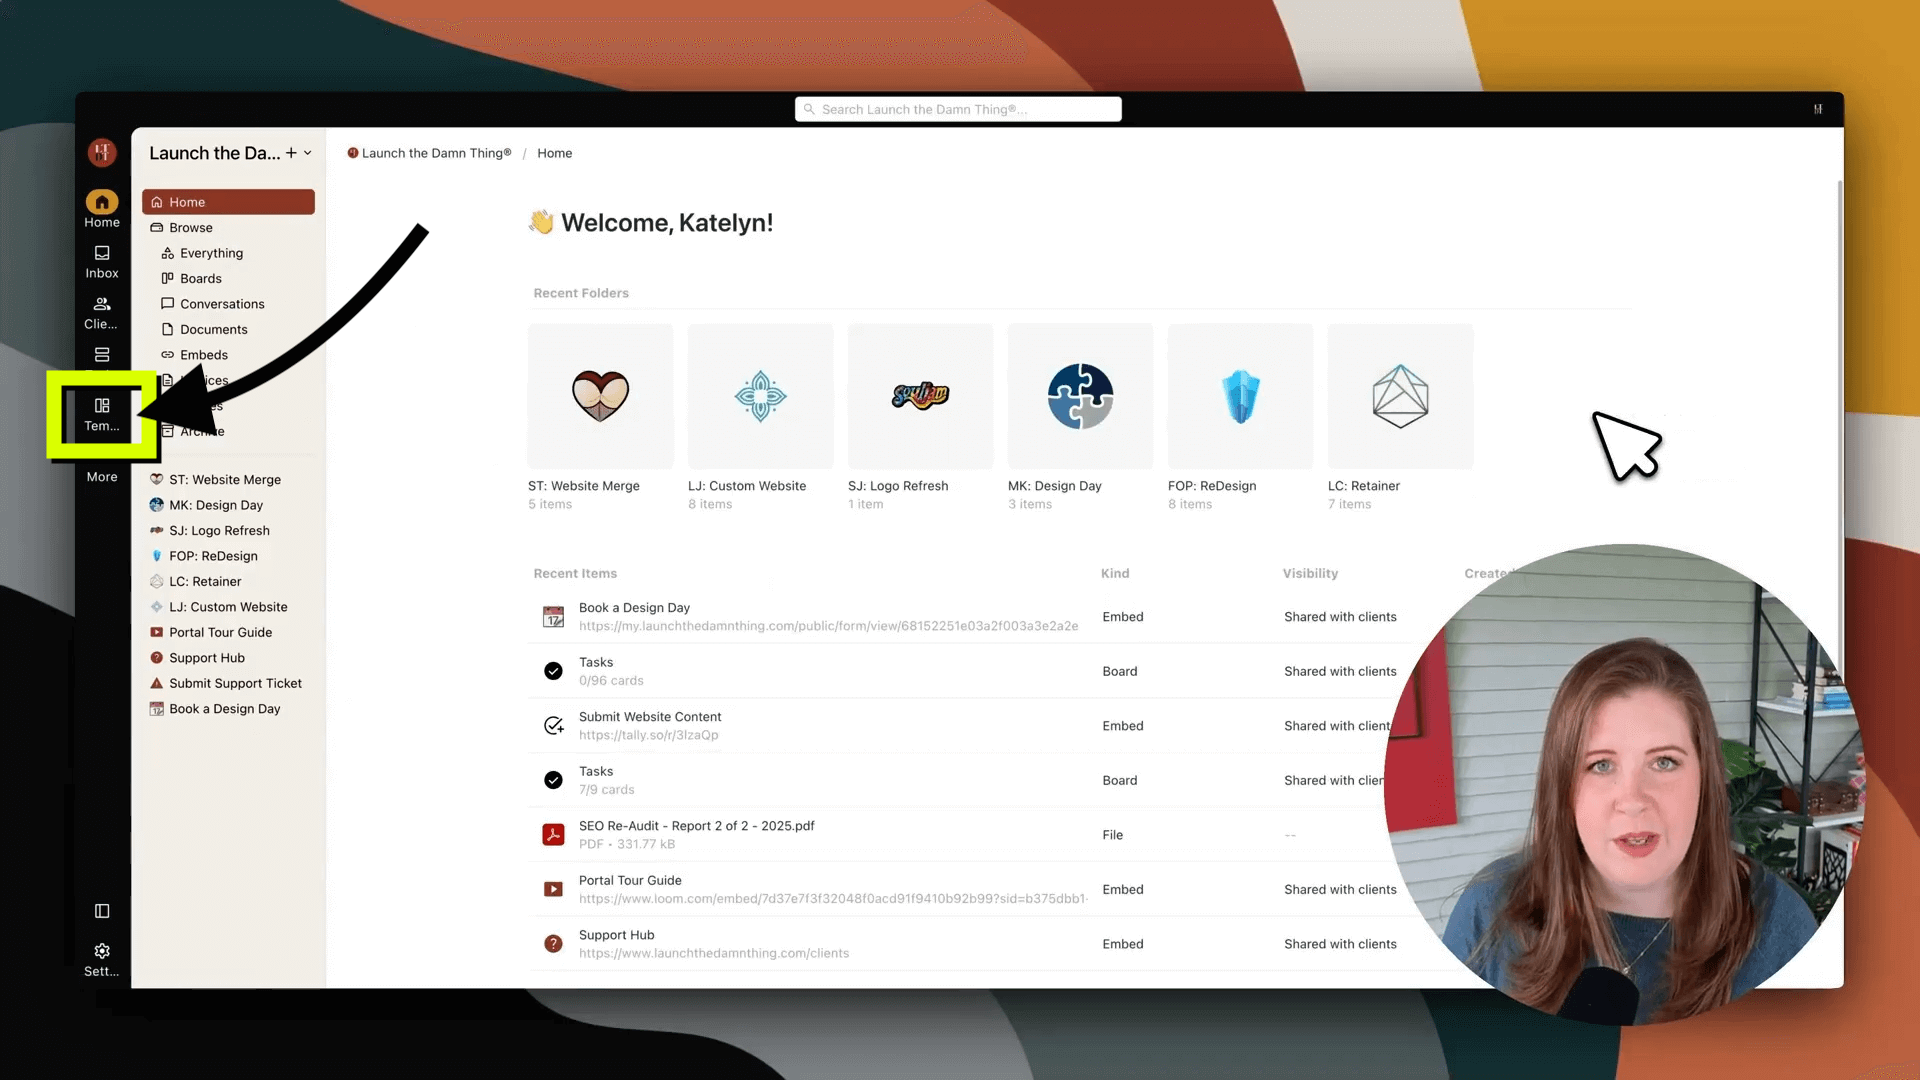
Inside My Kitchen.co Account
This is the inside of my Kitchen* account—specifically the home area. When you first log in, you'll see your recent folders, your recent items, and if you scroll past that, you'll also have a quick create menu so you can start anything brand new (from scratch) pretty quickly.
Let's take a look at the template I use, before we actually use it. I keep it in my archived folder because I want to be able to:
View it to check details
Restore & edit it when I need to make changes
Turn that version into a new template
Archive it again to keep it out of the way
This approach gives me a "living, breathing" template that I can update whenever needed. It also means I don't have to recreate the template from scratch every time, or if there's something wrong with the template-making process because the archived version (what the template was made from) can also just be duplicated if necessary. To update a template in Kitchen, I just make the change, then create a new template from that updated version, and delete the old template if I want to. Easy peezy!
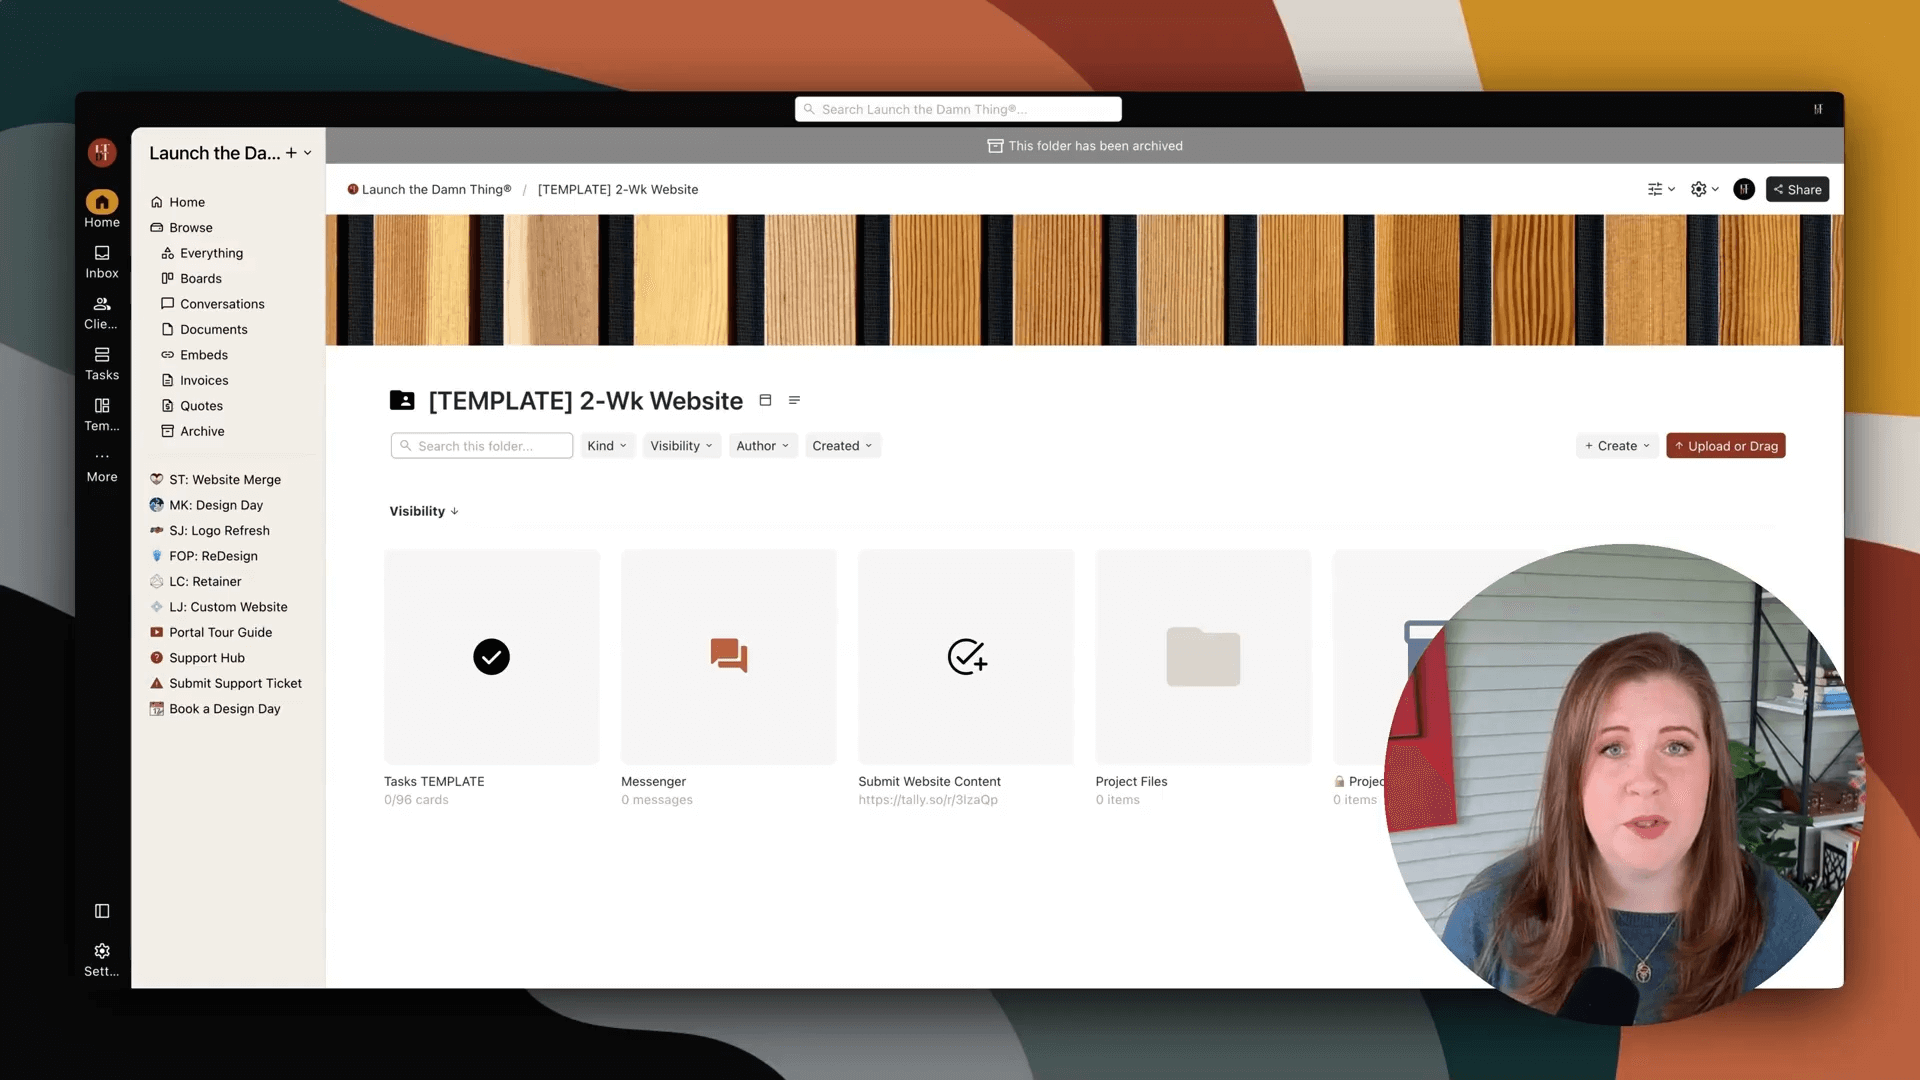

What's Inside My Template?
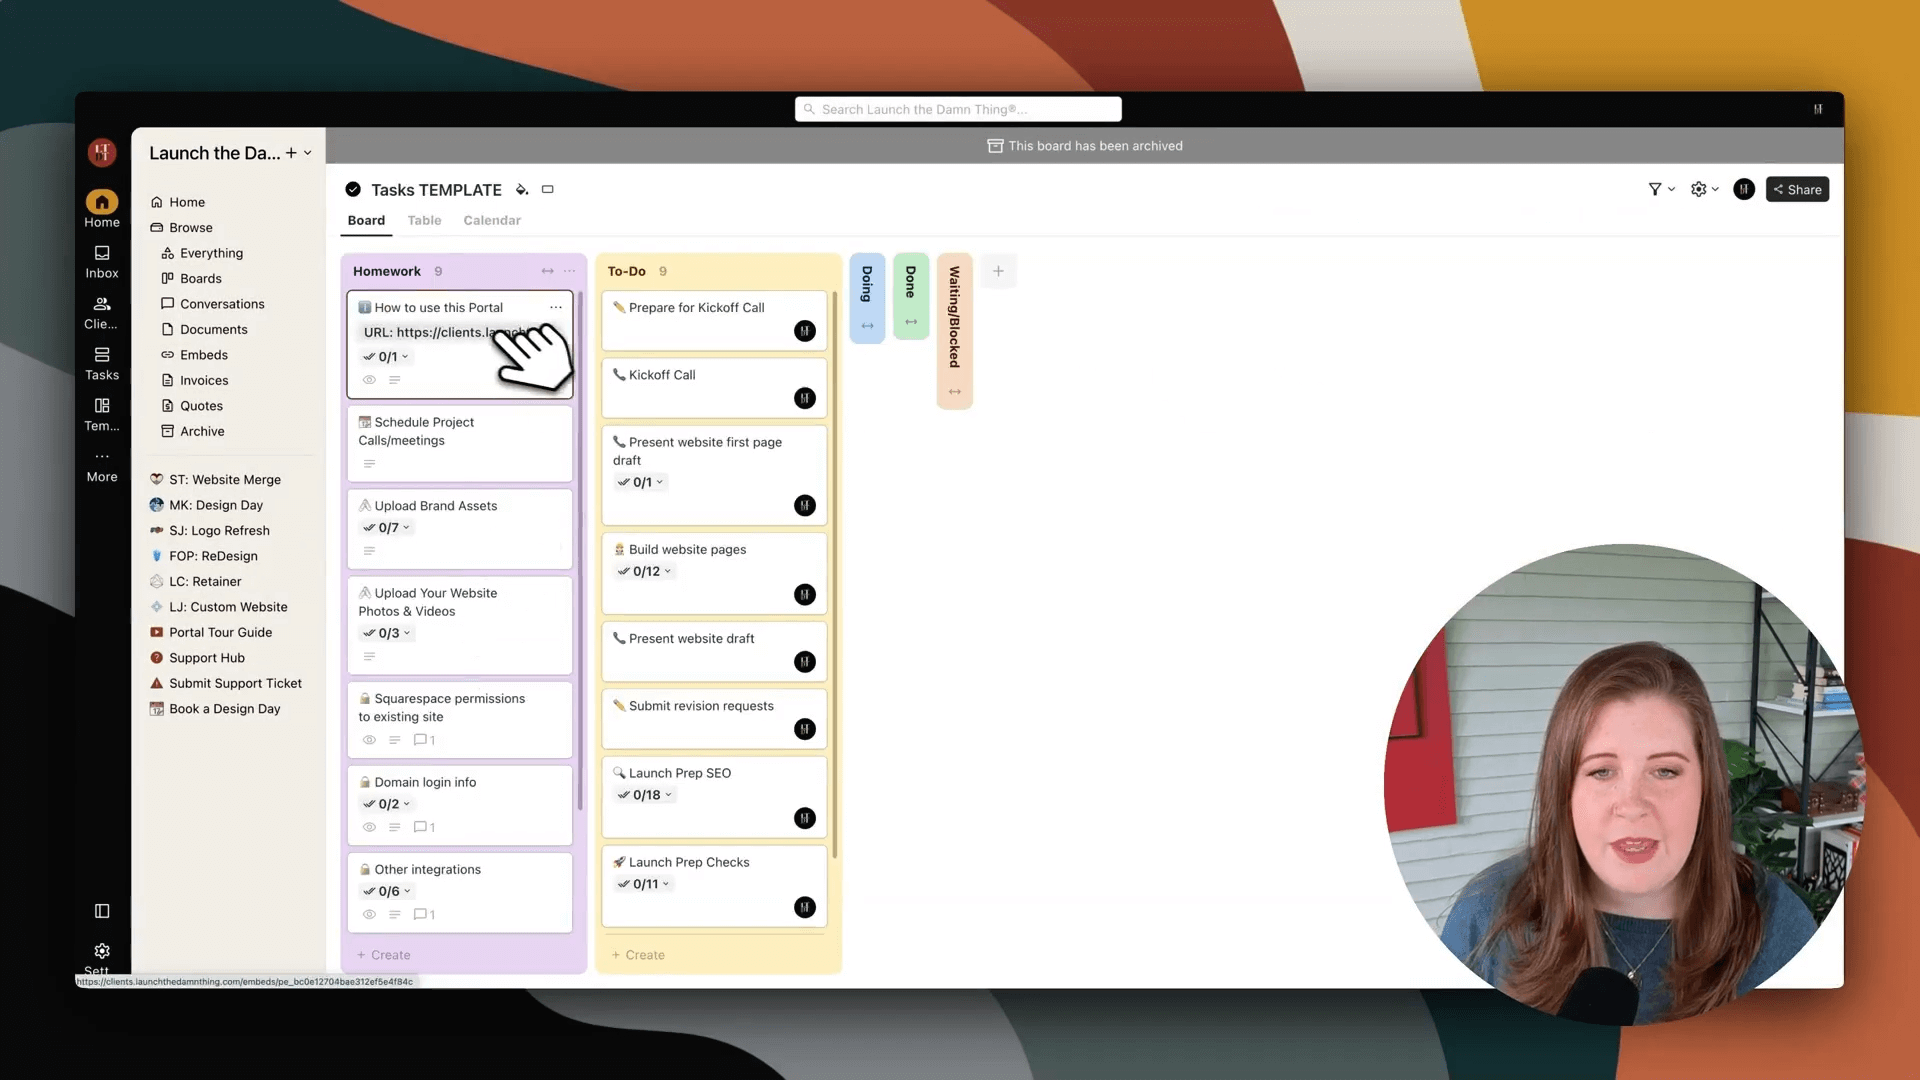
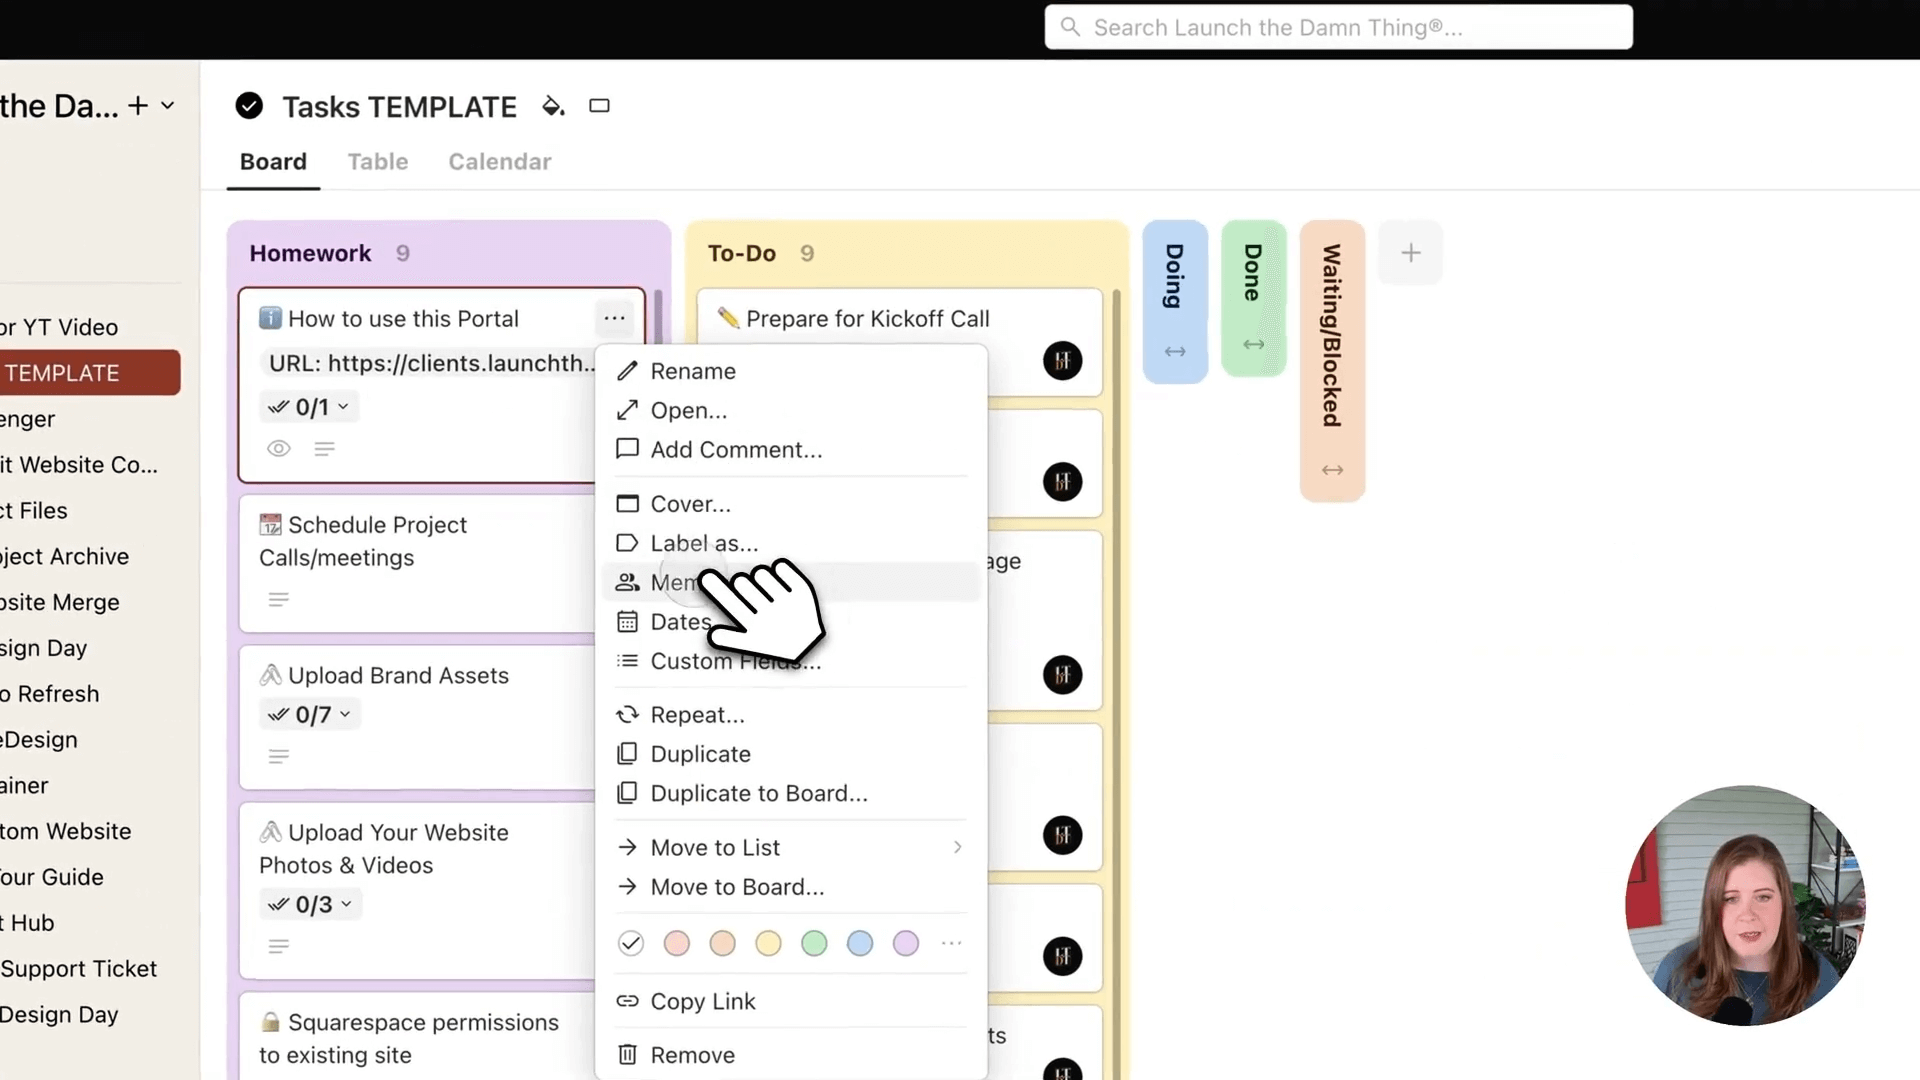
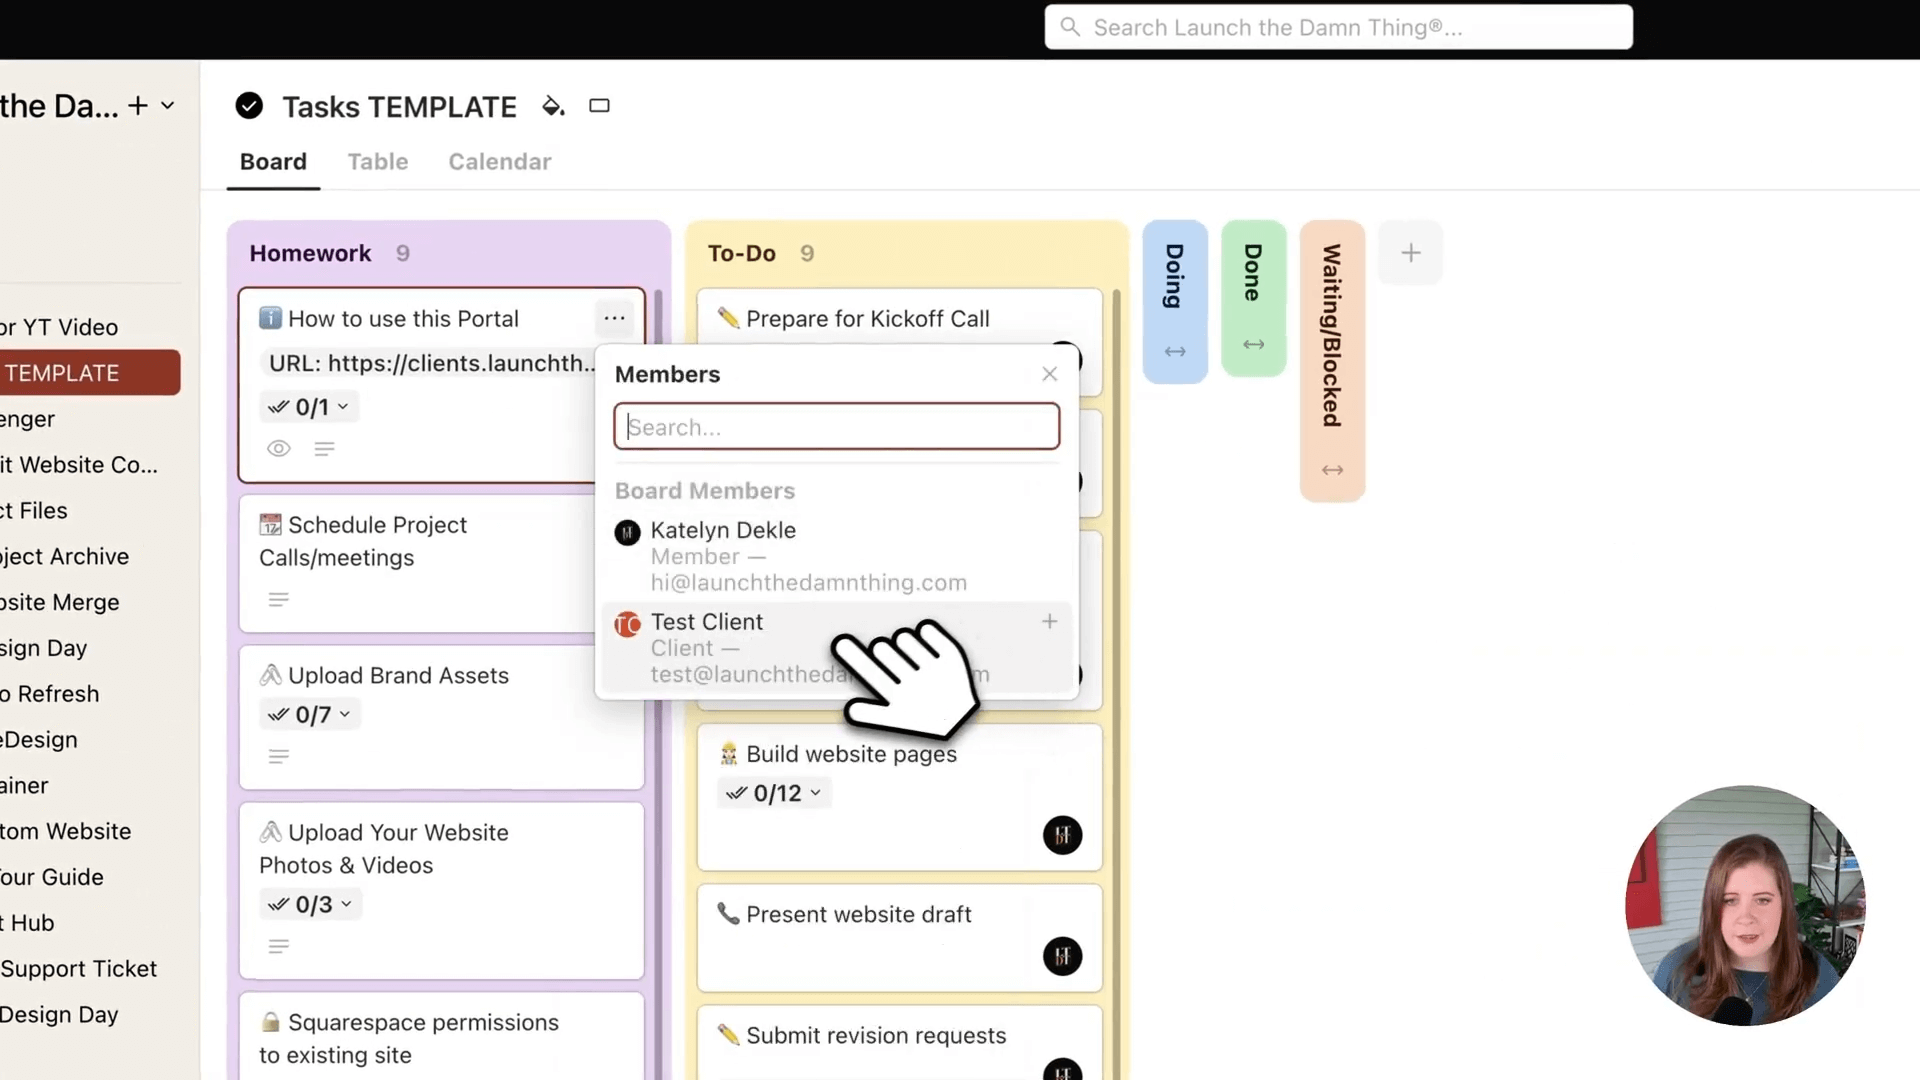
a task ‘Board’
The task “Board” is where all of my project-specific to-dos live, including all the homework tasks I give my clients. I can quickly assign due dates & tasks to clients, delete anything from the freshly copied template that's not relevant to a particular project, and that way I don't have to recreate the project structure every single time.
Some tasks on the Board are actually for myself—just to keep me from having to remember every little thing. Because that's the whole point of systems, right? 😅
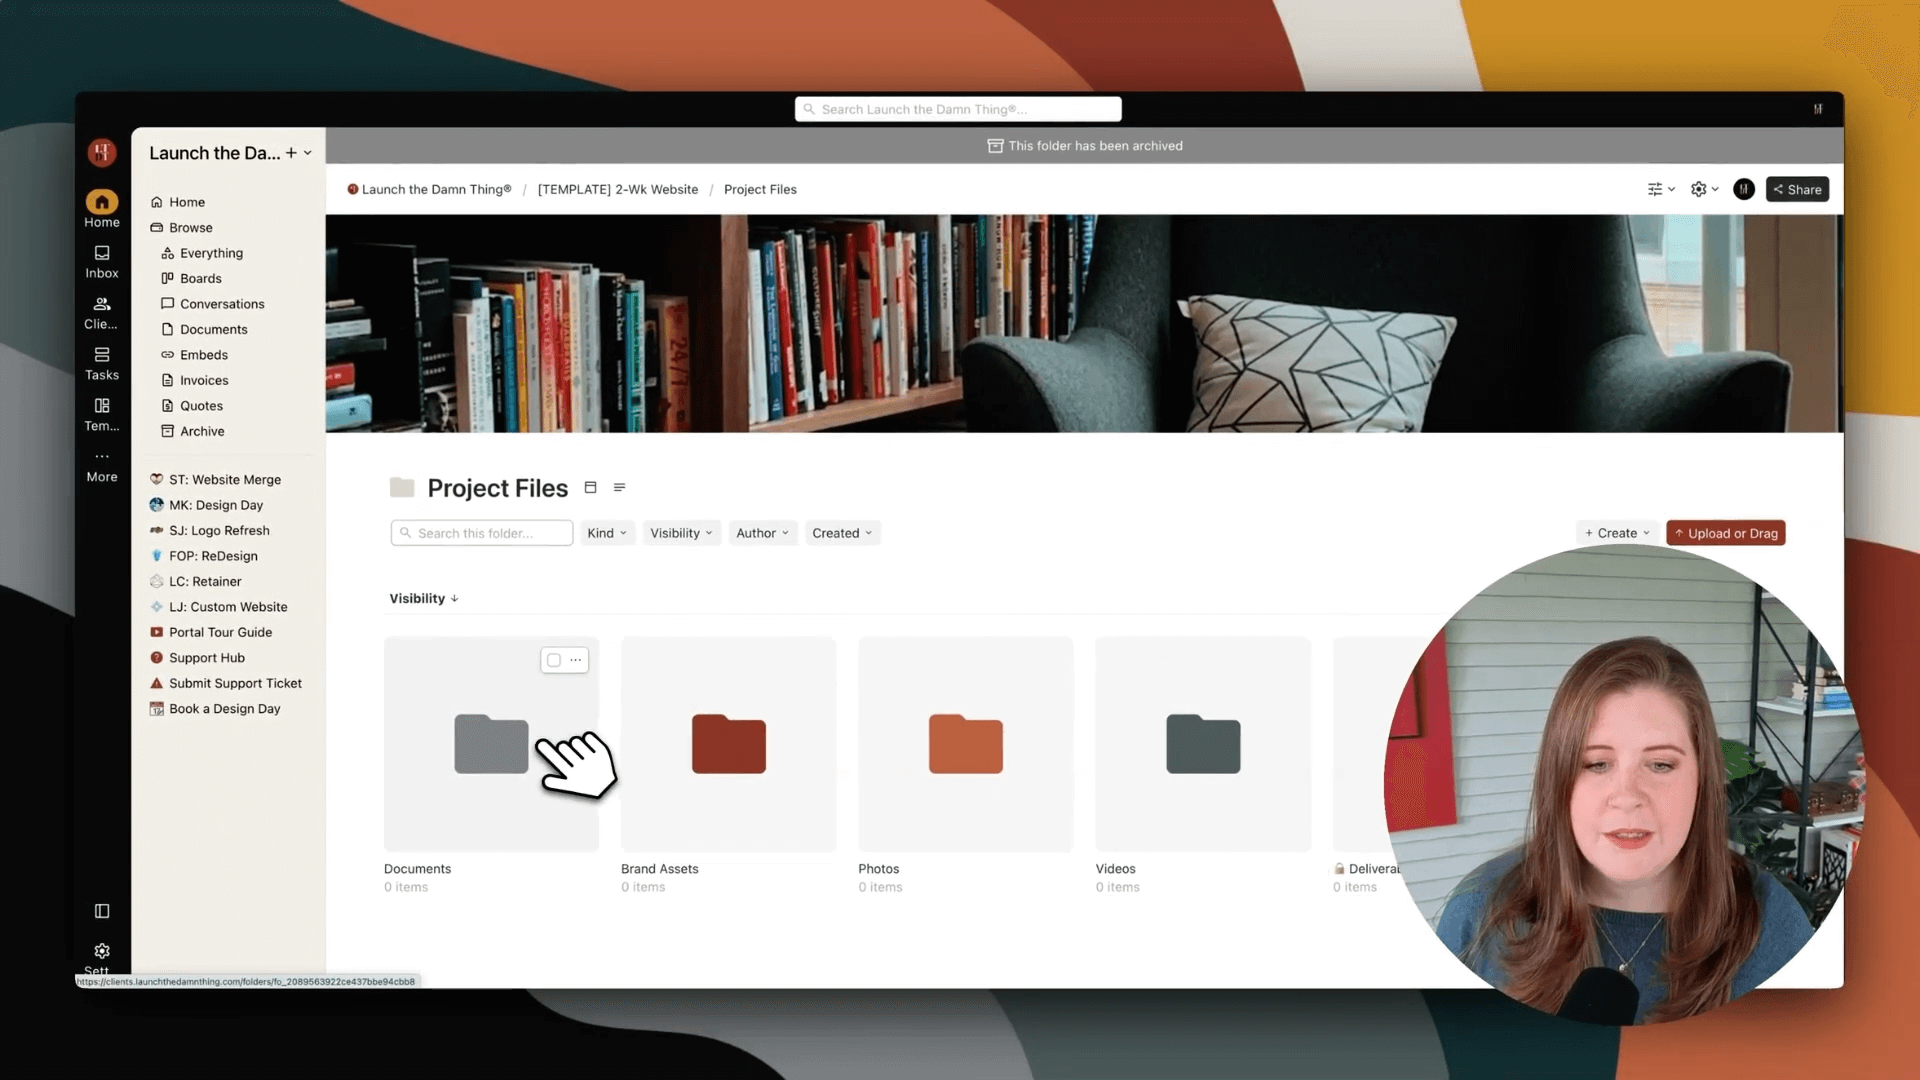
When we go back to the main project folder, this is the landing page that clients see when they log in—which is why I've made it somewhat attractive. I've branded the icons for each page in the folder (Task Board, Messenger, Project Files, and Deliverables) and given them specific icons that visually connect what each item does in the portal.
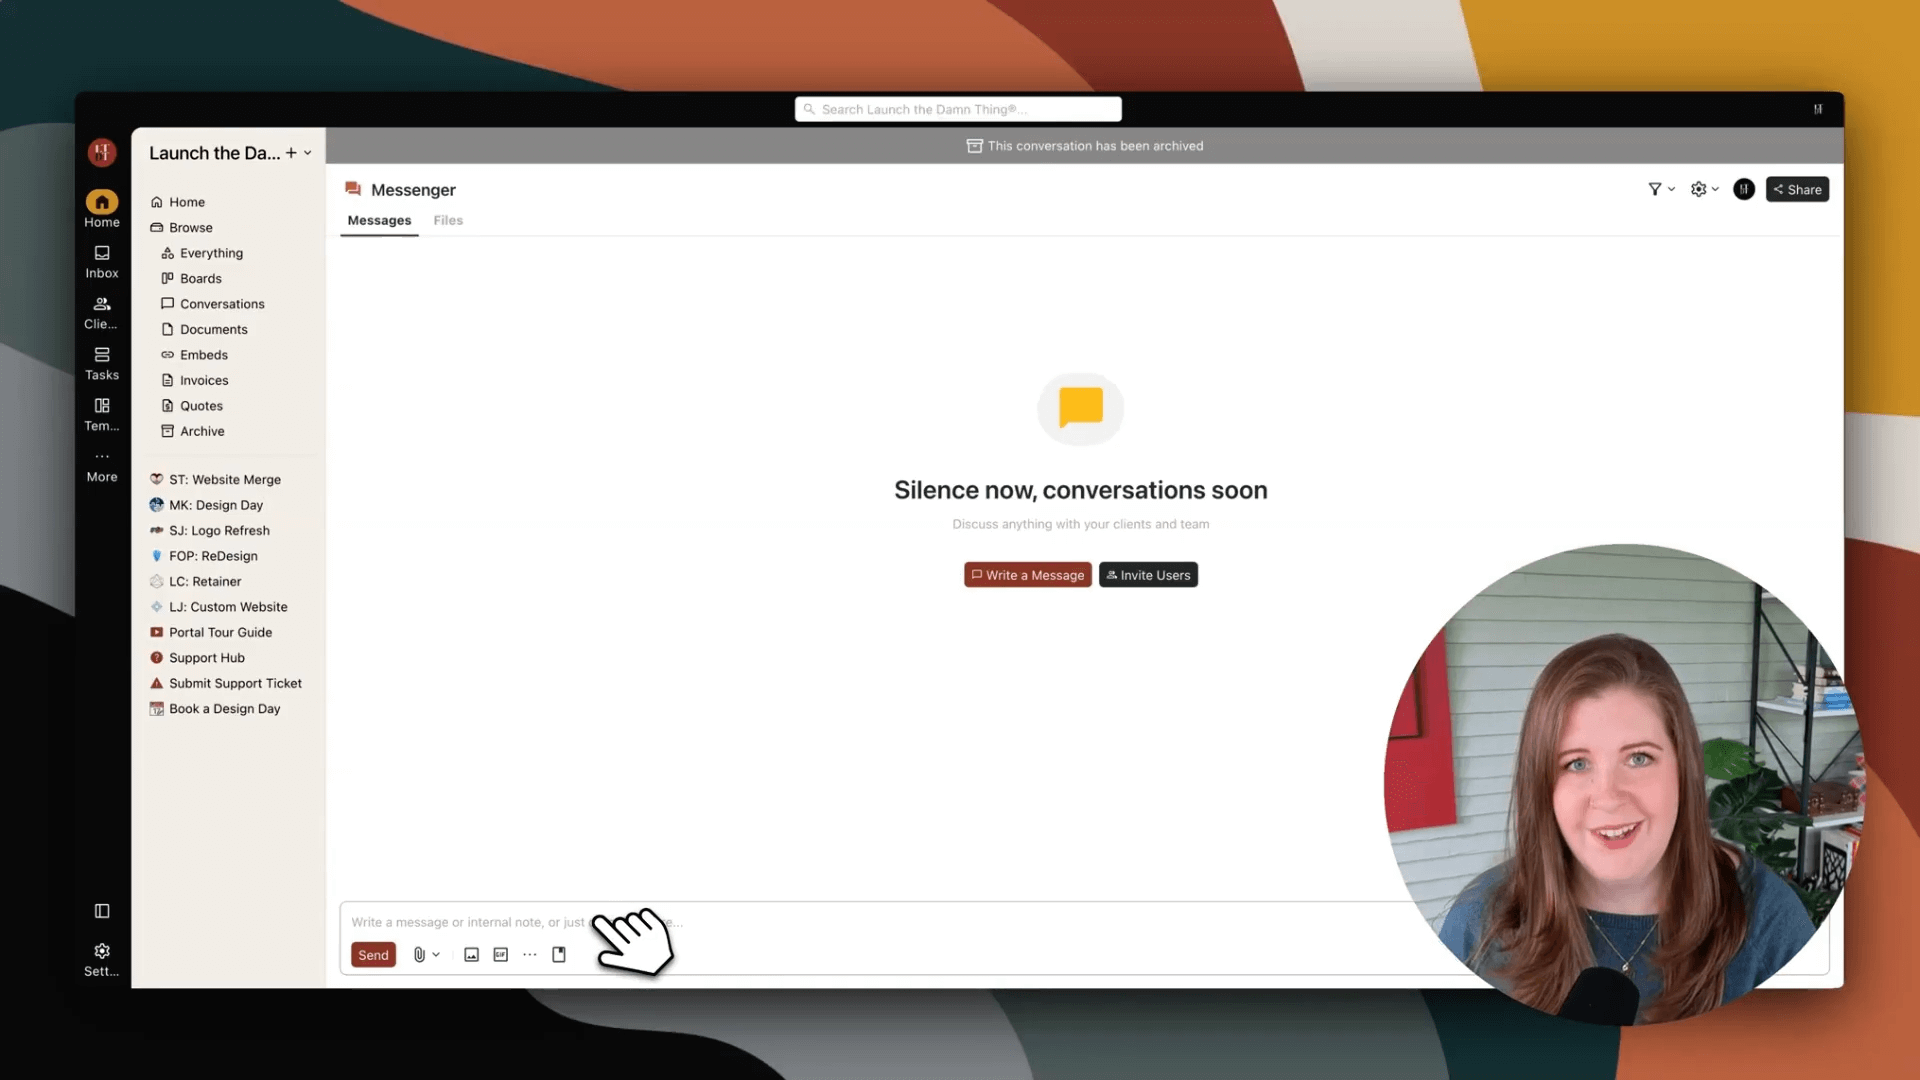
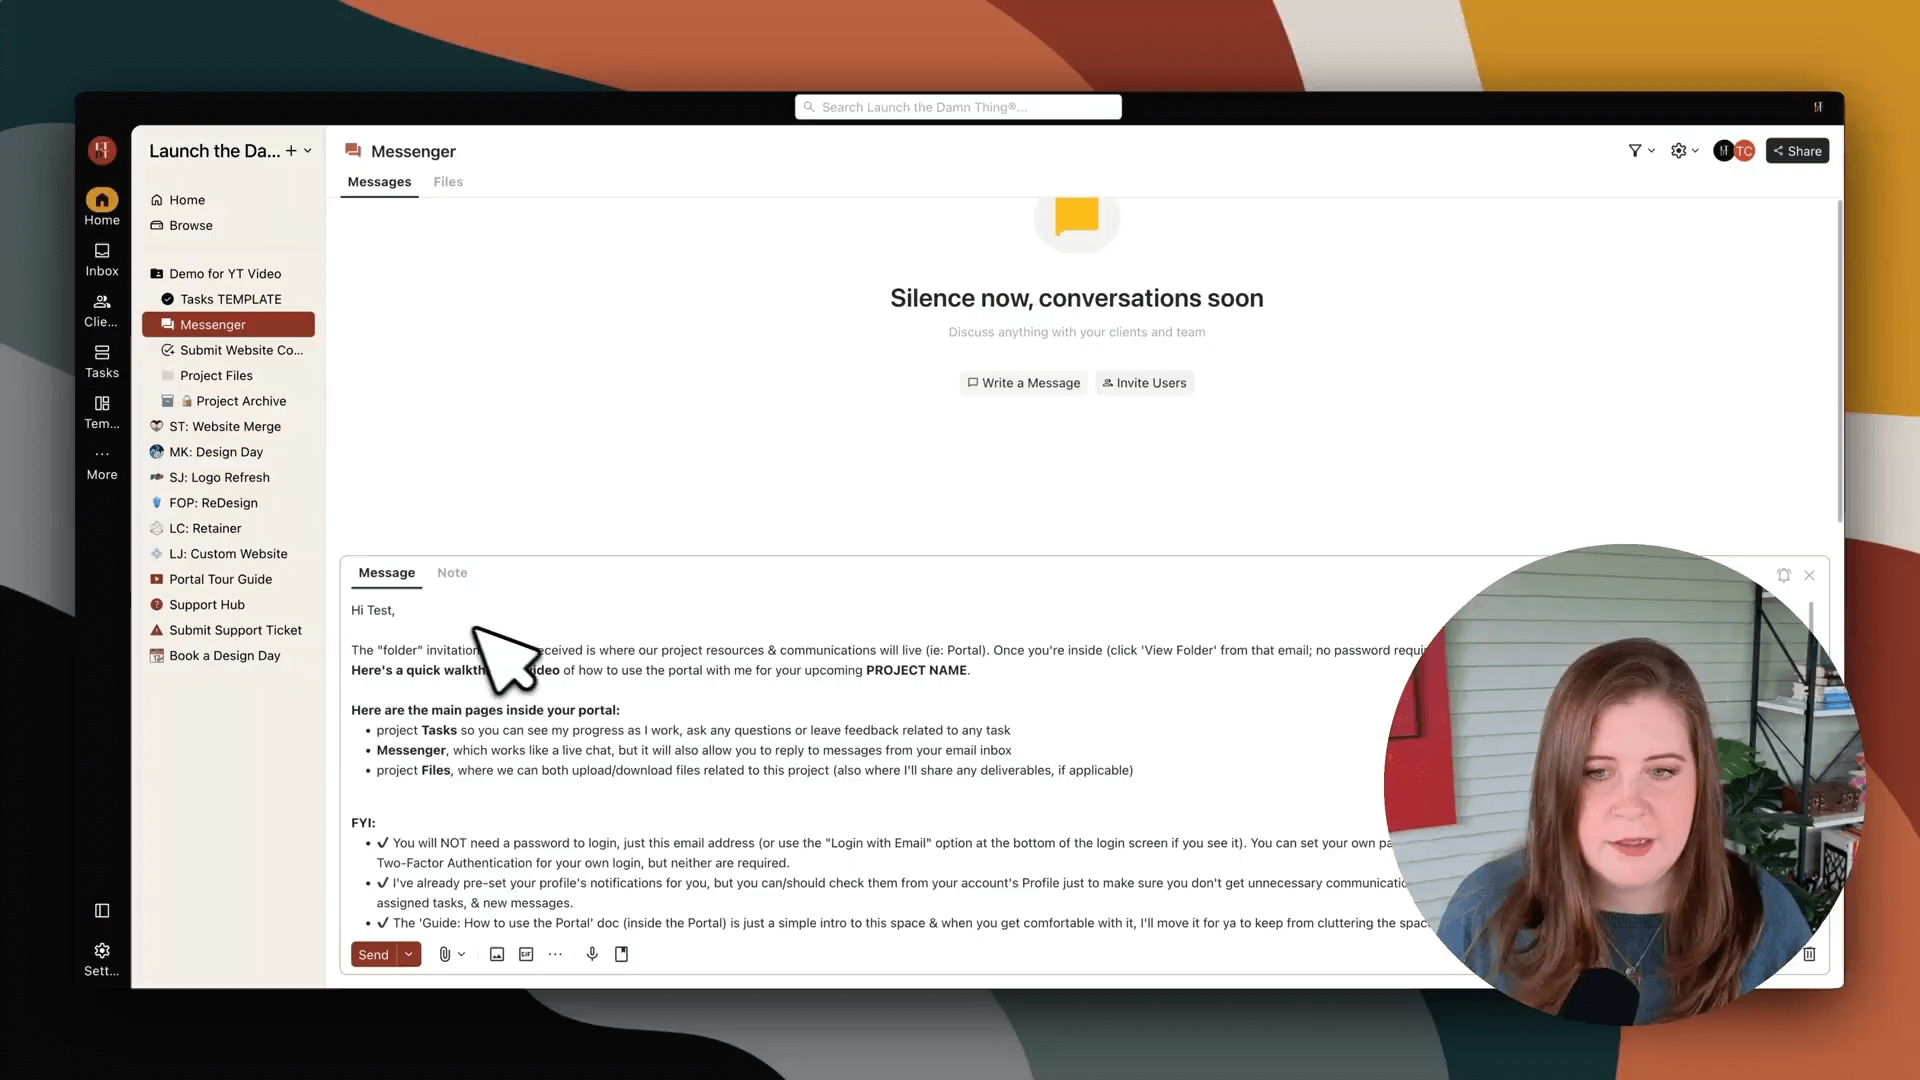
a live chat (‘Conversations’)
I also have a messenger (Kitchen calls these “Conversations”) where my client & I can have a live chat-style experience in each project, or wherever one is needed. When I send a message, it shows up in their inbox too and they can actually respond to that email, which will then show up in Kitchen* for both of us. It keeps everything in sync and super easy to use. I love it—it's amazing!
They're adding some exciting new features very soon (maybe even this week if we're lucky!), so keep your eyes peeled if you're already using Kitchen.
I also have an embedded Tally form for their content guide so clients have easy access to that for giving me whatever content I need for the website project, which allows me to use conditional logic to show/hide only the questions relevant to their business (hiding the others that aren't applicable).
an upload ‘Folder’
There's also a project Folder system that give my clients an area to drag & drop in their files for the project. This follows the ‘K.I.S.S.’ method —ie: "Keep It Simple, Stupid"— which is what I teach my students in the Ultimate Client Portal System course.
Here's how my folders are organized:
One folder for Documents (no sub-folders)
One for Brand Assets (no sub-folders)
One for Photos (2 sub-folders)
One for Videos (2 sub-folders)
A hidden folder for deliverables (that I'll reveal later when the website has launched & the final payment has been made)
Documents & Brand Assets
Inside the Documents sub-folder, there's nothing—clients can literally drag and drop whatever legal templates they need to share for me to install onto the site. Same for the Brand Assets sub-folder—it's completely empty but gives them a place to add logos, graphics, icons, fonts, patterns, or whatever else they need to share.
For Photos and Videos
I've created sub-folders inside each of those to help with file organization without overwhelm:
Photos
Stock photos
Photos of them/their business
Videos
Stock videos
Videos of them/their business
I also include little descriptions of what goes inside each folder—for example: "Your story, greeting, thank yous, testimonials, licensed stock photos for commercial use." (Hint, hint, they need a license for some of that stuff! 😉)
private folders
The Deliverables folder starts as a hidden (internal) folder where I put everything I've designed or edited with the intention of handing it off to the client as a tangible file or template they can walk away with when the project is over. Clients can easily bulk download or upload anything directly from there. I also keep a private (basic) Kitchen* doc to use as a notepad as needed, though I don't always need to use it.
Anything I create that I don't need right now or want to hide temporarily, I just dump in the private folder labeled 'Project Archive'. Clients don't see this folder because the privacy level is set to "internal" —which would be me, and my team (if I had one). Clients can only see the four main folders when they log in to the portal & open their project.
How to Quickly Recreate This Setup for New Client Projects
With that in mind, let's recreate this setup for a test project so I can show you just how quickly I can create this system. I don't have Kitchen directly integrated with Dubsado (my CRM) or Asana (my task manager), but Kitchen* does have lots of Zapier triggers and actions, so you could potentially automate parts of this process.
Here's my typical workflow:
Client signs, pays, and books their project through Dubsado
Project is officially on the calendar and I've received the initial payment + service agreement signature
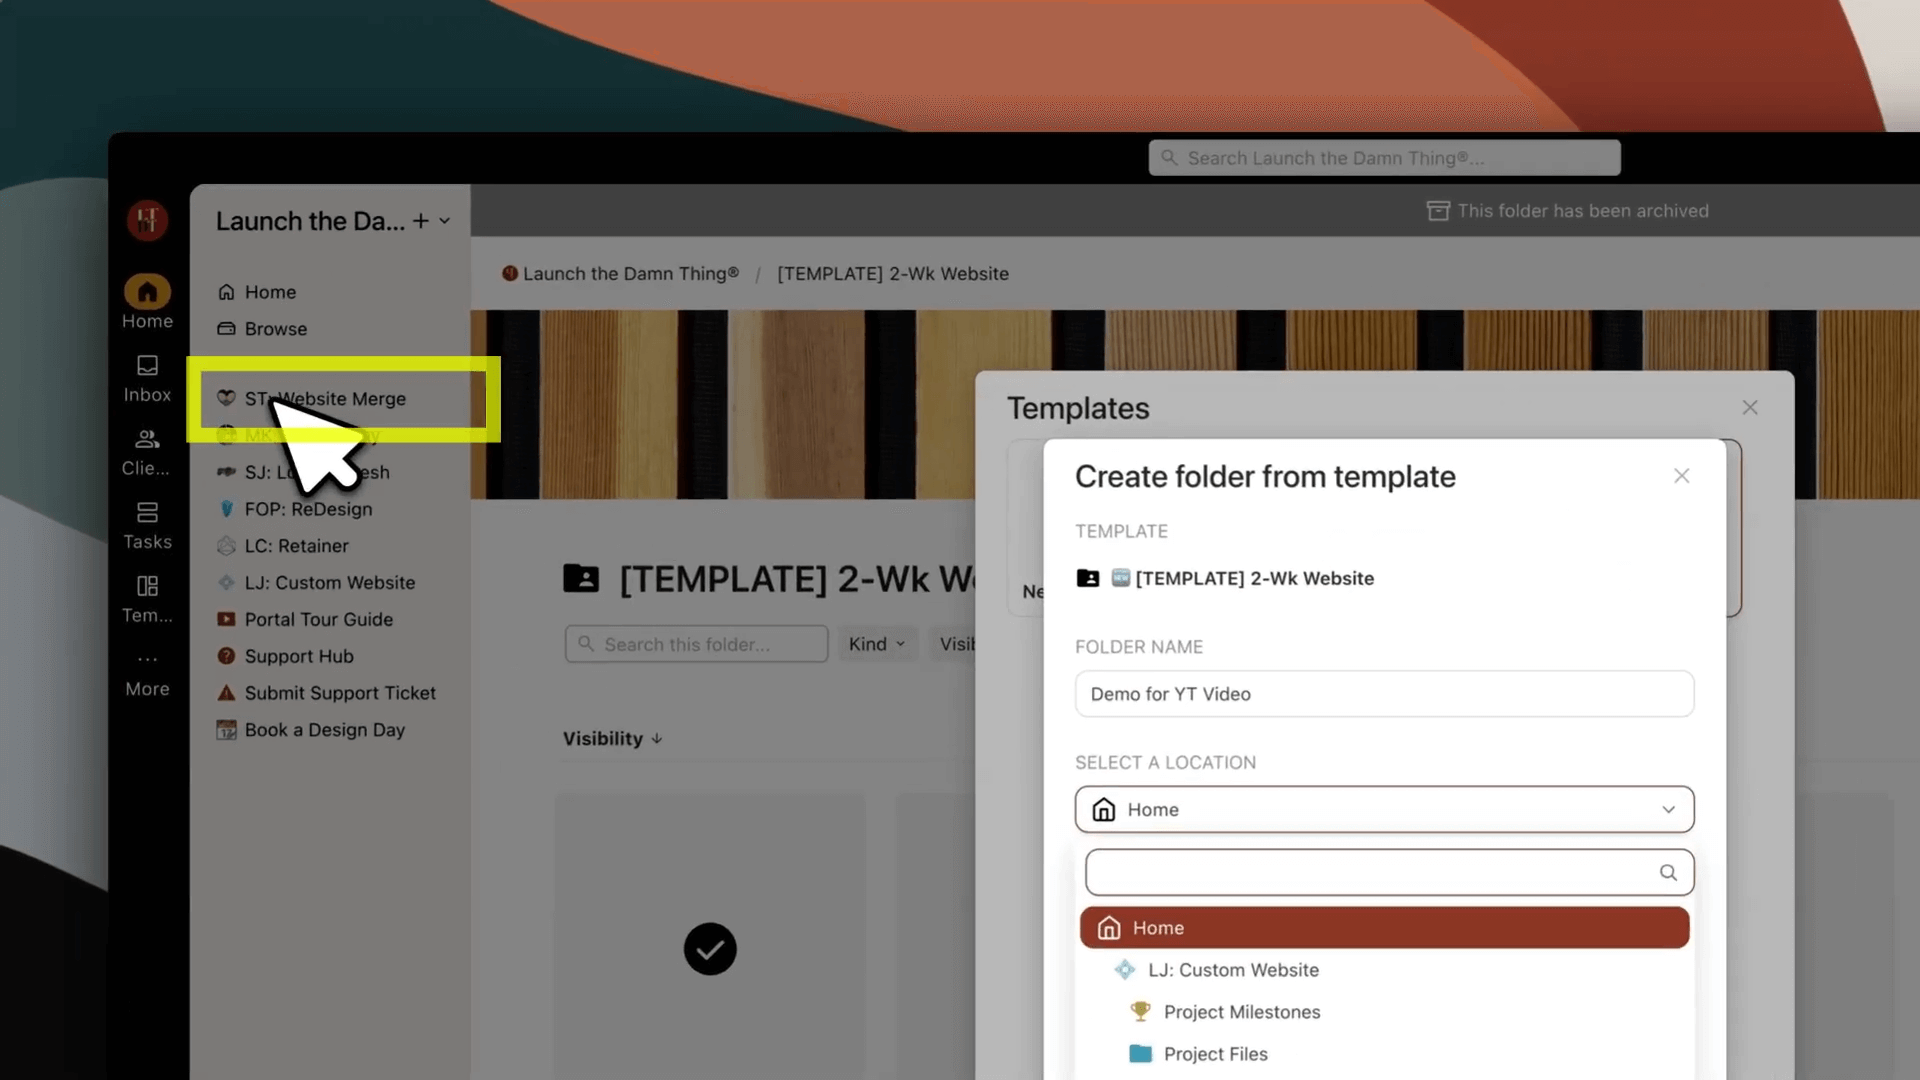
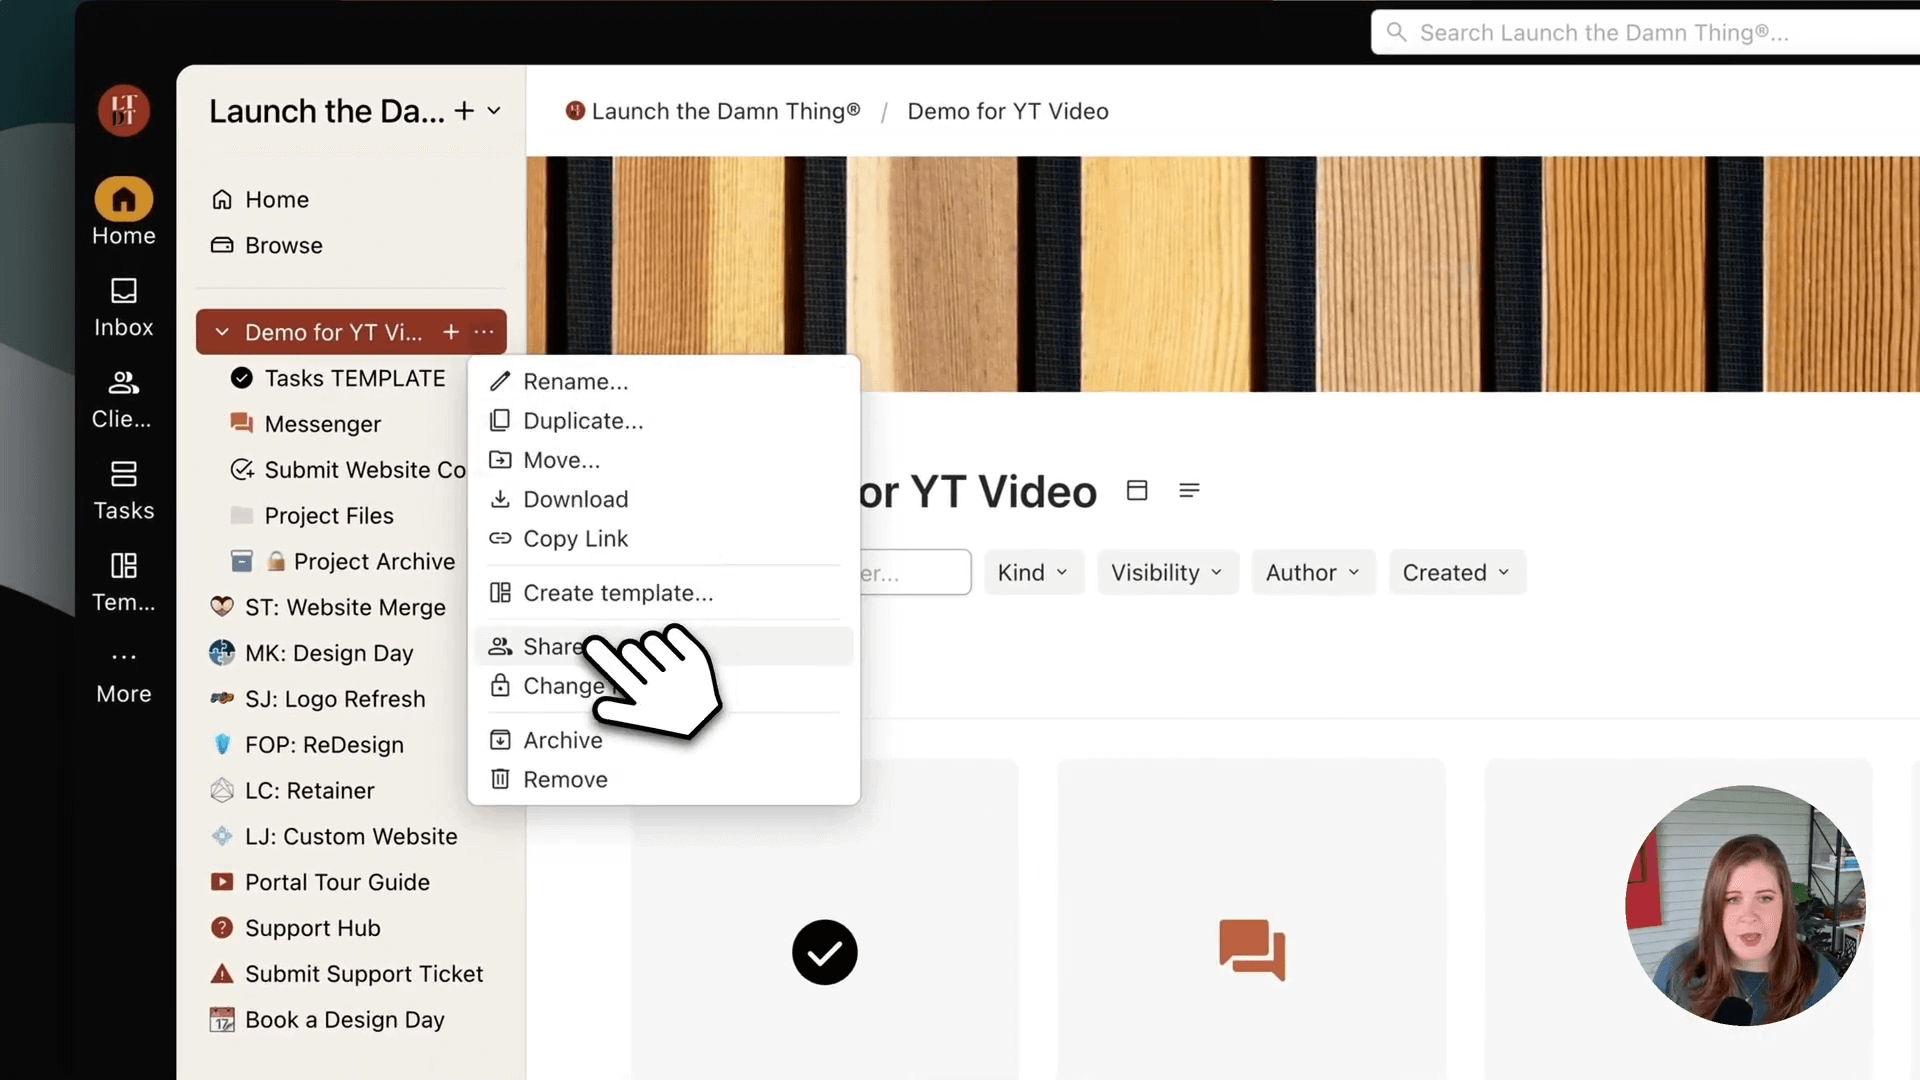
I go into Kitchen, then open my Templates menu
Select the template I want to use
Click "Use Template"
Edit the new copy for that specific client project
For this demo, I'll name the copy "Demo for YouTube Video" and keep it in my Home location in the sidebar.
Right now, all my folders are individual projects for individual clients, but if you're working with repeat clients as you continue to use Kitchen, you might prefer to create a folder with their name or initials, or business name or biz initials, and then have multiple project folders inside the client folder so they have one place to check all their projects with you.
Here's my current set up:
XX: Package Name/Project Type
Soon though, I'll have it set up like this:
Client Name A (or Business Name)
XX: Package Name/Project Type 1
XX: Package Name/Project Type 2
XX: Package Name/Project Type 3
Client Name B (or Business Name)
XX: Package Name/Project Type 1
XX: Package Name/Project Type 2
XX: Package Name/Project Type 3
This makes it easy to find anything in their project from the list when ya need to, and/or organize it later.
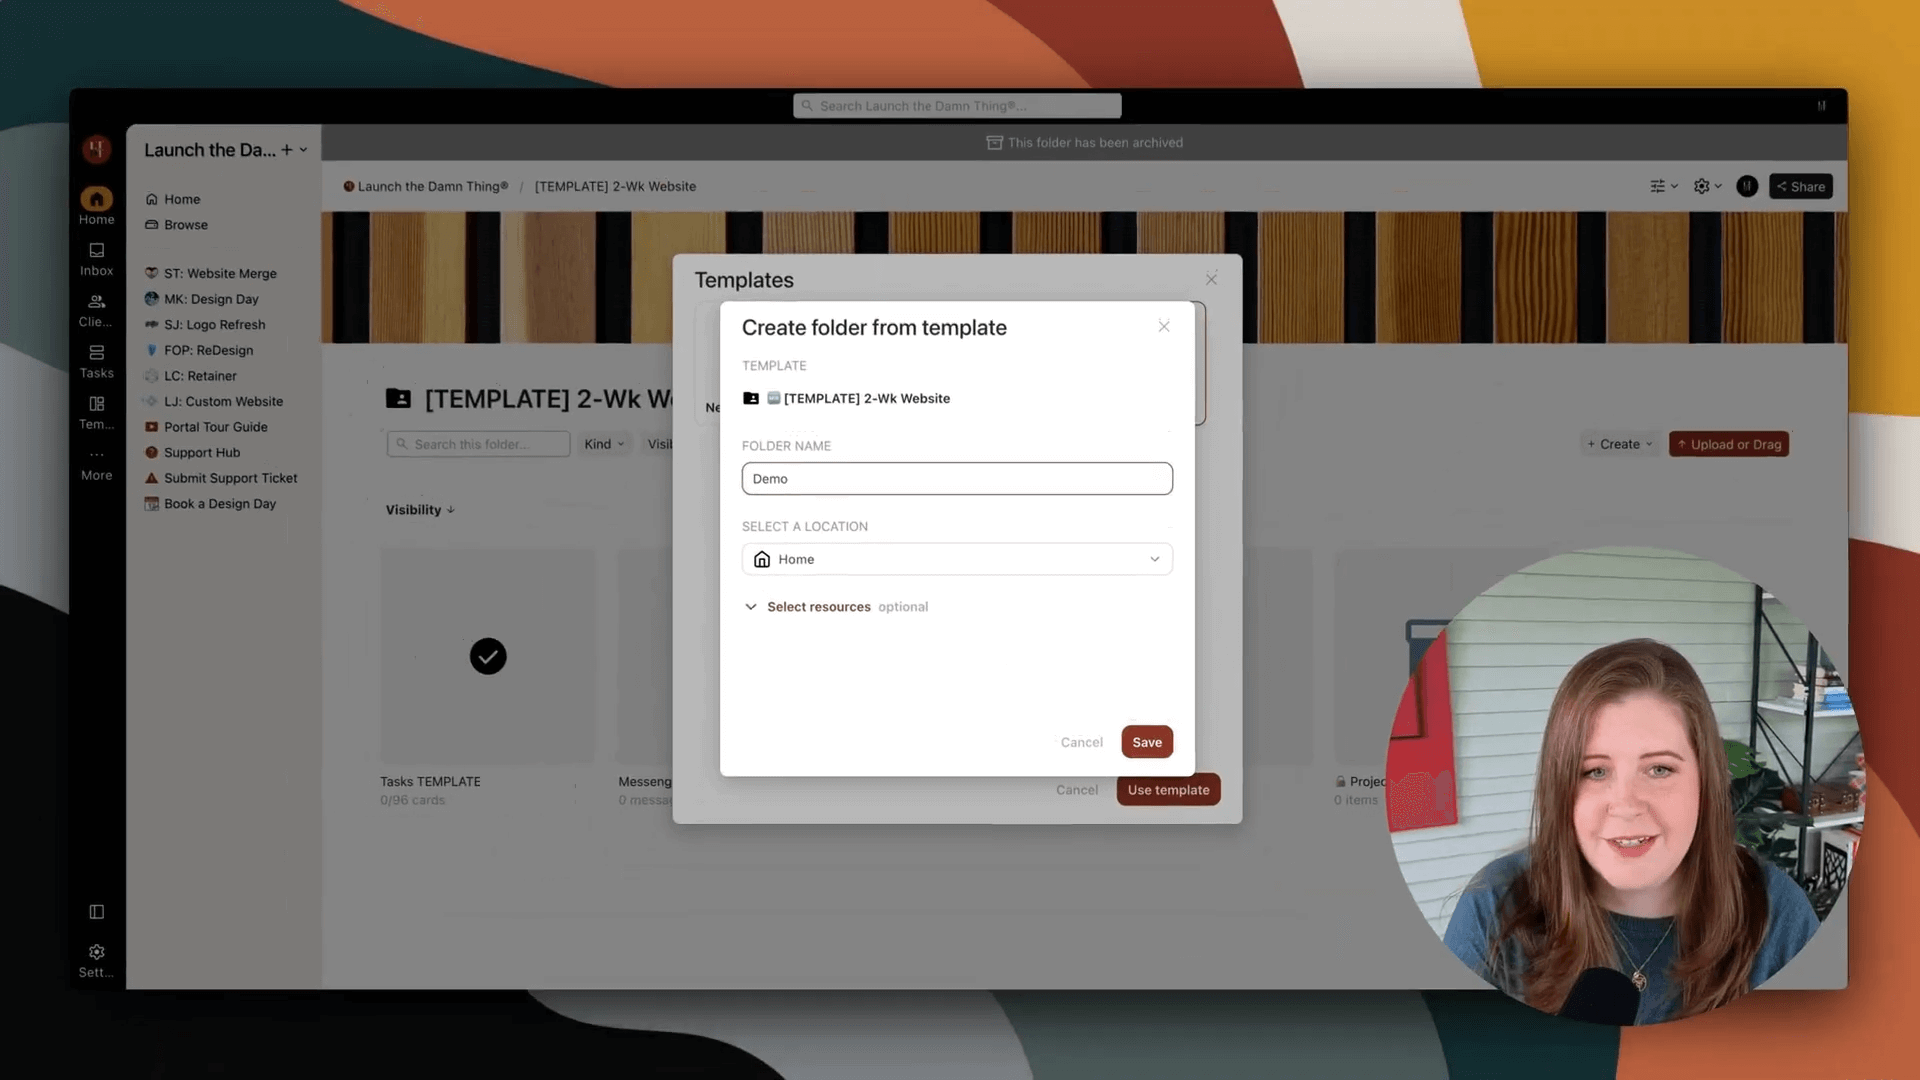
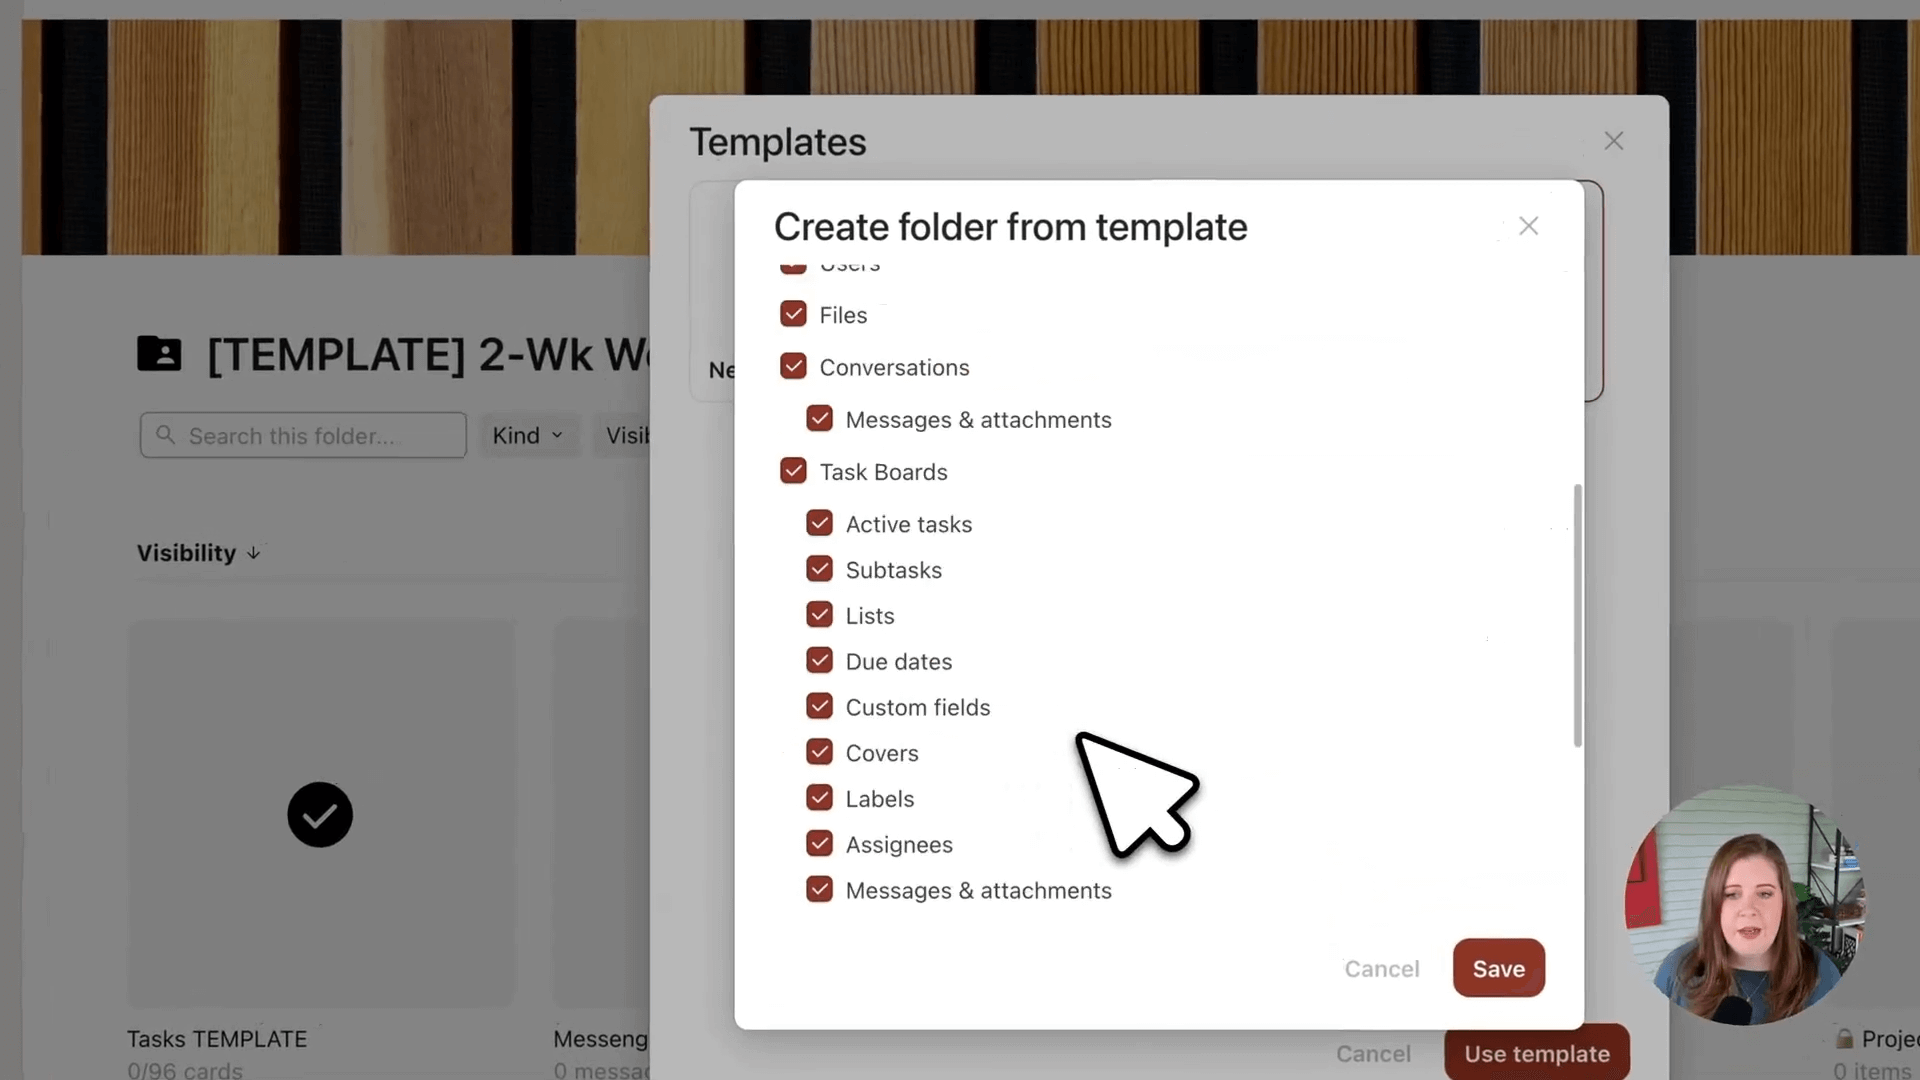
When selecting what to duplicate after you've chosen your template & selected 'Use Template', you can also uncheck (deselect) anything you don't want to copy over in each individual copy you make from the template. Since my template is empty and pretty much structural only, I'll bring everything over & delete specific items I don't need from the copy.
After clicking save, Kitchen* quickly recreates the entire system for me in about 30-60 seconds or less (likely depends on the size of the template).
When it's done, I have the "Demo for YouTube Video" project almost ready to go, with a few tweaks!
If you already have your client's brand assets or can pull it from their existing website or socials, you can upload their logo or browser icon to represent their folder in the portal. If not, Kitchen has tons of icons to choose from, and you can pick the color for the icon using their slider or set custom brand colors.
You can also change the cover image for their main project landing page if you want. My students in the Ultimate Client Portal System course have a pre-sized Canva template they can use to design custom covers for their clients. An example of the cover might be to put in a 'label' which names the project type they've just opened, or shows off their logo, etc. The cover is similar to that on Notion pages; very slim & narrow across the top of the screen.
The Magic of Templates - everything's already there!
Now I have that same list of tasks from the original template but I didn't have to recreate them all manually—such a time-saver! All their homework is already there too, just requiring a few minor edits.
Here's a fun Tally form tip too:
You can actually pre-populate your client's name and email in the homework form if you add a special string to the end of the URL. When they open it, their information will already be filled in so they can jump right in and get started. (This requires setting up hidden fields in your form, which I include in my template, provided to students.)
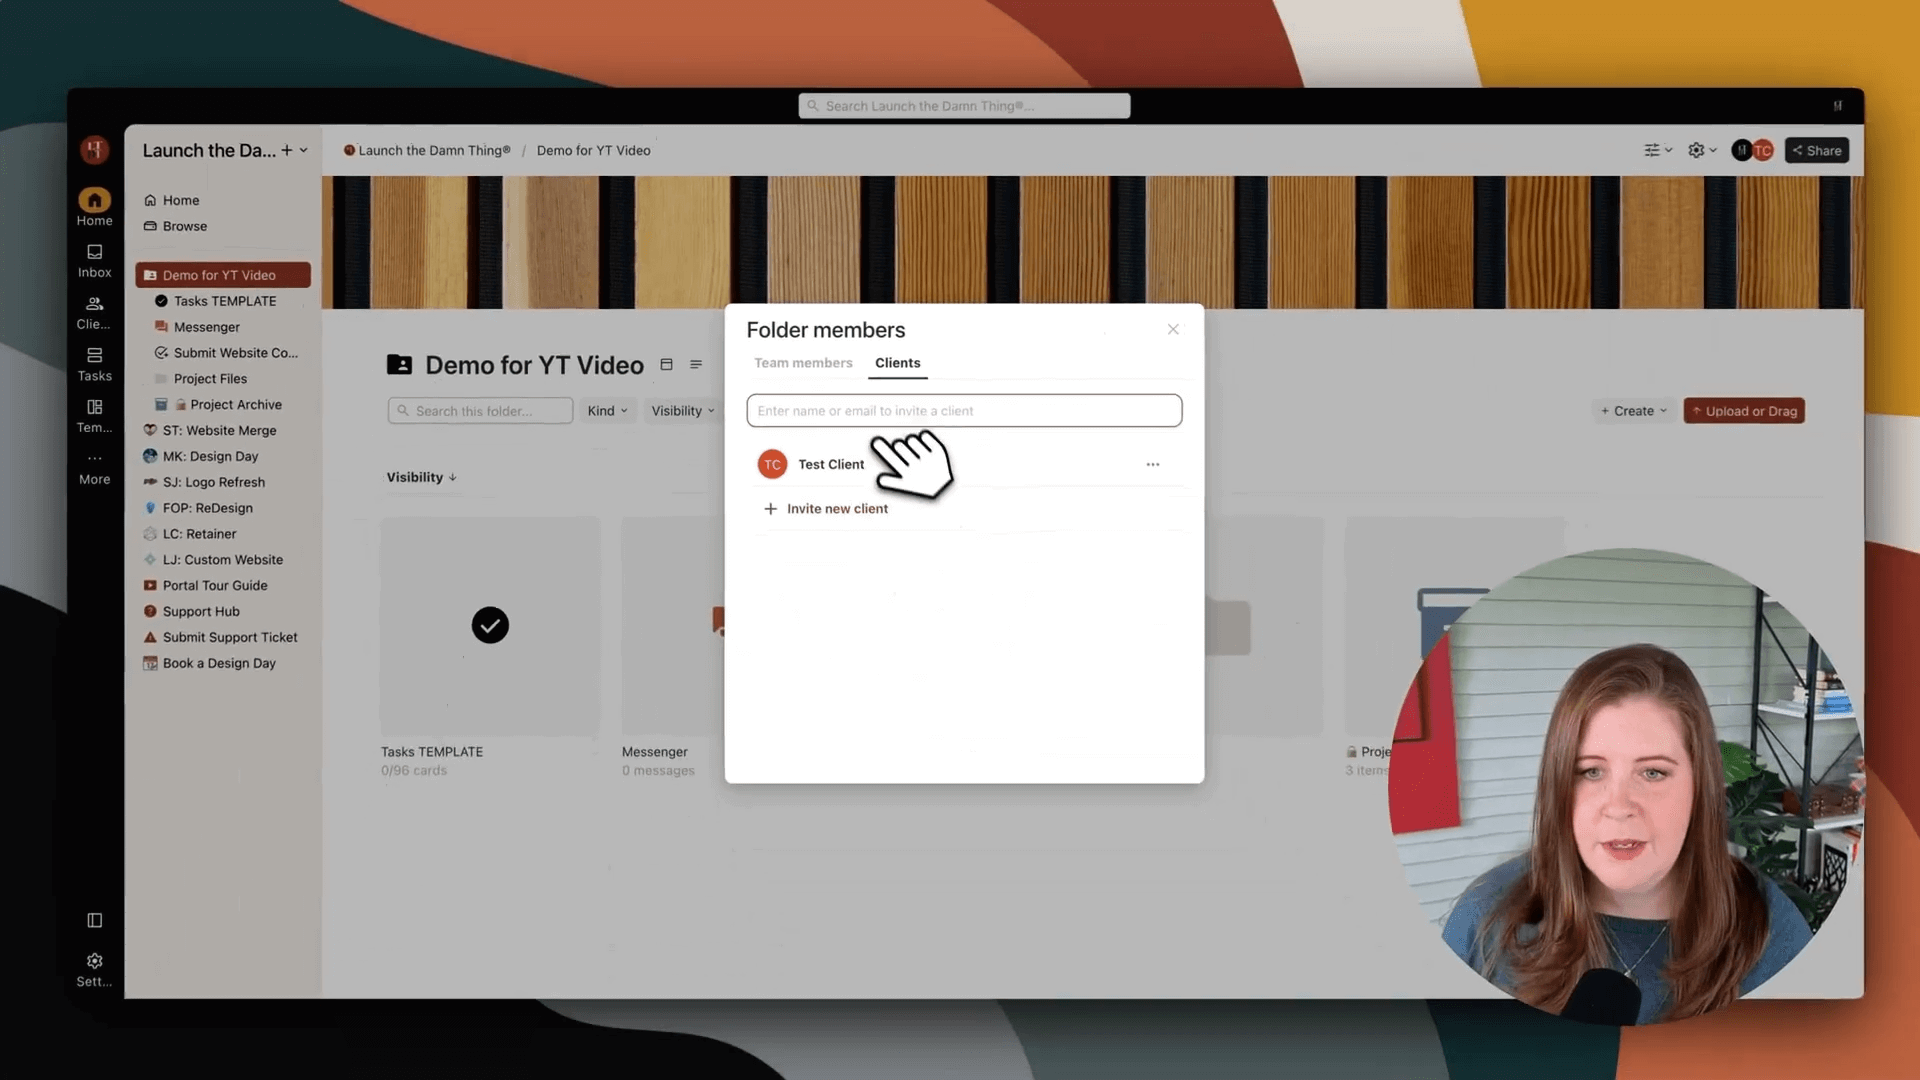
The Client Invitation Process
Next, I invite the client to the folder by clicking "Share" from the top-level project folder, selecting "Clients" tab from the popup menu, and typing in their email address. Once the invite has been sent, this gives them access to all the pages inside the project folder I just shared, including tasks, etc.
If the client is new & has never been invited to your portal before, you'll have an opportunity to type a quick message in plain text (no rich text formatting) to let them know what the invitation is & why they're getting it.
If your client has been invited to your portal before, they will NOT receive an invitation email with a message like the first time, instead they'll just be notified they've been invited to a new resource, and/or whatever other notifications you've/they've set for their profile.
Here's where we need to be strategic:
I don't assign tasks to them right away after inviting them (whether they are new or not), because I don't want them getting an overwhelming flood of notifications as I perform the next steps!
So here's what that process looks like. 👇🏼

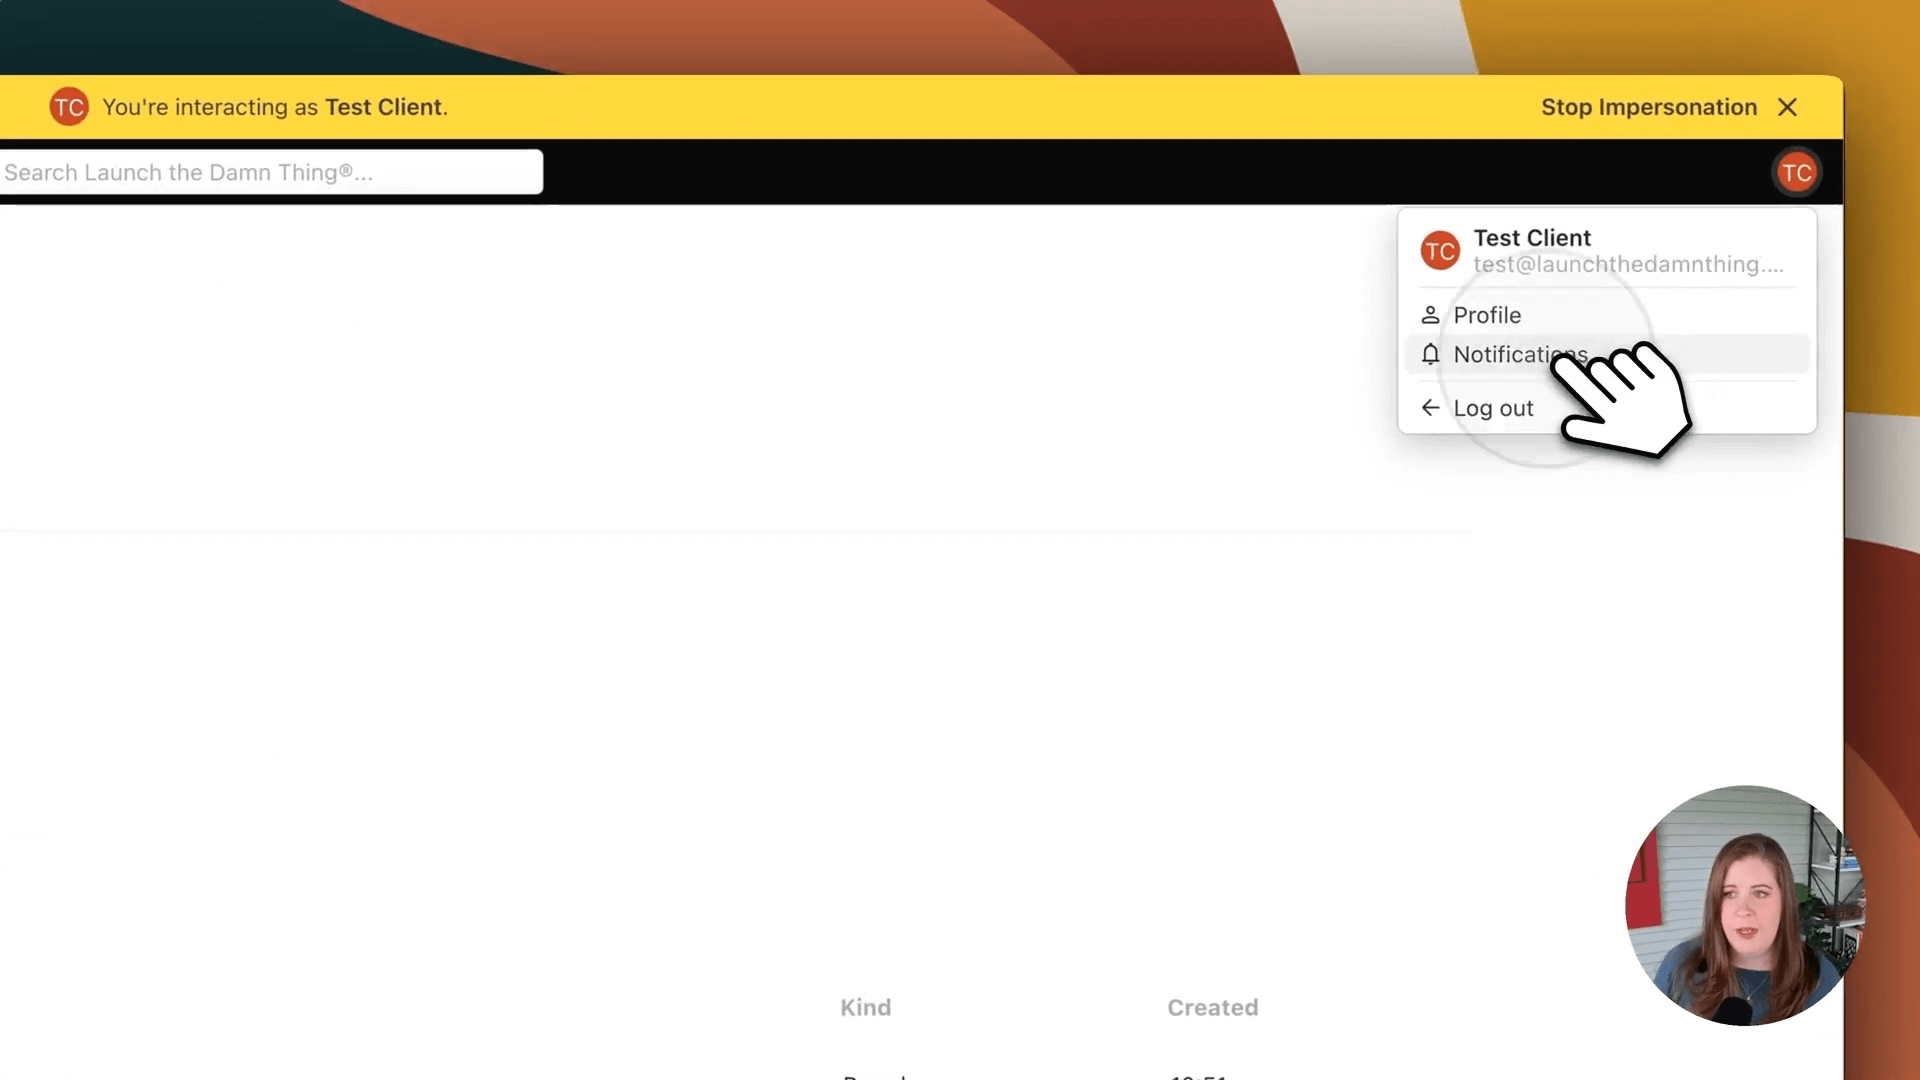
Impersonation Features in Kitchen*
See What Your Client Sees & Turn Notifications OFF
Instead, I go to the client profile in my Kitchen* account and click the three-dot menu in the upper righthand corner to select "Impersonate." This is REALLY important because now I'm able to see Kitchen through their eyes & act as if I were them.
This is one of the super important things about using a dedicated client portal system—because you can't do this with tools like Notion, ClickUp, Monday, or other collaborative 'project management' tools you've probably used before.
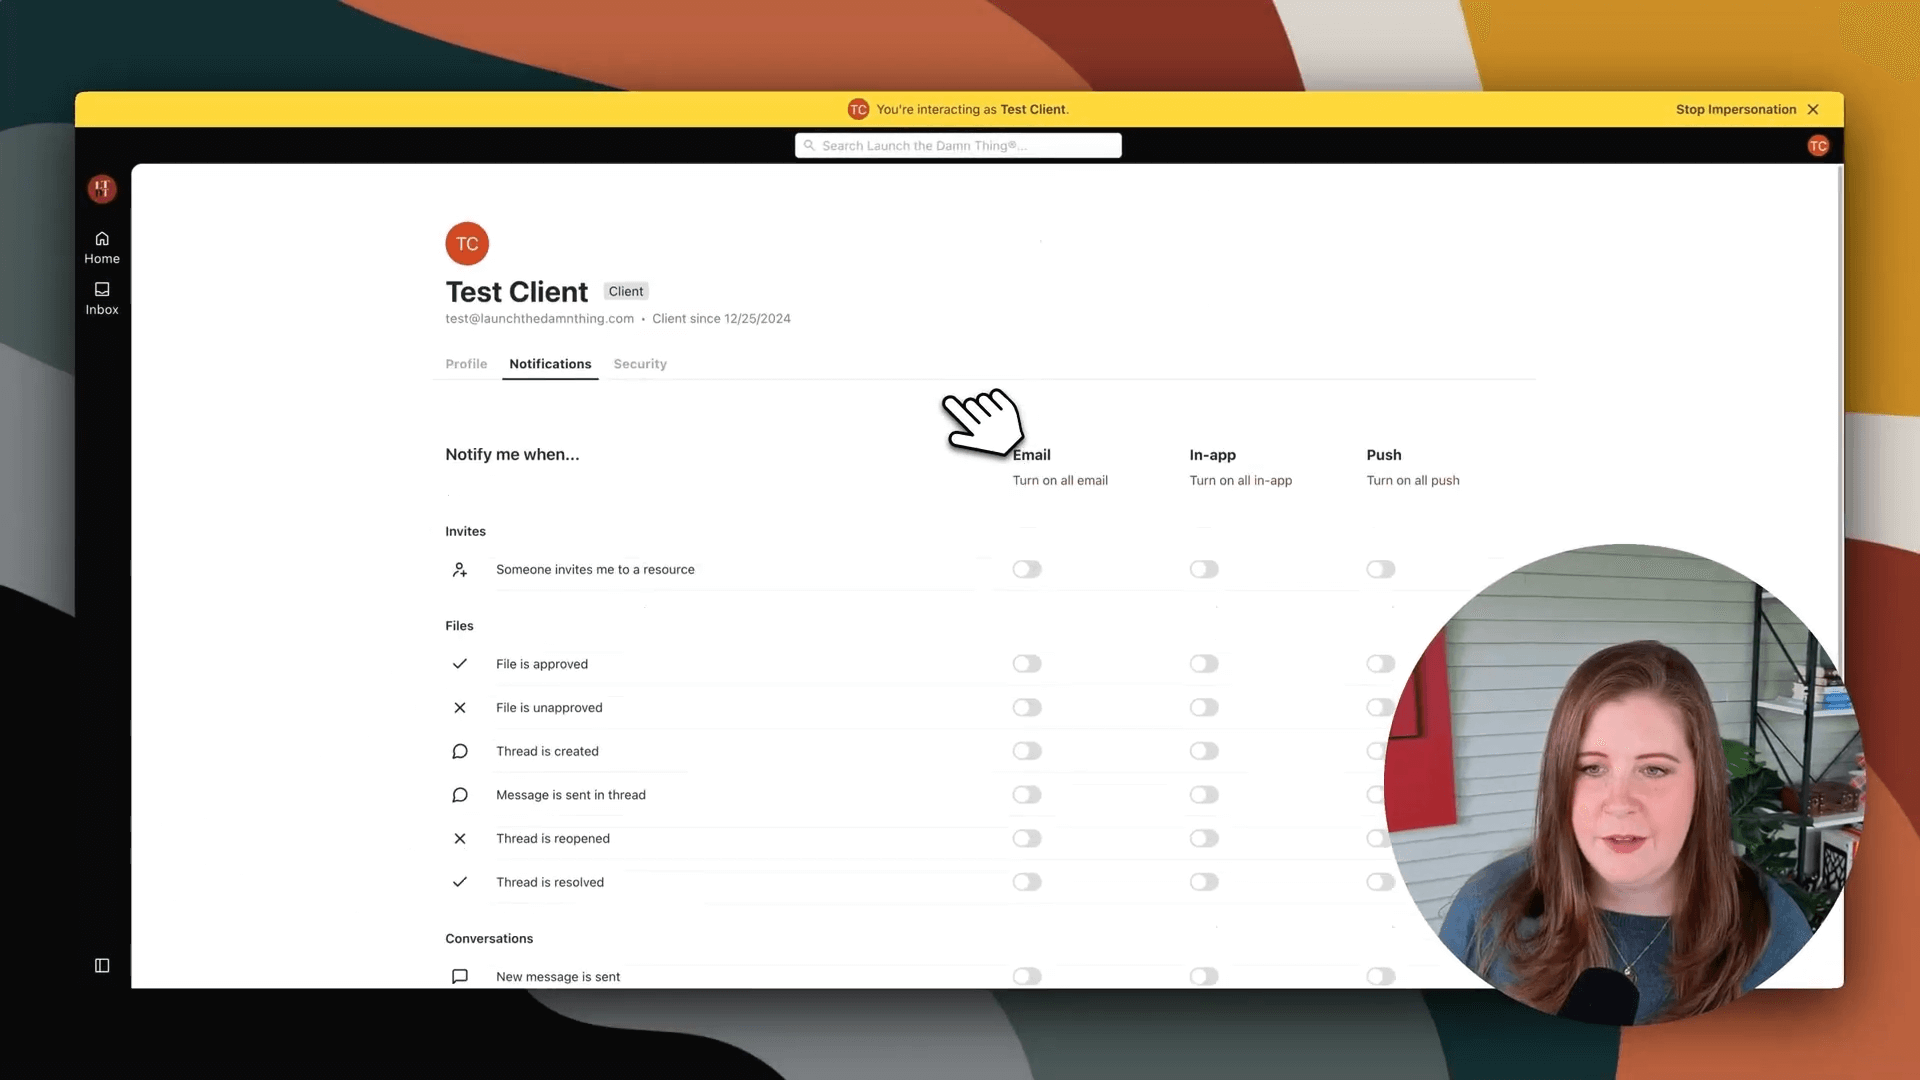
When I'm acting as the client with this impersonation feature, I'm literally seeing everything as them. So I go to their profile icon in the top right corner while impersonating them, click on Notifications, and turn EVERYTHING off. I make sure all toggles are off before switching back to my own account to customize the rest of the portal for them, by assigning due dates & tasks, etc.
Assigning Tasks & Adding Helpful Links
Now, with their notifications OFF, I can assign all their tasks without bombarding them with notifications. Before doing this though, I'll delete any tasks that aren't relevant to this specific project. For instance, if they already have a website that we designed last year so we're just adding new stuff to it and I'm still an admin on it, I'll remove the 'share Squarespace login' task so they see less overwhelm.
After assigning tasks, I take it a step further by adding direct links to relevant folders in the task descriptions or custom fields on tasks (where applicable):
Go to the brand assets folder and copy the link from the page menu
Return to tasks and edit the description
Replace the generic text with a direct link to their specific folder
Repeat for photos, videos, and other important resources
This extra step makes everything so much easier for clients to get around in the portal, because they won't have to hunt to find what they need when they need it. It takes a few extra seconds for us during set up, but creates a much better experience for our clients.
Turn Strategic Notifications Back ON
Once everything is set up, I go back into their profile through impersonation and turn on ONLY the strategic notifications that matter for my process:
When someone invites them to a resource
When a Thread is created
Message is sent in thread
New message is sent
Task is due
I deliberately avoid turning on "mentions" because it's too easy to get duplicate notifications that way, and unlike with Notion, @mentions (tagging people) aren't necessary in order to get notified about changes because there are other options which can trigger notifications. The goal is to give them minimal in-app notifications, minimal browser alerts, and minimal email alerts—notifying them only about the most important things.
You should test this setup yourself to see exactly what notifications clients will receive, and take note so you can repeat what works best for you & your process.
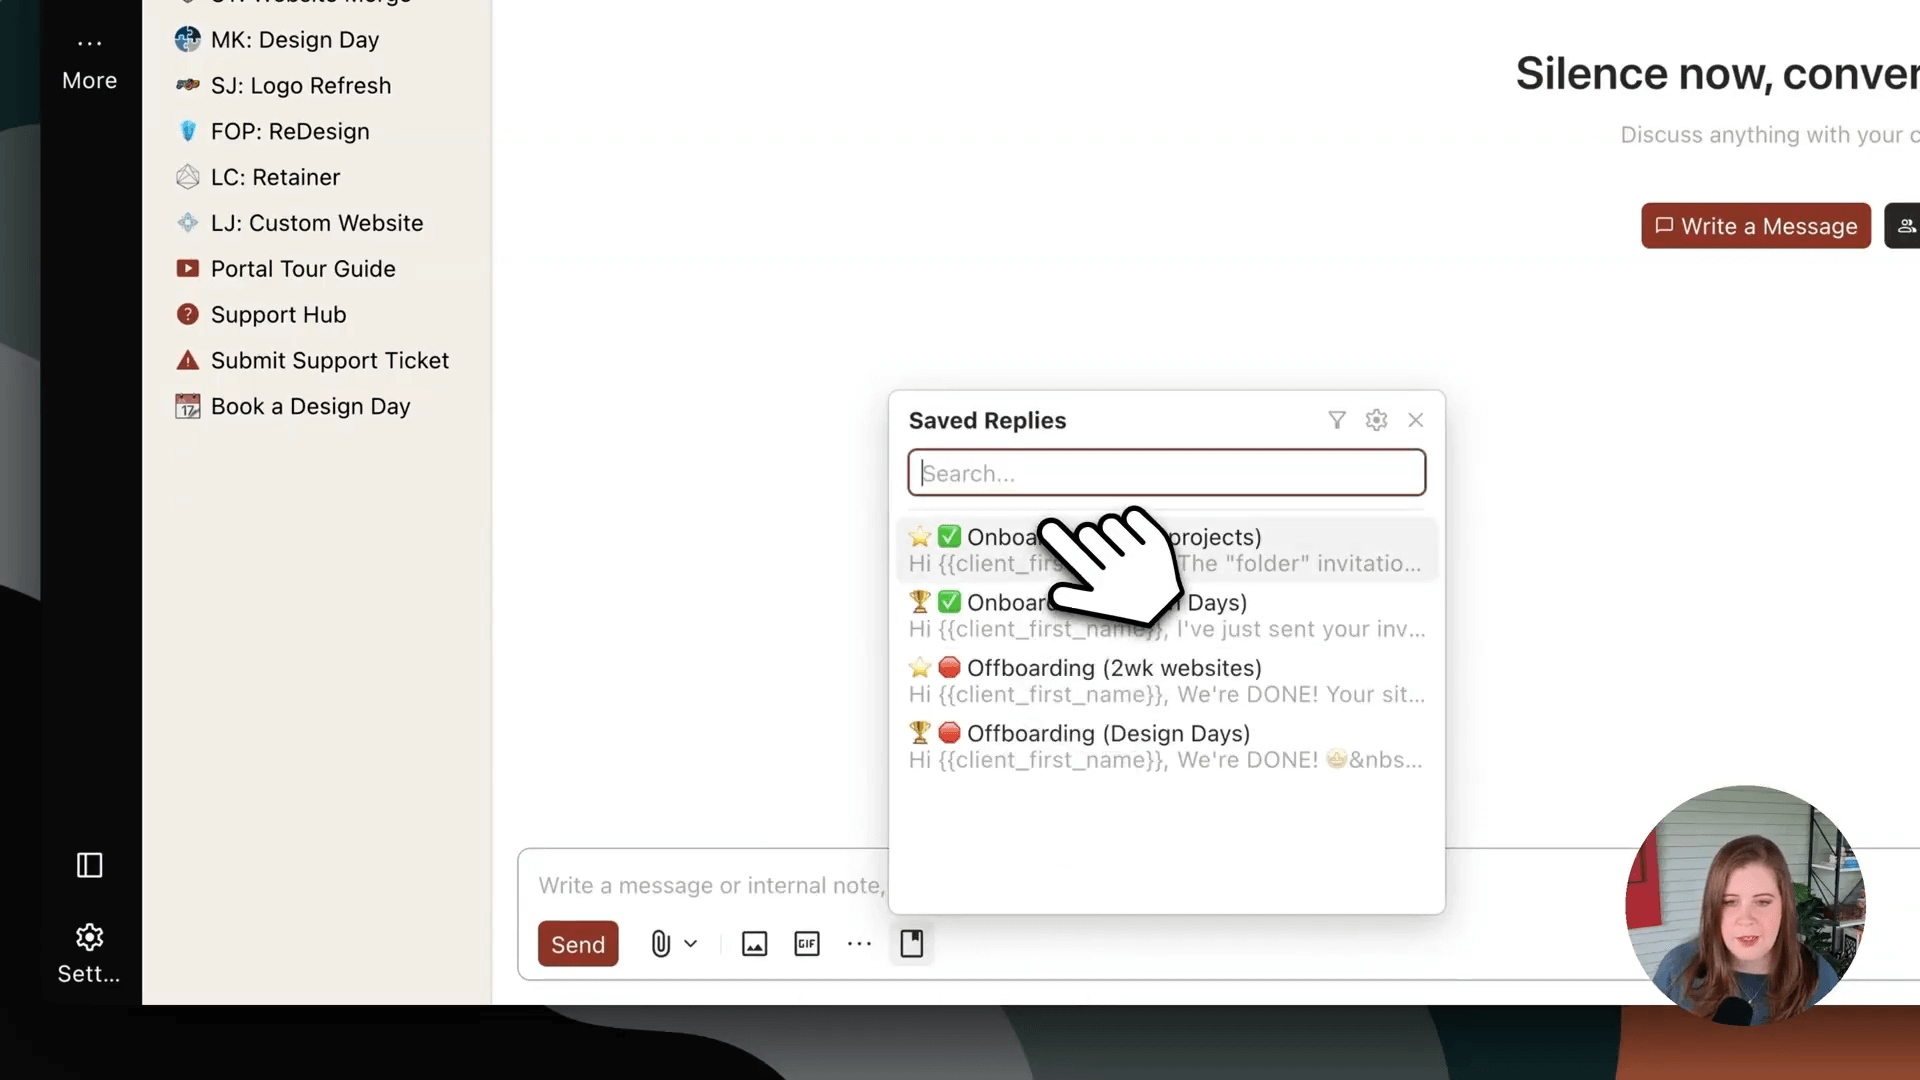
Sending Your Onboarding Message
The last step before I finish the setup process, is sending an onboarding message. I look at my saved replies and pick the pre-written email that matches this project type. Then I'll customize it with their name and project details before hitting send.
When clients receive this email from Kitchen*, they get a notification that I've send them a message, which includes the complete message with all the links to tasks, messenger, files, etc. and tips for using the portal.
All those links I added earlier while editing the onboarding message now become incredibly useful! Clients can click directly into specific tasks, the messenger, or files without hunting around, –right from their inbox. They can also click to view the conversation, which takes them straight to the messenger in the portal.
If they respond with a message, like "Great, thank you so much!" I'll get a notification inside the portal showing their reply in the Messenger & in an emailed copy in my inbox, —even if they responded to the emailed notification rather than through the Messenger in the portal.
Kitchen also shows a little email icon to indicate when messages were sent via email versus through the portal, and I can also see exactly when clients viewed messages thanks to the little eyeball icon that shows the date and time they looked at it.
Process Recap: the entire system in about 10 minutes!
So that's basically all there is to it!
My easily repeatable process is:
Use my CRM to book the project, take the payment, get the contract signed
Go to Kitchen* and use my template to create a new project folder
Edit the template as much as possible first
Invite the client to the project folder
Turn ALL of their notifications off
Set up everything they need access to (assign tasks, etc) that you couldn't do until they were in the portal with you
Turn strategic/select notifications back on for them
Use a pre-written onboarding message template to send them a welcome message from the Messenger page
Link up everything in the message that will help them find whatever they need access to
Hit send and I'm DONE!
It actually doesn't take that long, and the experience for clients is really simple, easy, and streamlined. They don't know (or need to know) that I'm using Asana to manage my own tasks, Dubsado to book projects and manage client relationships, and Kitchen to collaborate with them during the project. It all looks seamless from their perspective.
Try Kitchen* for FREE!
Hopefully that's helpful to see exactly how this process works from start to finish! Maybe it even gets you excited about trying Kitchen for yourself. 😃
They do currently have a free plan (as of posting), though that may or may not change in the future, but you can always try it for free on a free trial if it disappears! If you love it, make sure you take advantage of their lifetime payment option. (Spoiler alert: you might become a big Kitchen fan pretty quickly. 🤩)
Their affordable lifetime payment option allows you to pay once and never pay again, while keeping access to all these features. Go to launchthedamnthing.com/Kitchen* to take advantage of that offer, which is pretty fucking cool in an age where seemingly EVERYthing is a subscription!
READ MORE:
If you've been considering giving Kitchen a try, check out my Client Portal Systems blog post where I break down different client portal options and why having a dedicated system matters so much for client experience.
LEARN MORE:
For those of you who are already using client portals but want to level up your systems, my Ultimate Client Experience Guide gives you a step-by-step process for creating memorable client journeys from start to finish!
That's all I’ve got today! Let me know in the comments if you have any questions about my setup process or if you've tried Kitchen yourself. I'd love to hear about your experience too!!
Disclaimer: This post contains affiliate links, which means I may receive a small commission if you purchase through my link, at no extra cost to you. I only recommend products I genuinely love and use in my own business. The opinions expressed here are based on my personal experience with Kitchen.co.