How to Use Kit with Squarespace (2025): Complete Setup Tutorial
What's inside this post: Hide
I see this question a lot: "How do I use Kit with Squarespace when Squarespace already has email campaigns?"
I get why people are confused & why this trips everyone up, because Kit works completely differently than platforms like MailerLite or FloDesk. With those systems, you need a separate automation for every. Single. Freebie. delivery.
But Kit has a genius-level built-in feature where you can deliver your opt-in gift directly from the form's settings. No need for multiple automations to deliver all your freebies. And no complex workflows that make you feel like you need a computer science degree to manage your freebie funnels.
One form does all the heavy lifting for you so you can focus on using automations to do things that truly matter.
I've been using Kit (previously called, ConvertKit) for years, and I'm gonna walk you through exactly how to set this up from start to finish. We're talking form selection, design, settings, embedding on Squarespace (or any website builder for that matter), and testing the whole damn thing to make sure it works.
Because nothing's worse than thinking you've got it all set up correctly, only to realize your subscribers aren't getting their freebies. 😬 Oopsie.
Why Use Kit Email Marketing with Squarespace
Before we dive into the step-by-step stuff, let me explain why this combo works so well.
Squarespace is brilliant for building beautiful websites. Like, stupidly good at it. But their email marketing? It's... fine. Basic. Gets the job done if you're just sending newsletters and other very basic use-cases, but if you want to build real email automations, segment your audience, or create funnels that actually convert subscribers to buyers ––or at least convert them to fans, you're gonna hit walls pretty fast. And at first glance, it might look like Squarespace users are limited to the built-in Email Campaigns feature (an add-on subscription cost) or MailChimp which has a direct integration with the 'Newsletter' block, but that's actually NOT your only option! Squarespace works with any email marketing platform, Kit included!
Kit, on the other hand, was built specifically for content creators & small business owners who want to grow their email lists (and hopefully also make money with them). The free Newsletter Plan gives you up to 10,000 subscribers (which is honestly utterly bananas) and one automation, before needing to upgrade to a paid plan.
Compare that to MailerLite's measly 1,000 subscribers limit on their free plan, or FloDesk's 30-day trial for all features or their free plan which limits you to JUST collecting subscribers but not contacting (emailing) them, and Kit suddenly becomes a no-brainer.
Plus, as I said, Kit plays nice with any website builder, not just with Squarespace. You're not locked into using their landing pages (though they're decent if you want them). You can embed the subscribe forms anywhere on your Squarespace site and they'll pull in your site's fonts automatically to match your branding.
It's the best of both worlds—Squarespace's gorgeous design capabilities and Kit's robust email marketing features ––aaaaand you can do all of that for free until you've grown to 10,000 subscribers, if you're just getting started & only need the basics.
Select Grow then Landing Pages & Forms to create/edit a form in Kit
Kit Form Types: Inline vs Modal vs Landing Pages, etc
Inside your Kit account, from the top navigation bar, click on Grow, then select Landing Pages & Forms. From there, you'll be able to set up all your forms AND deliver whatever freebies or opt-ins, per form.
From the Landing Pages & Forms page, click + Create New. Then you'll see two main options:
Forms - These are embeddable forms that you can add anywhere on your site, in one or more areas (per form).
Landing Pages - These come with their own design and their own URL because they work as standalone pages, linked from any linkable thing on your site (buttons, text, images, etc).
For Squarespace users & people who are newer to email marketing, you'll probably prefer the Forms option since you'll be embedding it on your existing website page(s).
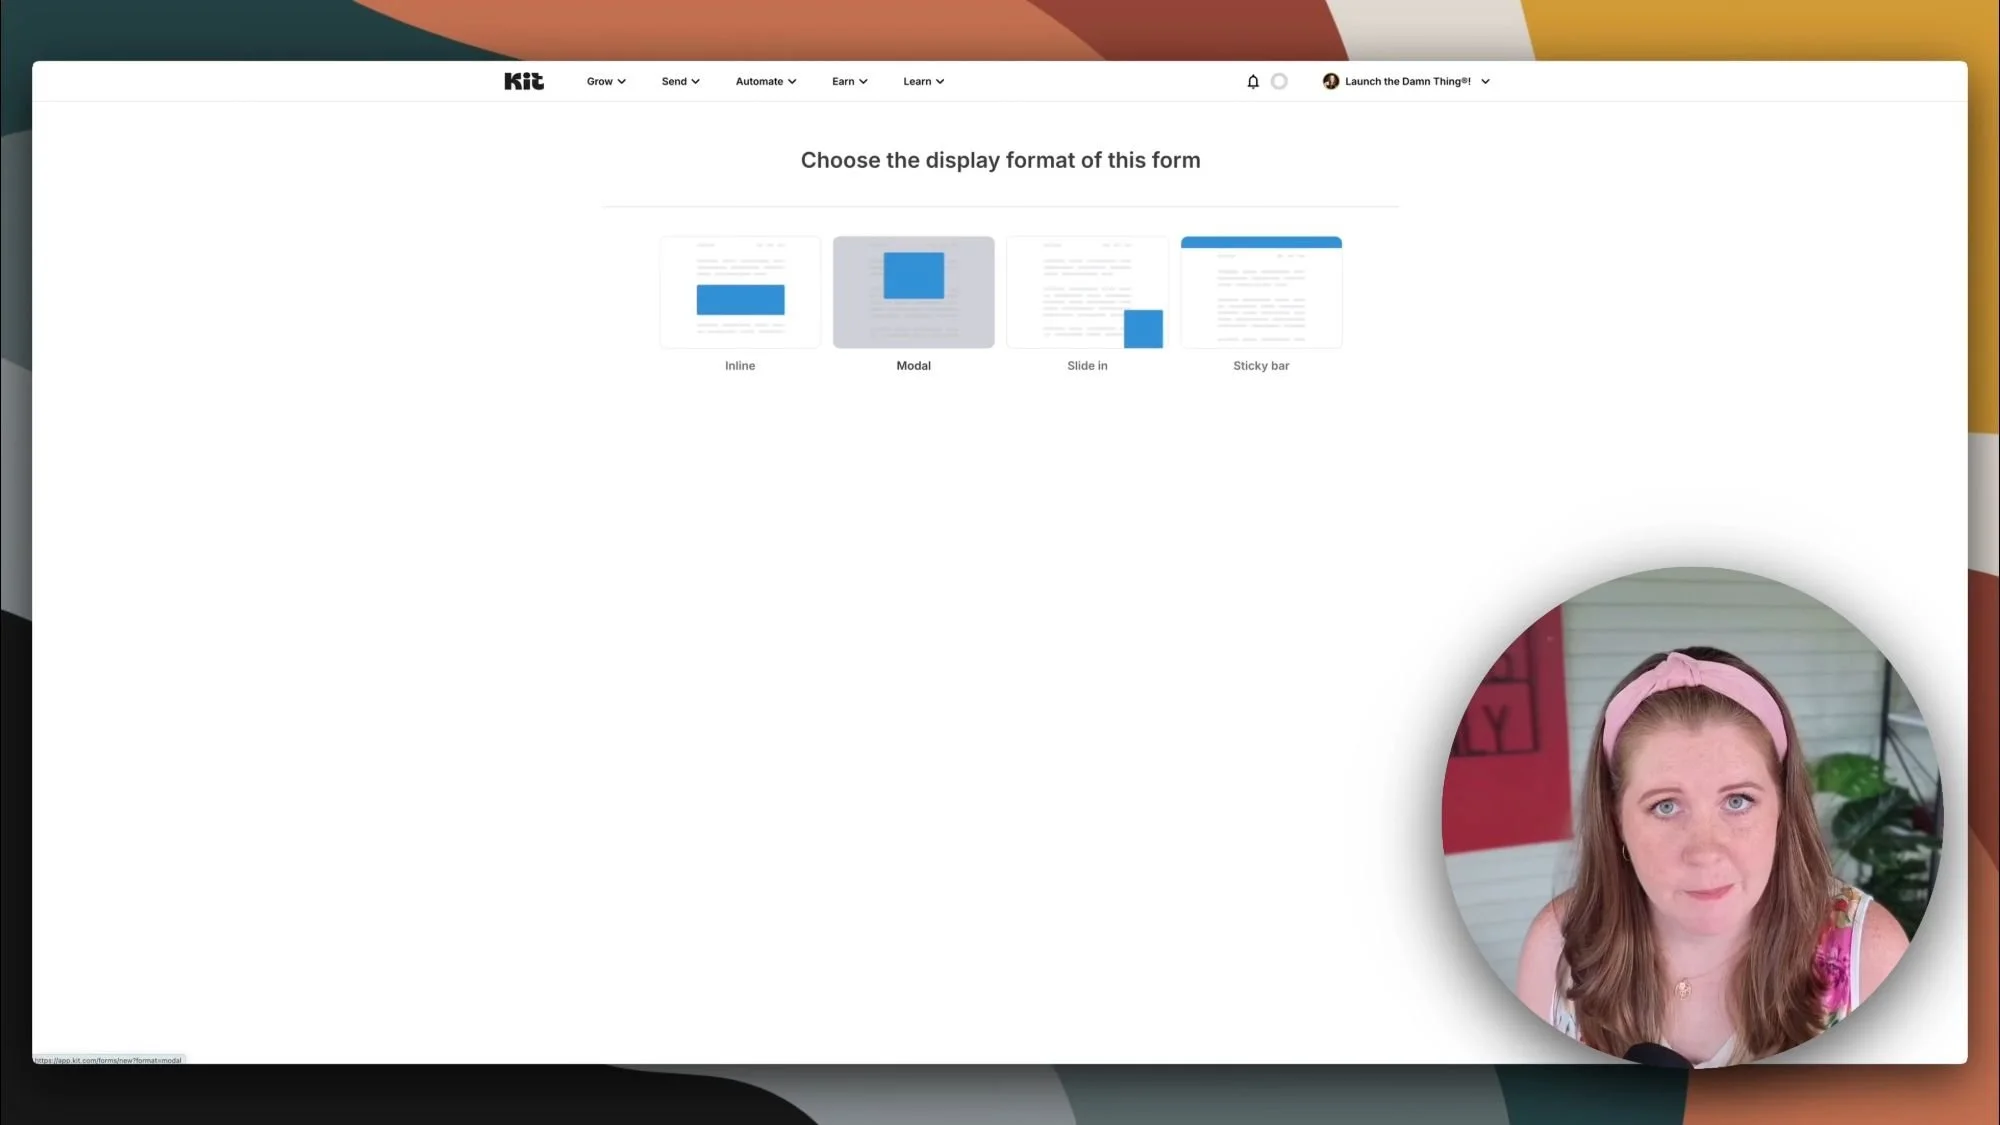
Once you decide on the style of form, then you get to pick what type of form behavior you want:
Inline - Sits right inside your content (blog posts, homepage, footer, wherever you want)
Modal - Pop-up that covers the entire page when triggered
Slide-in - Slides in from a corner (less intrusive than a Modal, but still sort of a pop-up)
Sticky bar - Sticks to the top or bottom of the screen (less intrusive than Modals or Slide-Ins, but customizably visible)
For this tutorial, we're going to use an Inline Form because it's the most popular, and potentially least annoying for our visitors.
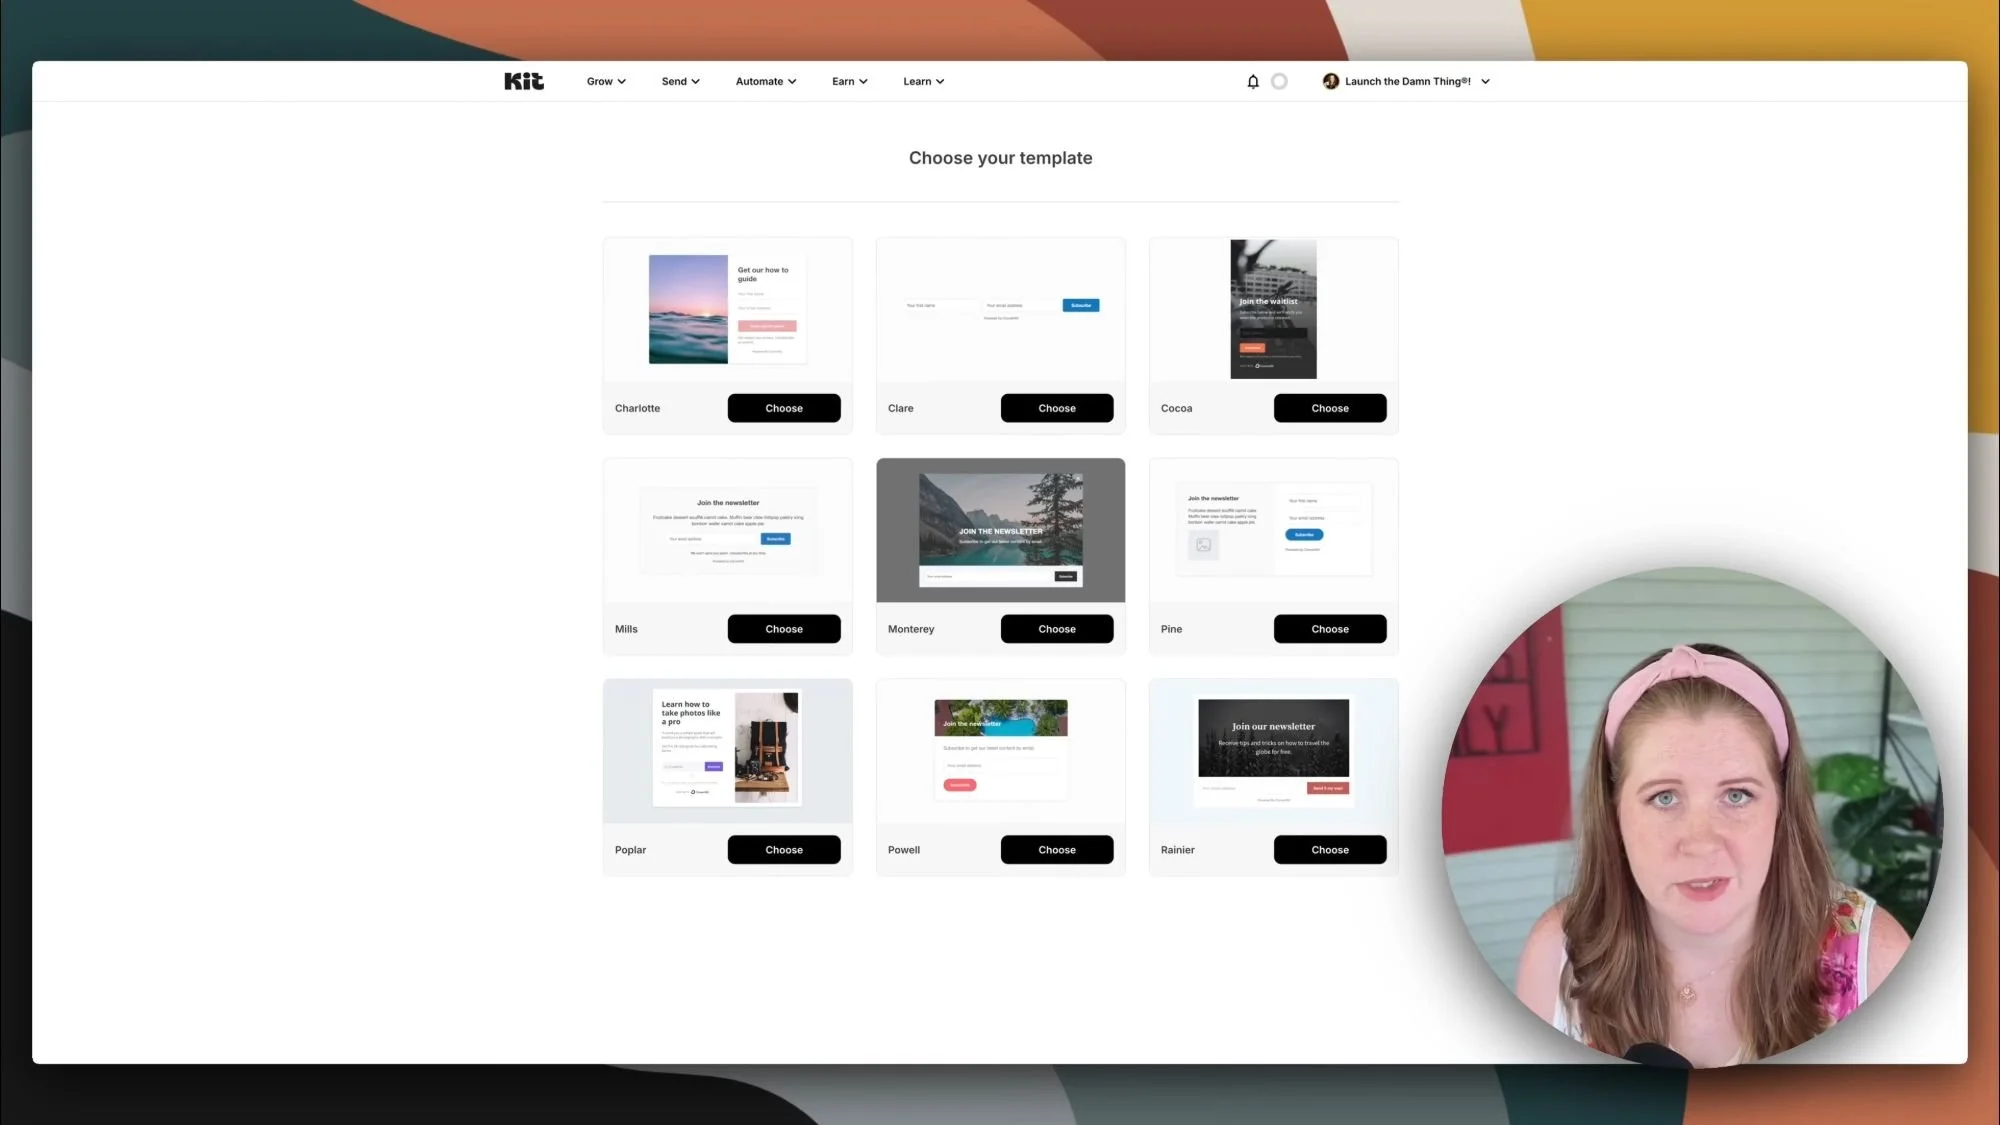
Choose a Form Template Design
Once you've picked "Inline," you'll see a bunch of design template options. They all do basically the same things, so pick whatever gets you closest to what you want it to look like visually.
The one exception is the Claire template (which may or may not still be named 'Claire' when you set this up at a later date), which gives you just the form fields with minimal styling & no other elements (images, titles, etc). This is perfect if you want maximum control over how it looks on your site, because you design whatever goes around/with it and just embed the form fields + subscribe button by themselves, if ya want.
For this example though, I'm picking the Charlotte template because it's simple, uses an expected/familiar design, and it has a nice image + form combo that works well for most freebies.


Where to replace the stock photo image in your Kit form template
How to Design Kit Forms for Squarespace
Swapping the Background Image
First, let's change out that generic stock photo. Click on the image in the design, then look at the righthand sidebar to see what it's settings are. From there, you should see a background section and with a button labeled "Edit" or "Replace." Kit has an Unsplash integration built-in, so you can search for something that actually relates to your freebie ––or you can upload a photo (JPG or PNG) of your freebie if you have one ready.
Pro tip: If using a stock photo, pick an image that matches your brand colors or at least doesn't clash horribly with your website, if you don't have a mockup of your freebie yet. If you want to make a mockup, use Canva!
Writing Copy That Actually Converts
This is where most people mess up. The default text is usually something bland like "Get our guide!" Nope. Not gonna cut it. 🫣
Your headline needs to be specific. Instead of "Get our free checklist," try "Get the 47-point checklist for moving without losing your mind!" or "Download the exact website launch checklist I used to get my first 1000 website visits." See the difference? Specificity works!
Kit Form Field Setup: Name & Email Best Practices
By default, you'll probably just see an email field in these form templates, but I recommend adding a name field too because addressing people by their actual name in emails makes a huge difference in open rates, engagement, click rates, and even conversion rates if you plan to sell things. Wouldn't you rather interact with an email that said, "I'd love to help you with that, Katelyn! Buy X here." vs "I'd love to help you with that! Buy X here." Better with the name, right?! Yep. 🙂↕️😃
Here's how to add it:
Click the circled plus sign ⊕ icon to add another input field
Select "Custom field" in the righthand sidebar
Choose "First name" from the second dropdown setting
Make it required (trust me on this) so people will actually fill it out
Drag it above the Email field, in the preview area to reorder them (& move the Name field to the top, above the email field)
Why first name only? Because asking for someone's full name is unnecessary for this situation so it may feel invasive. You don't actually need their last name to send good emails before they've bought anything from you.
Important: Make sure the Name field comes FIRST, then Email. People are impatient & creatures of habit. They expect these fields to show up in that order. If you flip it, they'll much more likely to accidentally put their email in the Name field and vice versa, then get frustrated when the form won't let them submit it, and maybe give up & abandon the form entirely.


How to Customize Kit Form Button Text and Colors
Change that button text from the generic "Subscribe" to something that matches your freebie. "Subscribe & get the checklist" or "Download the guide + Subscribe" works way better. Using both "subscribe" and some form of CTA works great for transparency, so they know they'll be joining your email list when sign up to get their freebie & the people who confirm are happier to get emails from you.
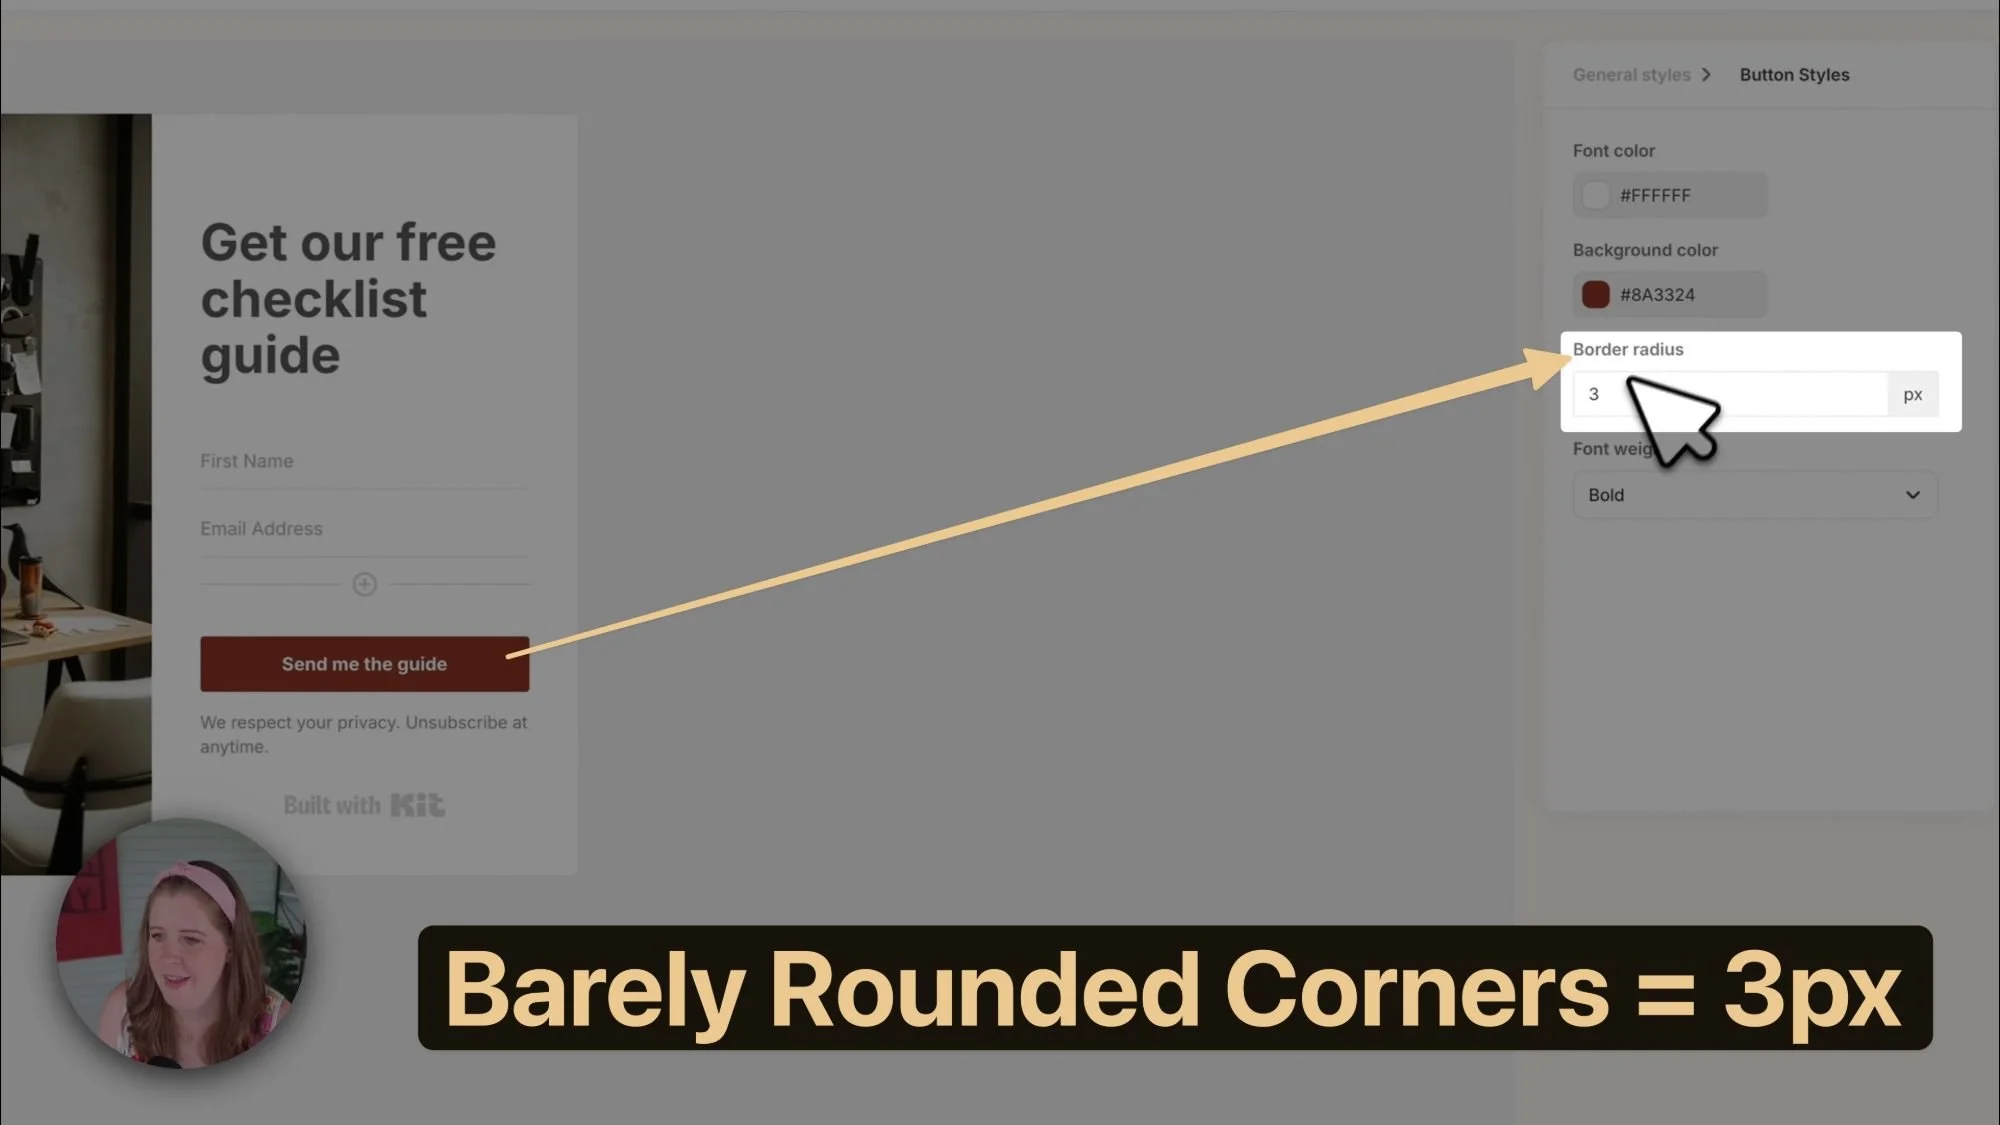
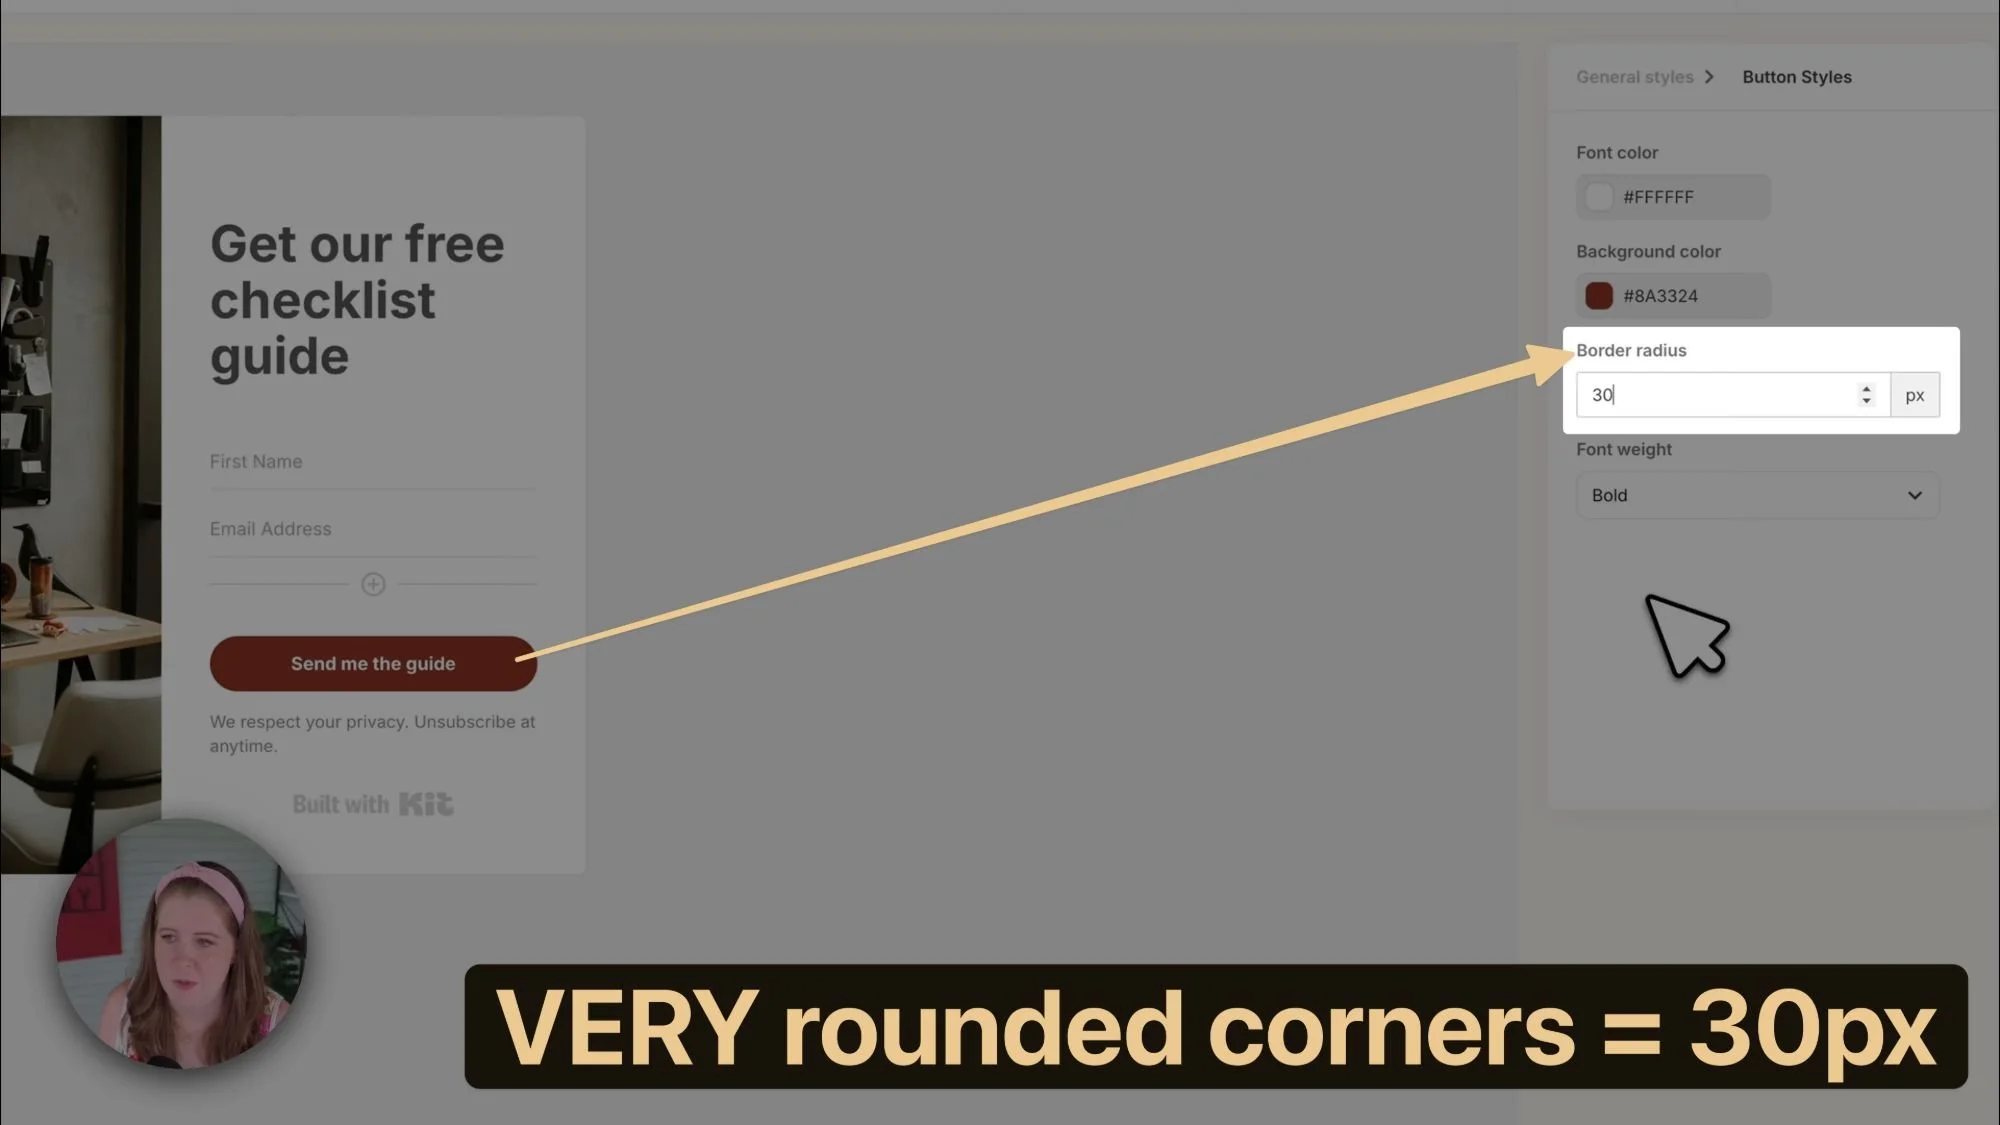
Also, if pink isn't your vibe (it's definitely not mine, despite my cute headband in this post's video), you can change the button color & shape to match your brand. To change the shape from sharp rectangular corners, to rounded, to pill shaped, play with the border radius in the button's settings. The higher the number, the more pill-shaped, the lower the number, the more rectangular.
Standard px (pixel) values for that Border Radius setting are:
0px (sharp corners, rectangle shaped)
5px (soft rounded corners)
30px (large rounded corners, pill shaped)
Remove Kit Branding from Forms (paid plans only)
If you're on a paid plan, you can turn off the "Built with Kit" text by clicking on those words in the form editor/preview side, then unchecking the box to show that in the righthand settings area.
Free plan users are stuck with it, but honestly, it's not the end of the world if you can't get rid of it for a while.
Adding Custom CSS to Kit form styles
Change the ‘ugly’ neon green success message color with Custom CSS
In the form’s General Styles panel, there is a CSS area where you can add the following code snippet:
.formkit-alert-success {
    background-color: #fff !important;
    border-color: #000 !important;
    border: 3px solid;
    color: #000000 !important;
}
Where to add Custom CSS to forms in Kit
Improve the layout of the input fields + subscribe button with Custom CSS
In the same CSS area of the General Styles panel, add the following code snippet:
.formkit-field {display: flex !important;}
.formkit-field:first-child { display: flex !important;}
.formkit-field:last-child {display: flex !important; }
.formkit-input { display: flex !important; }
@media screen and (min-width: 800px) {
.formkit-field {
margin: 0 5px 15px 0 !important;
flex: 1 0 20% !important;
}
}
2 examples of flexible layout for Kit input fields with Custom CSS applied
Where to access the Form's Settings in Kit
Kit Form Settings: How to Deliver Lead Magnets Without Automations
This is the part that makes Kit different from every other email platform, so pay CLOSE attention!
After editing your form's design template, click on Settings from the upper righthand menu, and you'll see a few tabs within a popup. Let's walk through each one.
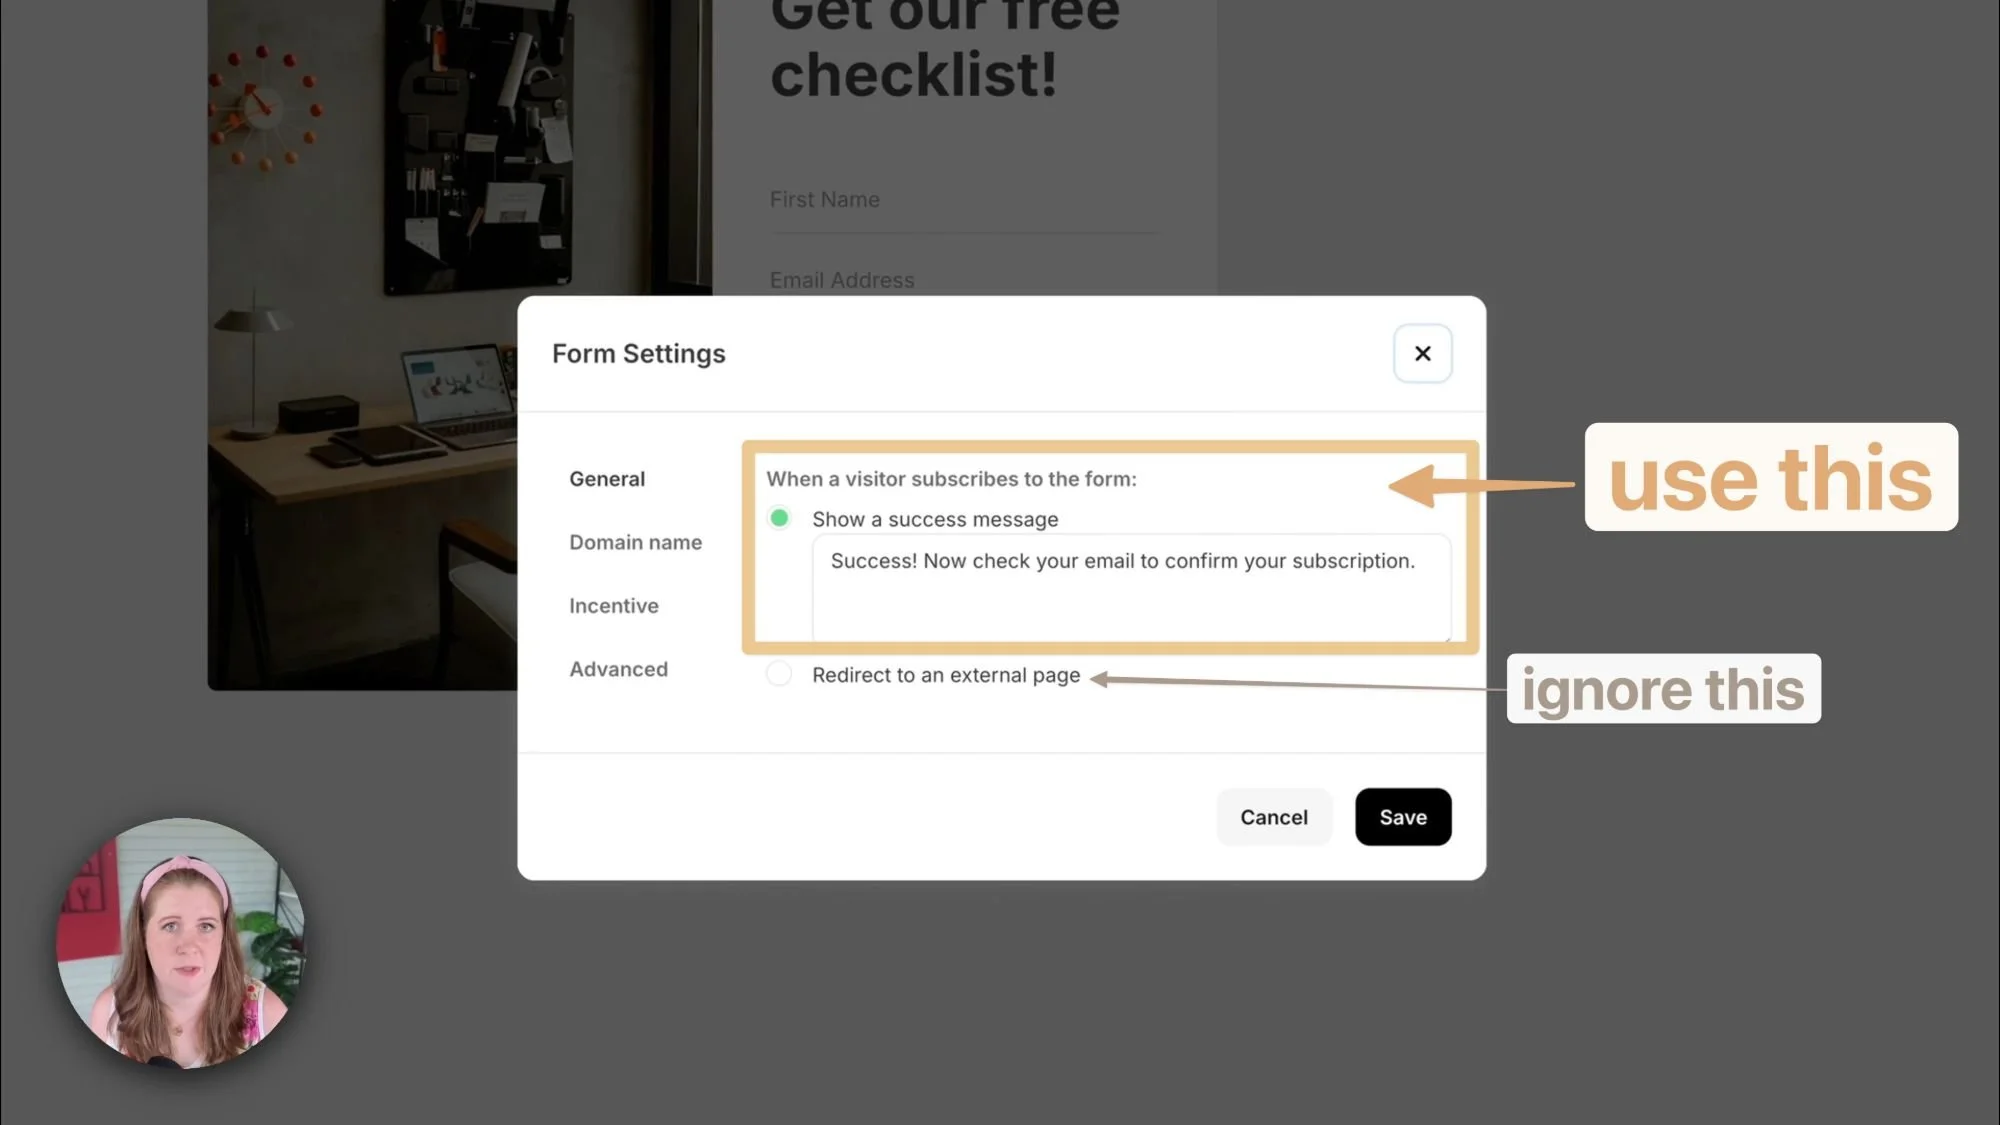
General Settings
Under the success message, change the default text to something more helpful for your potential subscriber. Instead of just "Thanks for subscribing!" try something like: "You're in! Check your email to access your [name or type of specific freebie]." This tells them exactly what to do next and sets the expectation that they need to check their email to get it.
Kit Incentive Email Setup:
Auto Confirming Subscribers (aka: Double Opt-in is OFF)
I’m gonna go against the grain here & tell you why I think you should leave my double opt-in ON in Kit, instead of telling you how to turn it off. 😂
you don’t pay for unconfirmed subscribers bc you can’t contact them until they confirm from the incentive email you're sending via the form's settings
confirmed subscribers have better engagement because they literally CONFIRMed they want to be there; they give you better open rates & click rates, which is better for deliverability long term & for your sales conversion rate if you sell in any of your emails
Double opt-in is HIGHLY recommended for compliance with anti-spam laws; Kit even tells you why they don't recommend you auto-confirm subscriber if you try turning Double Opt-in off in the form settings
the incentive email ALSO confirms the subscribers while delivering the freebie they are opting in for, which is relatively unique as most other platforms I’ve used make double opt-in a literal double (2 step) process; Kit’s form settings give you an option to deliver the opt-in when they click the button in that email, AND ALSO confirms them if auto confirm is OFF, & the URL for the button in the incentive email is the variable code for confirmation: {{confirm_url}}
See Kit's help desk article for more information on the incentive email, or this article about why you should NOT use the auto-confirm features.
Screenshot of example incentive email layout in Kit
Double Opt-in Freebie Delivery
Double Opt-in ON by default in Kit, but it's the way they handle the double opt-in process that made this not-hidden secret a small-but-mighty part of the reason Kit quickly became my favorite email marketing platform. Instead of sending your subscribers 2 emails each time they subscribe AND creating a separate automation to deliver a freebie if someone fills out a particular form, you actually set it all up right here in the form's settings.
Click Edit email contents and you'll see Kit's most basic email editor (they use an older editor for this), but it gets the job done.
Here's what you need to edit in your incentive email:
Subject Line:
Make it clear their freebie is inside. Something like "🎁 DELIVERY: Your checklist is inside!" or "Here's your free guide!"
Email Body:
Start with a friendly generic greeting (you can't use their name here because they haven't confirmed they want to be on your list yet)
Thank them for being here
Tell them what to do next: "Click the button below to confirm your email and access your checklist"
On The Button:
Change the text to something like "Confirm and get my checklist" or "Get my checklist & Confirm"
Here's the key thing to understand—this one email does TWO jobs:
It confirms their email subscription (the double opt-in requirement)
It delivers their freebie
When they click that button, Kit both confirms they want to be on your list AND redirects them to whatever you're giving them. Two birds, one stone. 👏🏻
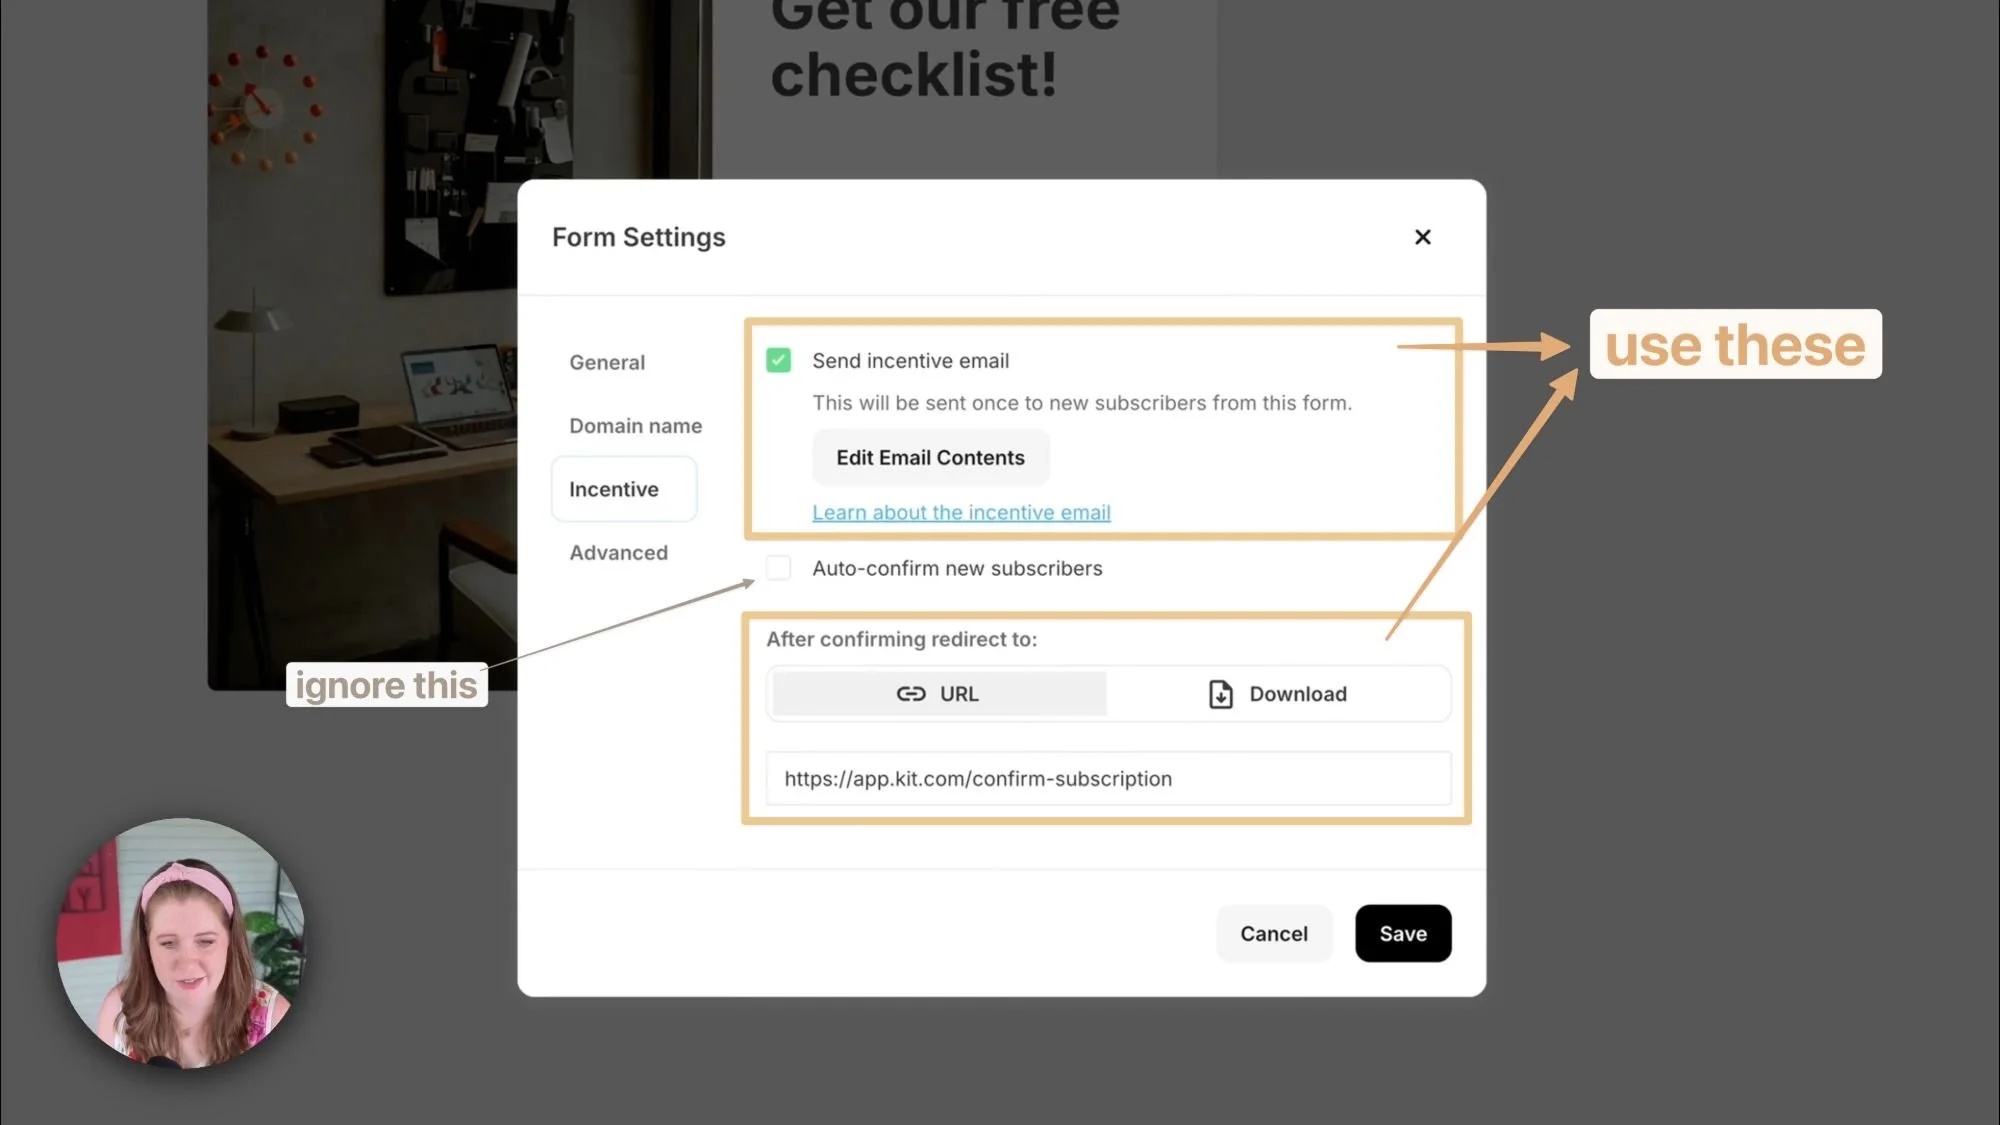
How to Upload Files vs Link to External Content in Kit
After you've written the email, you need to exit the email editor & go back to the form's settings panel, to tell Kit where to send people when they click that confirmation button.
You DO NOT add the link to the button itself in the incentive email!!
DO NOT remove the default link value which should look something like this: {{confirm_url}} ––or your subscribers will have trouble actually confirming their email subscriber status when they click to get their freebie.
You have two options to deliver the opt-in/freebie:
Upload a file: If you've got a PDF, a docx, csv, jpg, or any other file, just upload it directly to Kit. When people click the confirmation button, they'll be taken to a download page where they can preview & download the file.
Link to something: If your freebie lives somewhere else (Google Docs, a Canva template, a page on your website, access to a Custom GPT, etc), just paste the URL here. Again, when they click the confirmation button in the incentive email, they'll be taken to this link to access their freebie.
Kit Advanced Form Settings: Repeat Subscriber Behavior
Under the Advanced tab, you can control what happens when someone who's already subscribed sees the form again.
The default is "Continue to show the form," and I recommend leaving it that way. Why? Because people sometimes forget what freebies they've downloaded. If you hide the form after they've subscribed once, they can't get access to that stuff again if they lose it, or if they've unsubscribed and want to subscribe & download that freebie again ––they can't do that if they can't see the form.
Letting them re-download or re-subscribe is way better (for both of us) than getting emails asking where to download that freebie again.
How to Embed Kit Forms in Squarespace (Step-by-Step)
Now your form is set up and ready to go. Next, let's get it on your website!
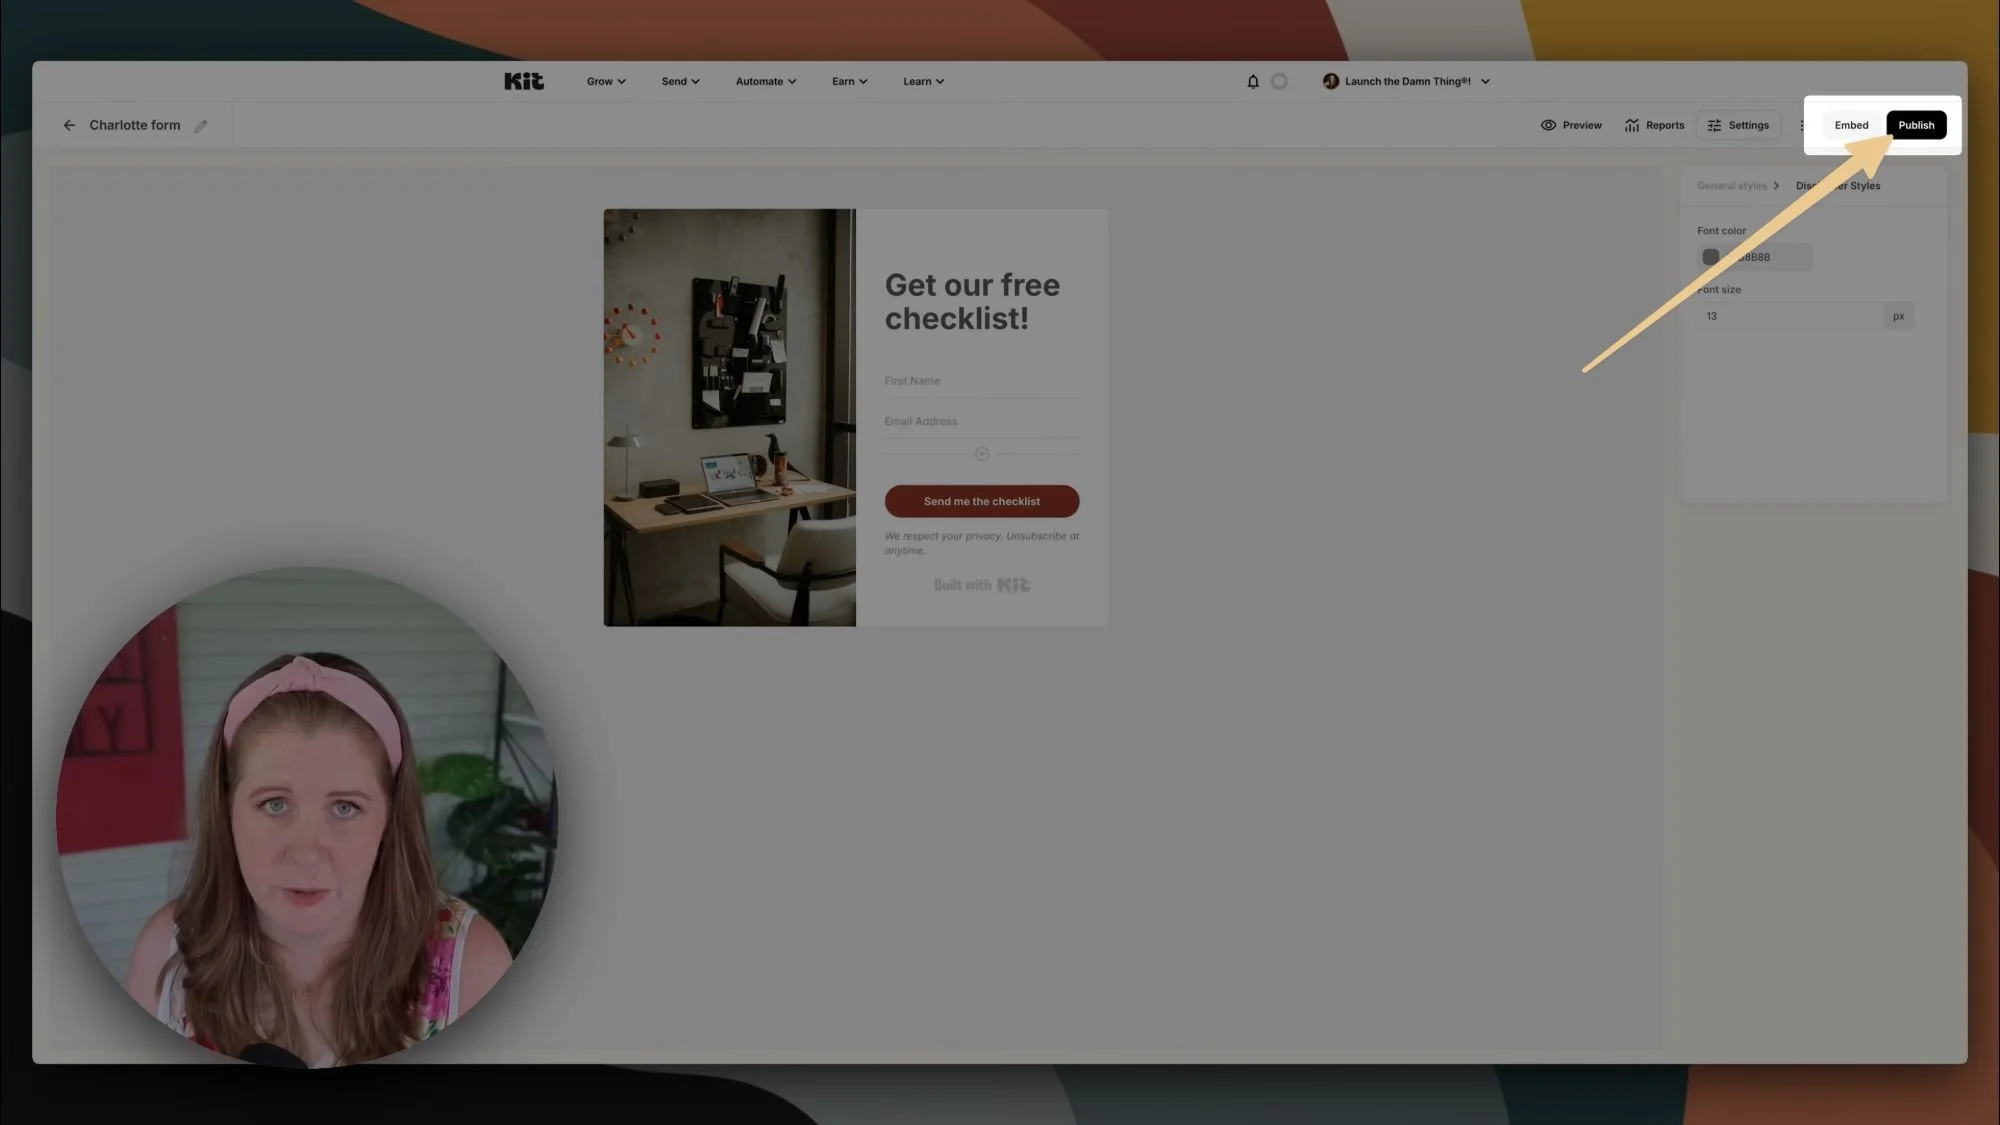
First, make sure you Publish the form in Kit by clicking on the Publish button in the top righthand corner of the form editor. You can't embed it until after you click that button & it's published by Kit, even though the embed button shows up before/to the left of the Publish button, which might suggest you embed then publish. No. Publish first, then embed. You can try it the other way around, but it won't work (trust me; I've made that mistake too!) 🤭
Once it's published:
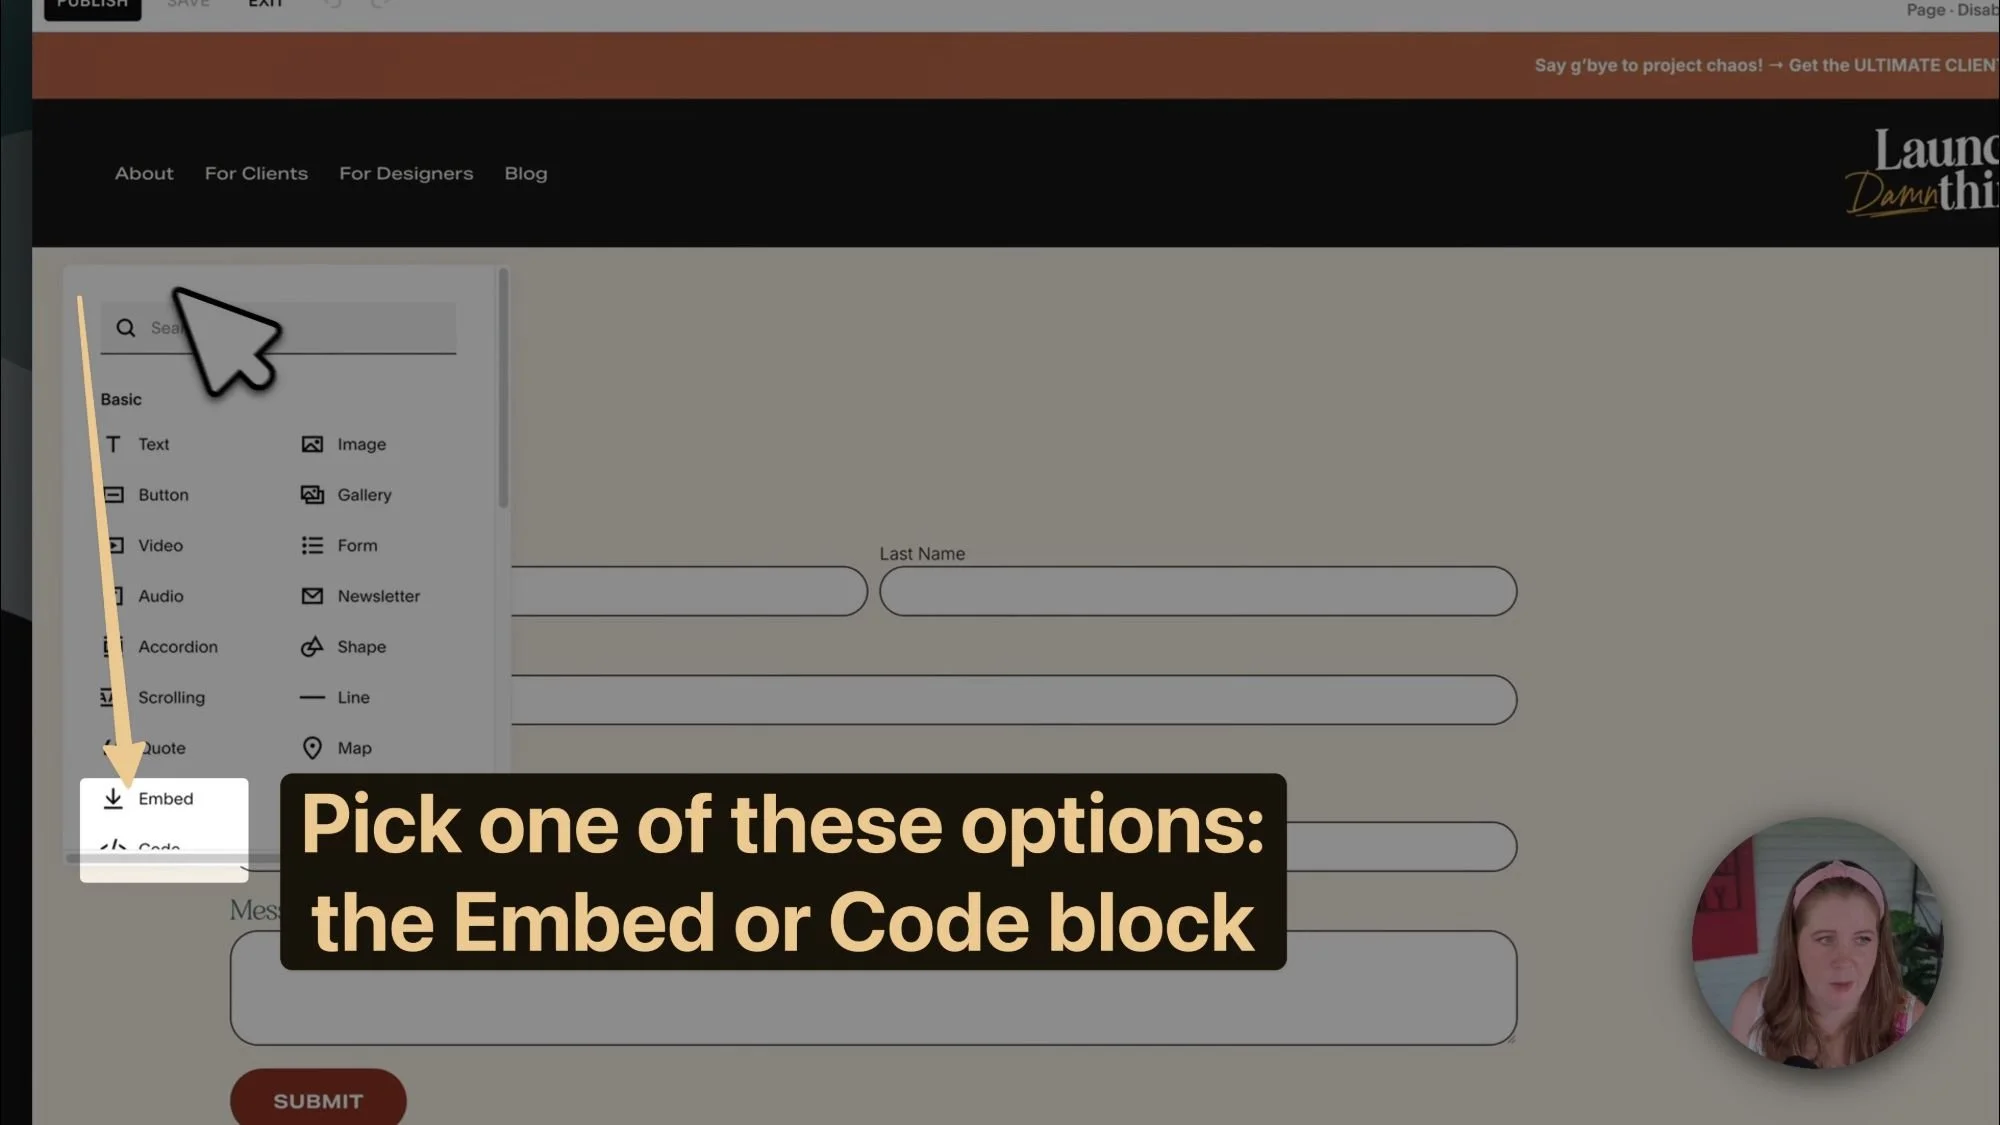
Then you click Embed
Copy the JavaScript code to your clipboard (it'll be the first option, though, any of the option will work if you know what to do with them)
Head over to your Squarespace website
Open the page where you want the form to go, then go into Edit mode for that page
Add a Code Block (or an embed block, either should work)
FYI: Squarespace's new pricing plans handle Code & Embed blocks differently as of 2025; Basic Squarespace plans will need to use Kit's HTML option to embed the forms, Core Squarespace plans & higher can use any option to embed the forms. Learn more about this from Squarespace's current pricing breakdown &/or this Help Center article on Code Blocks.)
Paste in the code
Save and you're done
The form will pull in your site's default fonts automatically, which is why you don't see font options in Kit's form builder. Pretty nifty! 😊


How to Test Kit Forms Before Going Live
Before you announce your new freebie to the world, make sure ya test it to make sure it works the way you expect & the incentive email looks good. Use your own email address (or junk address), fill out the form, and make sure:
The success message appears correctly
You get the confirmation/incentive email
The confirmation button actually works
Your freebie downloads or the link goes to the right place
I've seen too many people skip testing and then realize their automation was broken after 50 people tried to sign up. Don't be that person! 😬
Pro tip for testing:
A lot of people do a couple rounds of testing and then 'run out of email addresses' to test. With more industry-standard tools like Kit, reusing email addresses might mean that the tests don't work if you're already subscribed. If this happens, and if you have a Gmail or Google Workspace email address, you can format your email with +test between your prefix (what comes before the @ symbol) and the domain.com (what comes after the @ symbol). This will give you any number of unique email addresses to test, each of which are 'fake' temporary alias email addresses that will still come to your inbox so you can test the whole process from start to finish. Just make sure that each time you use one, it's different than the ones you've used before, otherwise Kit may think this is an existing subscriber trying to resubscribe.
Some examples:
if my email address is hi@launchthedamnthing.com → then the fake test emails could look like: hi+test@launchthedamnthing.com or hi+test58@launchthedamnthing.com
if my email address is katelyn@katelyndoeswebsites.com → then the fake test emails could be: katelyn+test@katelyndoeswebsites.com or katelyn+omgnotanothertest@katelyndoeswebsites.com
if your email address is yourname@yourdomain.com → then your fake test emails could be: yourname+testanything@yourdomain.com
Kit + Squarespace Integration Examples
Now, let's look at how this actually looks in practice.
Example 1: Kit Inline Form with Custom Squarespace Design
On my blog's home page, I have a freebie for a cheat sheet. Instead of using Kit's pre-designed form template, I used the Claire template (remember that one is just the form fields) and built my own design around it.
I've got a couple of image blocks above the form that shows what the cheat sheet looks like + some text describing what they'd be signing up for, then the Kit form below it. The form could work by itself, but having that visual makes it way more compelling & I got to set it up however I wanted without designing that bit in Kit.
Example 2: Kit Landing Page for General Newsletter Signup
I also have a general newsletter signup form that lives on its own page & has its own link. This one doesn't have a specific freebie though; it's just for people who want to join my list for regular updates & to hear more from me.
Since there's no incentive here, the messaging is different on that one. Instead of promising a download, I'm telling them what kind of emails they'll get and why they're worth reading.
The form also includes checkboxes where people can tell me what they're most interested in. These are set up as tags in Kit, which lets me send more targeted content later when applicable.
Because this form has its own URL, I can't (don't want to) embed it onto my website, but I can link to it from anywhere on my site! So I have a link to it in my Footer and sometimes I have a link to it in 'ads' like this one:
Kit Free Plan vs Paid Plans: Features Comparison for 2025
Here's whatcha get on Kit's free Newsletter plan:
up to 10,000 subscribers (most competitors give you 1,000 or less)
1 automation (perfect for a welcome sequence for new subscribers)
Forms
Basic segmentation
Decent email editor
Better email deliverability
The only real limitation is that you can't remove the Kit branding or opt-out of the Creator Network, but honestly, if you're just starting out and trying to grow your first 10,000 subscribers, those 2 things are a pretty small price to pay, IMHO.
Once you outgrow the free plan, their paid plans are competitive with other robust platforms and you get access to advanced automations, better reporting, and all the bells and whistles you might expect.
Comparing MailerLite’s vs FloDesk’s Free Plans in 2025
MailerLite:
up to 1,000 subscribers
up to 12,000 monthly emails
basic automations
organize your audience (segmentation)
no email design templates
chat & email support for 14 days
paid plans start at $9/mo and increases with the size of your audience
FloDesk:
Forms
organize your audience (segmentation)
access to all usage, brand settings, and form types
can't contact your subscribers until/unless you're on a free trial or a paid plan
free trial of paid features lasts 30-days
paid plans start at $38/mo for email marketing, or $59/mo for all features, including checkouts
or get 50% OFF your first year with my code DAMN50
Check out these posts next to learn more about email marketing platforms:
find out which of these 5 platforms might fit you best (newbie comparison)
get a comparison between FloDesk & Kit (deep dive comparison)
FloDesk vs Kit: subscriber preferences & link actions (advanced tutorial)
Common Kit + Squarespace Setup Mistakes to Avoid
Don't Overcomplicate the Confirmation Process
I see people trying to set up complex automation sequences for freebie delivery when Kit's built-in incentive feature does exactly what they need. Keep it simple! You can use those automation features later for better things. 😉
Don't Skip the Double Opt-In
Yes, turning off double opt-in means people get their freebies faster. But it also means you're not complying with GDPR and other privacy laws, plus you'll potentially get worse deliverability & your subscribers tend to be less engaged (because they weren't there "for you" in the first place; just there for the free shit). The extra step is worth it & Kit makes it easy for everyone.
Don't Use Generic Copy
"Get our free guide" doesn't make anyone excited. Be specific about what you're offering and why someone should care enough to subscribe to get it, download/open it, and actually use it.
Don't Forget to Test
Seriously, test your forms before you promote them! Nothing kills momentum like a broken signup process. Whomp, whomp. 🫤
Keep it simple
Email marketing doesn't have to be complicated. Kit + Squarespace is honestly one of the best combinations out there for creators who want beautiful websites AND powerful email marketing.
The key is understanding that Kit works differently than other platforms & has purposefully made this process simpler. Once you understand that the freebie delivery happens in the form settings (not in a separate automation), everything else becomes much easier & faster.
Now stop overthinking it and go set up your first form! You've got freebies to deliver and an audience to build. 💪
Want to see more tutorials like this? Let me know in the comments what else you're struggling with in either of my favorite platforms: Kit or FloDesk!