How to Schedule Blog Posts in Squarespace
What's inside this post: Hide
📌 Pin it!
Life pulls us in all directions, doesn't it? It can be so unpredictable, especially for business owners & entrepreneurs. Anything we can do to make our business more predictable, for the people who invest their time in us, makes the experience more positive, right?
But I know blogging can be a time suck; I totally get it. Especially when you're first starting out.
To solve that problem, you can batch like-tasks (blogging & posting to social media, for example) & schedule ahead, so that throughout the days/weeks ahead, you don't have to think about it on the day-to-day. Who's got time to post live, anyway???
You've got enough on your plate already; don't add even more unnecessary stress to your day!
Why should I blog, anyway?
Google likes to pay extra attention to sites that stay updated, so kill two birds with one stone! Don't be a stagnant, set-it-&-forget-it website.
Those kinds of websites don't "work" for businesses anymore, especially if your business relies on people seeking you out, or finding you online in any capacity. Trust me, you want your site to do some "work" for you, so you have less to do yourself! Right?
Write blog posts that help your readers learn something from each post, and by doing so, you're updating your website on a regular basis (telling Google you're still relevant!).
You can post daily, weekly, biweekly, monthly; whatever schedule works best for you. Whichever you decide on though, stick to it and promote each post on your other platforms so people can find it! After a while, people will catch on to your routine, and if they want to follow along they'll come back to check for new posts.
But if I blog to share what I know, aren't I giving it all away for free?
Yep! But not really. You've got to remember there are 2 types of audiences for a lot of businesses:
the DIY-ers
the non-DIY-ers
The DIY-ers never planned to pay anyone to do it. They are scouring the internet for free places to figure out how to do it themselves. You were unlikely to sell to them anyway!
So, if you want to reach that crowd regardless, help them by throwing out helpful tips on your blog, so they can learn from you, or create a course to put all that info in one place & teach them how to do it at a discounted price (for not working with you one-on-one).
The non-DIY-ers never planned to learn how to do it, because they either have the capital to blow on paying someone else, or they don't have the time/motivation to learn how to do it.
You can help those folks best by showing them your skills with an all-access pass to your knowledge center (your blog). Some of those readers will read your tips & think, 'Oh, I really don't want to do all that... I'll just pay her/him to do it instead.'
How to create & schedule your blogs on Squarespace version 7.0
First, hopefully you already have a blog page. Go to that page in the backend of your Squarespace website, and click the + sign in the top right of the Blog menu, or press the space bar to get the pop up that adds a blog post to that page.
If you don't already have a Blog page, that's okay. I'm walking you through that too, in the video directly below! Don't worry, getting started is super easy!
How to create your blog page on Squarespace 7. 0
I like to put my Blog page in my Not Linked area, because I have a separate Archives page that I designed and I use that one in my navigation.
If you do this, note that your Blog Page and your regular page with blog stuff on it, will have 2 different page type icons:
Your actual Blog page will have an icon that has a lowercase "a"
TIP: name this one /archives in your URL options
example of full URL: www.example.com/archives
The blog home that you may create will have a blank document icon
TIP: name this one /blog in your URL options
example of full URL: www.example.com/blog
That separate Blog Home page allows me to control how the page looks, and I can add categories, sections by year posted, and a search bar, among other things. (To see an example, you can check out my blog home here, if you didn't get here from that page.)
READ MORE:
How to set up Blog Archives on Squarespace
How to create categories with icons on Squarespace
Don't forget to go back and add the necessary page title & description in the Blog Page Settings! That will tell Google what this new page consists of, and helps it categorize your site better.

This is the Settings icon for pages. When you hover the link to that page in your Pages menu, or up in the right corner of the Blog Page menu when you're on that page.
7 steps to create & schedule your Squarespace blog posts
7 steps to create & schedule your blogs on Squarespace 7.0
Click the + to Create the New Post
Give the New Post a Name!
Add your main image for the post (you can Save & add more content later, or do that here if you want)
Add relevant tags (this helps keep your blog organized; it also helps you link to your blog content elsewhere on your site if you create a tag with the name of your blog post)
Add relevant categories (for example, this blog is in the Squarespace category)
Click "Draft" near the bottom right, to Schedule the post & pick a date you want it to publish for you.
Then Click Save!
Whether your post is published or not, you can always go back in & edit the contents.
One thing I will note here, is that if you use this window to create your blog post, your styling will look a little odd. Don't worry, it won't look that way when Published.
If you want to design your blog & see the styling correctly as you go, then just do the basics in this window, click Save, then go back & edit it on the preview page, as you're used to doing.
That means, click on the blog post you want to edit in the left-hand menu, then find & click the dark grey "Edit Page" button on the page preview side. Now you can edit the contents & see the styling as you go.
For further blog options, click on the other tabs at the top of the Edit Post page.
Content lets you create the title, body copy & imagery inside, tags, category, and other basic settings.
Options lets you add the blog post thumbnail image, change/edit the URL for that blog post, add an excerpt if you want to use one, and more.
Location isn't usually relevant for most bloggers, but if you're a travel blogger then you could list the location from where you're posting (for example).
Social is where you can choose what outlets you want Squarespace to push the blog post to, when it Publishes. You can turn those on & off here.
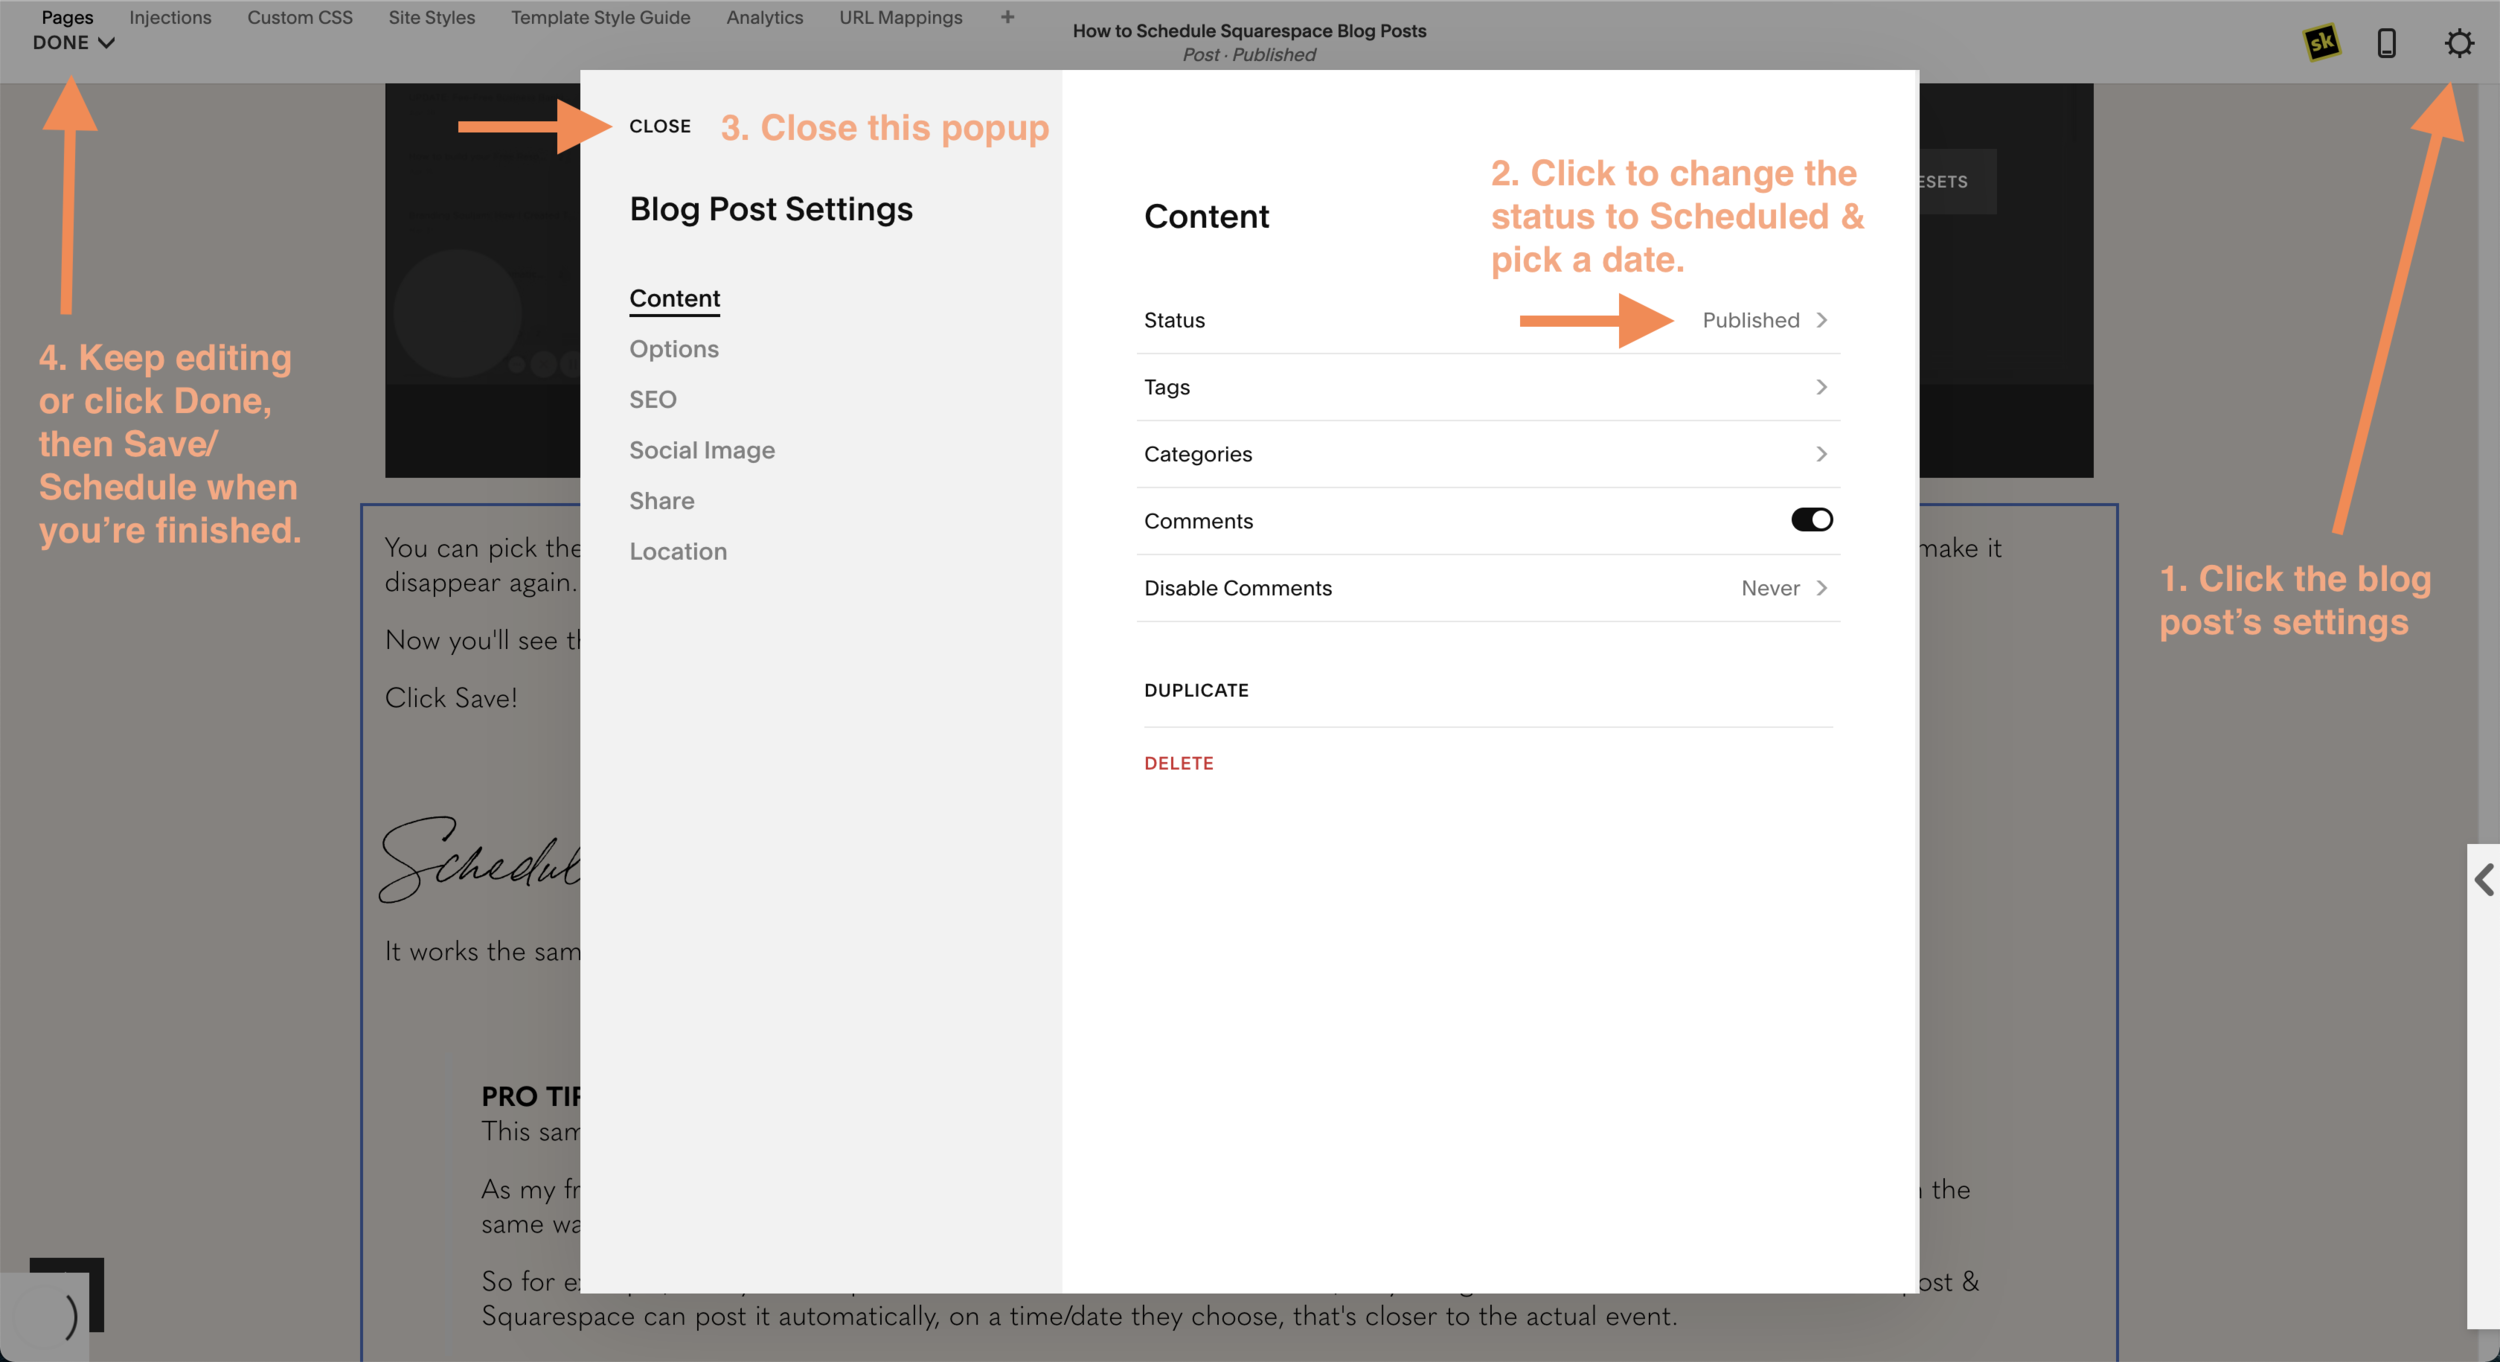
Choosing a Publish Date on Squarespace 7.0
You can pick the month, day, year, time, and AM or PM in this window. Once you're done, click off of that little popup area, to make it disappear again.
Now you'll see that it says, "Scheduled" and it will list the time & date you set it to Publish.
Click Save!
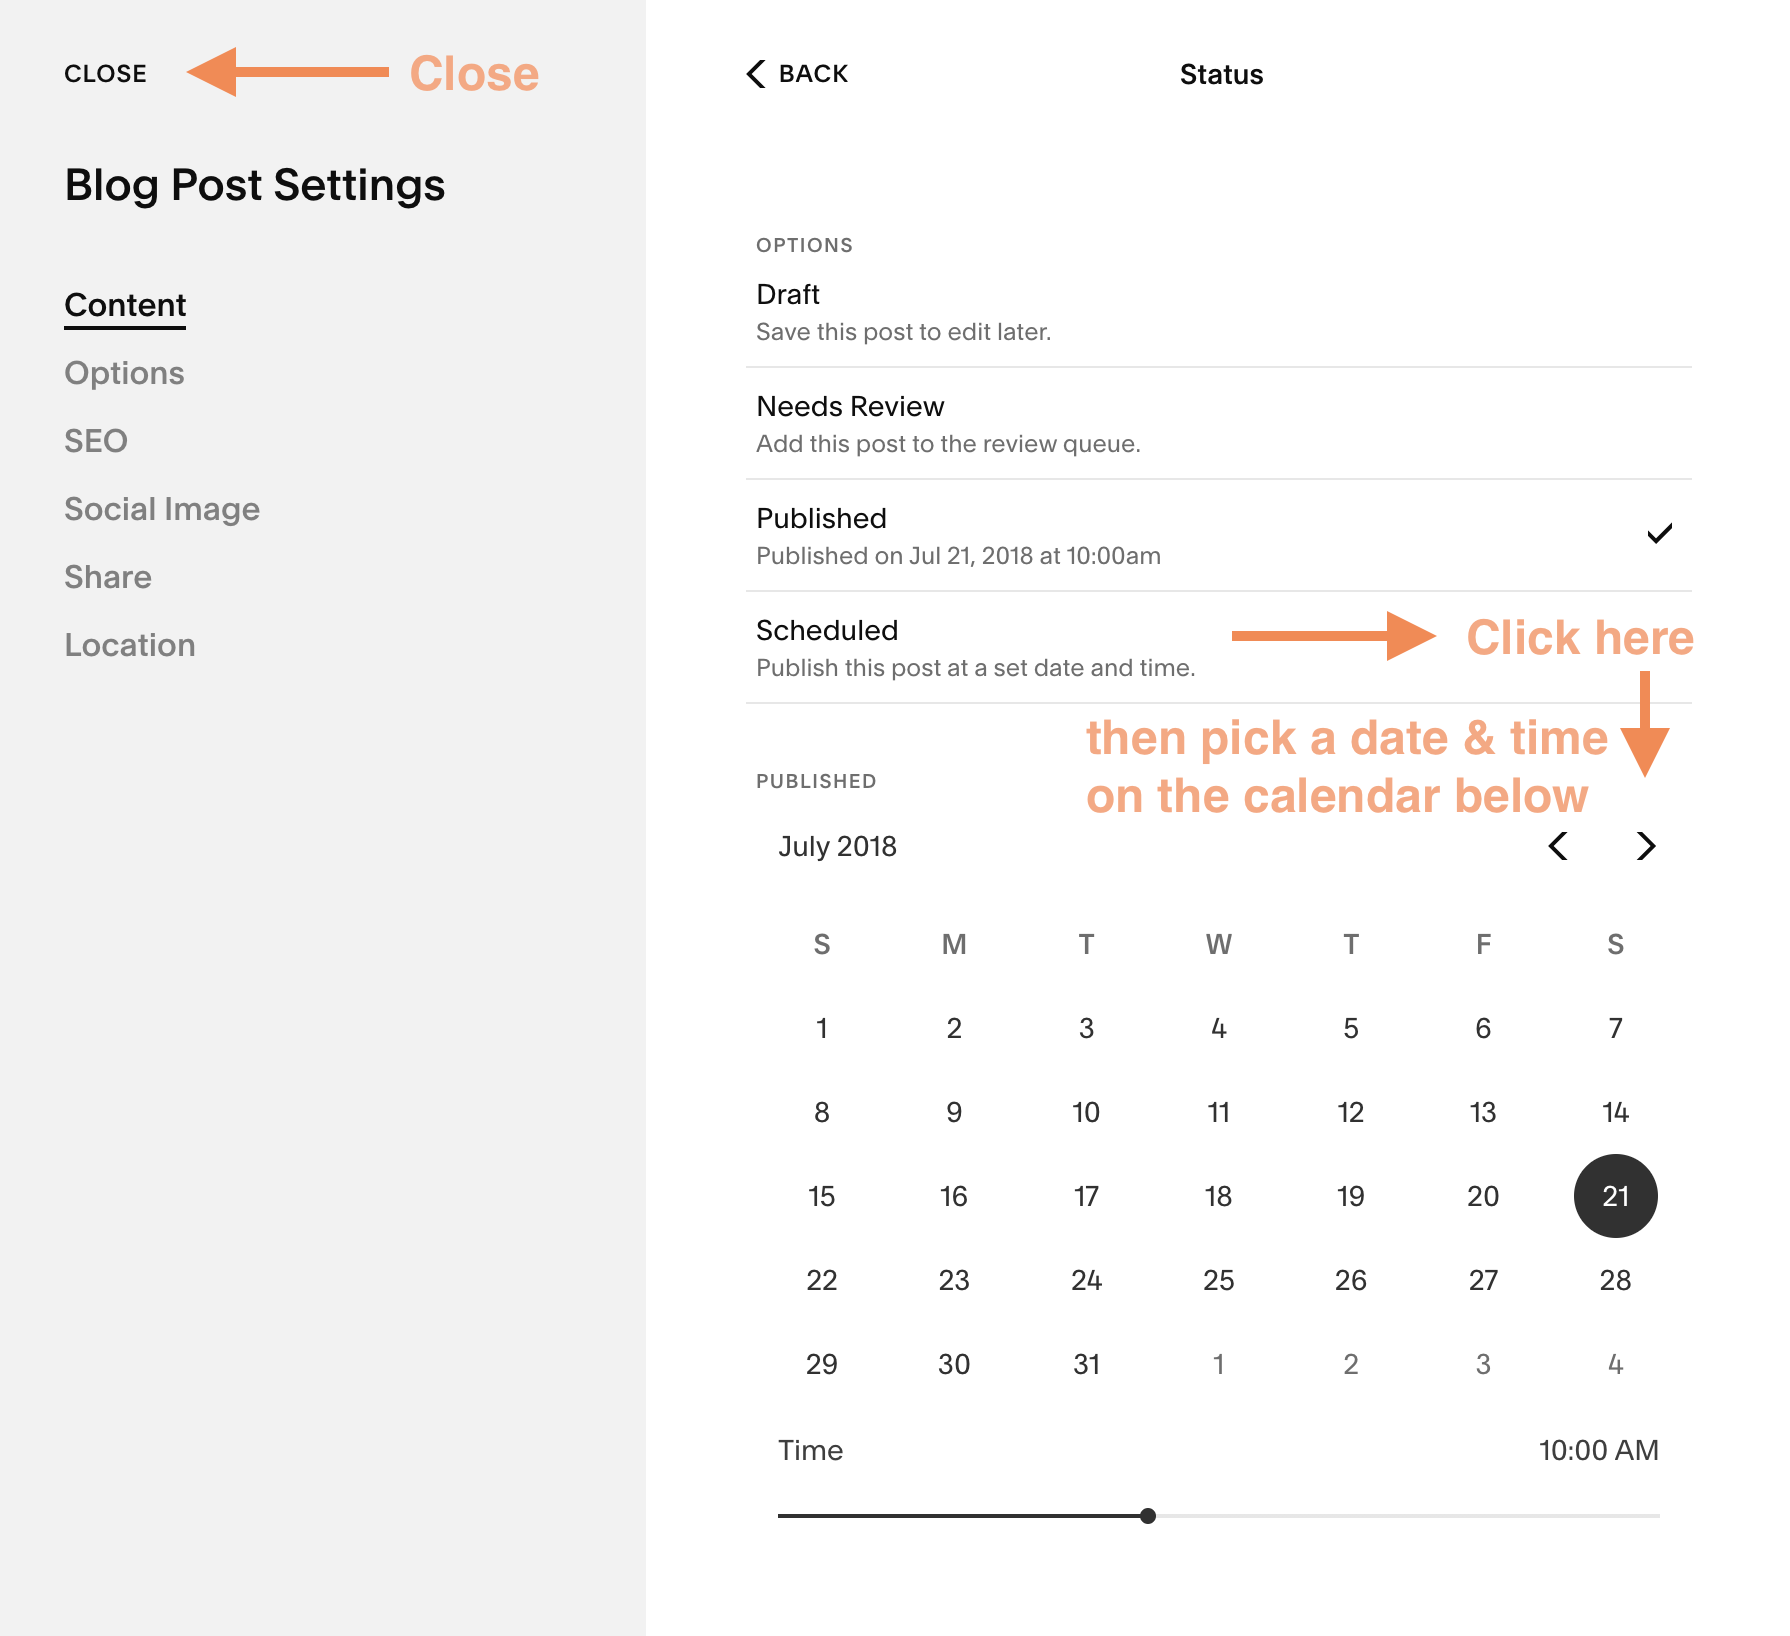
Scheduling Blog Posts on Squarespace version 7. 1
It works the same way as 7.0 but it looks a little different.
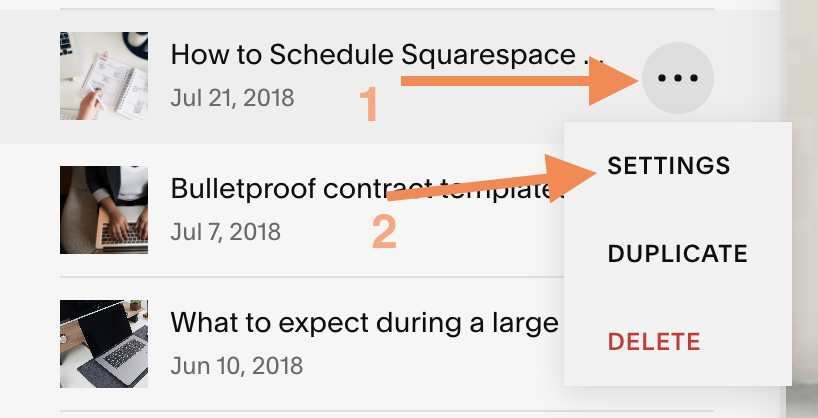
You can quickly get to the settings popup for each post by clicking the ••• button next to any post in the blog post list.
You can also get to settings from within the blog post editor.
Here’s what to click & where. And how to schedule the post from within those settings.
PRO TIP:
This same tutorial works for those who don't blog, but update a schedule/calendar on Squarespace instead.As my friends over at SouljamBand.com, they keep up with a gig calendar and they can schedule those gig info posts, in the same way, I schedule blog posts ahead of time.
So for example, if they book a performance event 12 months from now, they can go ahead & create the event-related post & Squarespace can post it automatically, on a time/date they choose, that's closer to the actual event.
That's all there is to it!
Save yourself time & energy, and batch your blog posts. Use a whole day or two, or a week if you have it and plan ahead; write a few, schedule them ahead of time, and then you'll have some brain space cleared up!
No more stress about when you'll have time to write one & post it, on the day it's due! Who has time for that anyway, right?! You've got enough to think about already!