

How to customize your home blog page on Squarespace 7.1
What's inside this post: Hide
Simplicity is usually king, but when it comes to the default blog page styling on Squarespace… not so much.
Not to mention, the “< Older Posts” / “Newer Posts >” pagination is not super helpful for viewers who are looking for posts on a certain topic, or maybe found a broken link and don’t want to scroll through 5 or more pages of posts to find what they came for.
More than likely, they’ll just get overwhelmed, frustrated & bounce.
BOOM. You’ve just lost someone who could’ve become a fan, a groupie, a customer, or client.
But it doesn’t have to be that way! There are easy ways to customize your home blog page WITHOUT using any code at all, by just thinking outside the bun a little. 🌮
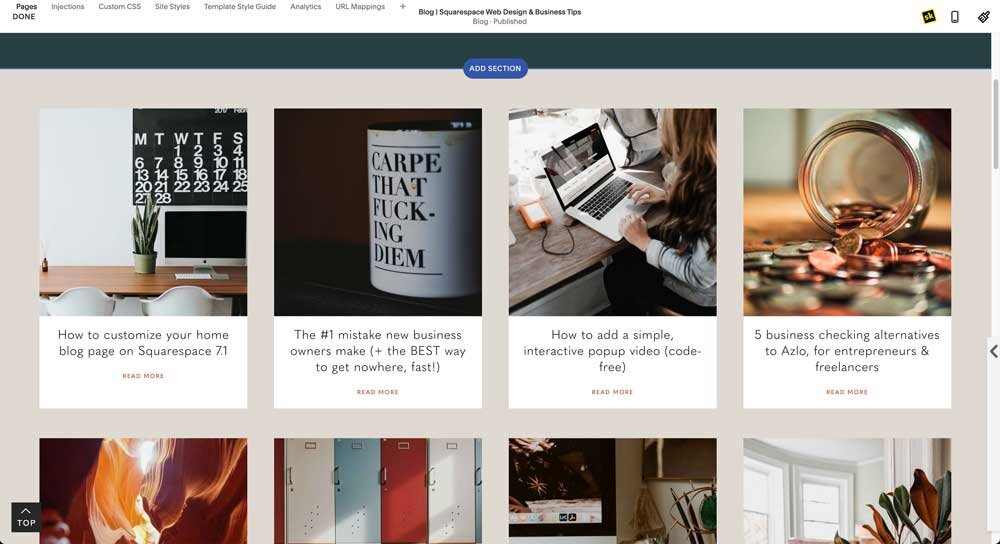
Customize your 7.1 Blog page
Add more sections to your blog page
Did you even realize you could do that?
If you’re coming from 7.0, you likely haven’t even given this option a thought since it doesn’t allow this.
But 7.1 definitely does, and it’s what I’ve done to my own home blog page!
To add a new one you simply go into Edit mode on your home blog page, then hover over the topmost page area.
Squarespace has also changed their UI a little, you might’ve realized, so we’re not looking for that black teardrop insert marker or adding an index page section, which to my knowledge you can’t do on the blog page in 7.0.
In 7.1 you look for the blue pill-shaped button and click ( ADD SECTION ) to pick your new section layout or start from a blank (recommended).
📌 Pin it!
Need some inspiration? Check out my blog home page here.
I’ve added a new section on top of the blog collection area (that’s where my page title shows, my search & filters), and one below it too (that’s where my ‘here’s who’s chattin’ with ya’ blurb is).
Don’t clutter it up. No one likes TOO much information, but adding one or two more sections to the page, if strategically placed, is a great way to make the most of your blog.
Why do it this way vs. using the fake “blog home page” + Summary Block method?
just typing that is confusing (although the implementation is actually easier than just explaining it), and
Summary blocks have a display limit of 30 items, without using a pricey extension (& even the pricey extension only extends it to 100).
It works & it’s a great strategy if ya need it, but it depends on how many blogs you have. If you post more than 30 in a year (that’s about 2x/month), it becomes a little complicated to display all the posts on one page using a series of Summary blocks.
So if you’re on 7.1, you can simply skip the confusion and just add your filtering systems to the section above (or below, I guess, but I wouldn’t recommend that) your main blog collection, –and here’s what I’d recommend adding!
Add elements to help viewers filter your posts easily
If you’re not sure what to add, just think about how you would want to be able to scour someone else’s blog if all they had was generic pagination for ← Older posts and Newer posts → to help you find something specific.
If you’re still not sure, definitely add the following, but also scroll through the ‘add block’ dialogue window to see if there’s anything else that may be helpful to use.
SEARCH BAR
This is a MUST HAVE. Especially if you don’t have one anywhere else on your site. You can use the built-in Squarespace Search block to help viewers filter your blog post content via keywords they choose when they search (which, btw will give you an idea of what your viewers are looking for –ie, more content ideas!), –or you can limit the search to only show your blog posts in the search results.
SHOW CATEGORIES & TAGS
I prefer doing this with Archive blocks these days because they’re really simple to set up. They’re not as necessary as a search block though, because there are other ways to achieve the same result, which I cover in these posts over here:
How to create blog categories with icons
How to organize your blog posts on Squarespace
The neat thing about using Archive blocks though is that the function is built-in and requires no designed buttons, icon images, or extra pages to make it work. Did that just fly right over your head? No worries. Just forget I said anything about that last bit. 😂
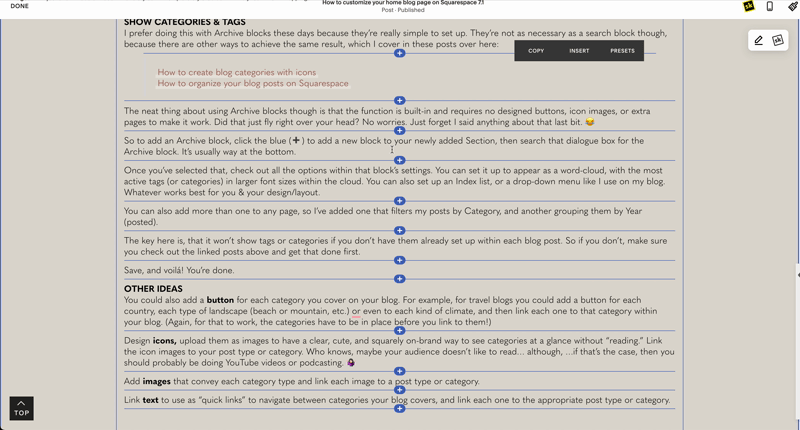
So to add an Archive block, click the blue (➕) to add a new block to your newly added Section, then search that dialogue box for the Archive block. It’s usually way at the bottom.
Once you’ve selected that, check out all the options within that block’s settings. You can set it up to appear as a word-cloud, with the most active tags (or categories) in larger font sizes within the cloud. You can also set up an Index list, or a drop-down menu like I use on my blog. Whatever works best for you & your design/layout.
You can also add more than one to any page, so I’ve added one that filters my posts by Category, and another grouping them by Year (posted).
The key here is, that it won’t show tags or categories if you don’t have them already set up within each blog post. So if you don’t, make sure you check out the linked posts above and get that done first.
Save, and voilá! You’re done.
OTHER IDEAS
You could also add a button for each category you cover on your blog. For example, for travel blogs you could add a button for each country, each type of landscape (beach or mountain, etc.) or even to each kind of climate, and then link each one to that category within your blog. (Again, for that to work, the categories have to be in place before you link to them!)
Design icons, upload them as images to have a clear, cute, and squarely on-brand way to see categories at a glance without “reading.” Link the icon images to your post type or category. Who knows, maybe your audience doesn’t like to read… although, …if that’s the case, then you should probably be doing YouTube videos or podcasting. 🤷🏻♀️
Add images that convey each category type and link each image to a post type or category.
Link text to use as “quick links” to navigate between categories your blog covers, and link each one to the appropriate post type or category.
See? Easy peazy + NO code necessary!
bonus!
Want a more customized solution, try this instead
Get the Universal Filter plugin from SquareWebsites. It’s a one time payment for a custom code snippet, but it’s a functional or feature plugin, –not a just design snippet of CSS.
I should warn you first – this is probably not for beginners, unless you plan to either ask support to install it for you, or pay a pro to install and customize it to match your website’s style.
This plugin uses Javascript, a Jquery library, and custom CSS as the BASE to get it onto your site.
That said, it’s what I use on my blog for the various dropdown filters –and I’ve also put it on multiple client’s websites as well, in shops and on blogs, etc. It’s a phenomenal add-on to the Squarespace blog collection!
This filter can add drop downs for categories, tags, sorting and the search bar –so with this installed, you don’t need the steps I mentioned earlier! Just this one piece. It also works with Summary Blocks and Blog collection pages.
I highly recommend it! But again, it’s not for the average DIY-er or beginner as the installation isn’t super straightforward, especially if you want to alter how it looks at all, immediately following the standard installation.