How to use ThriveCart with products on Squarespace
What's inside this post: Hide
If you’re selling products in Squarespace (or any website builder) and you want more payment options, whether they are digital, physical, services, memberships, or whatever you want to sell, use something like Thrivecart.
It can be tricky to set up, just because the two don’t have a direct connection (ie: the way MailChimp has a direct integration with Squarespace, or ConvertKit & Teachable have with ThriveCart), which makes this process not very intuitive.
If you have Thrivecart, or you're looking at Thrivecart for more payment options because Squarespace doesn't give you the functionality that you're looking for, and you're trying to decide if Thrivecart is the right answer for you, then today's video will help clarify that for you and show you how to link them together with just a few steps!
Because it's not hard, but it's probably NOT gonna work the way you think.
That said, Thrivecart and Squarespace are two of my favorite softwares for online businesses, so on that note, let's quit wasting time and dive right in.
Note: Today’s post works best as a video walk-through, BUT I took a VERY LONG TIME also writing out the whole process with screenshots so you can read it instead if that’s your jam. #yourewelcome 😉 Still, there are some things in the video that just can’t fit on this page –so if you’re prone to FOMO, watch it, don’t read it. 🤣
Why would you want ThriveCart and a website builder?
First, here’s an overview of how this actually works and why someone would choose to use ThriveCart in addition to a website builder with e-commerce functionalities built-in like Squarespace.
Some great basic examples would be if you wanted to
sell something with multiple payment plan options,
or split payment options,
or a subscription on a service, like Members Areas in Squarespace with different options for the same membership based on different payment billing cycles maybe, or something like that.
Member’s Areas (in Squarespace)
With Squarespace, Members Areas can only have two types of payment options, specifically for recurring subscriptions or fixed amount membership pricing, but there are limitations to this & how it works.
Both prices need to have the same structure, meaning either two recurring options or two fixed payment options for the same Members Area.
With Fixed Amount payment options, if you have 1 that’s fixed, the second has to be a series of installments.
You can read more about Members Area pricing in this article from Squarespace.
The only other payment option I’m aware of is to offer the gated areas for free.
That’s not really enough options, in many cases. What if you want to sell a high-ticket service, a semi-expensive template, etc and offer things like:
split pay (the fixed amount spread over X months)
subscription access to an ongoing service or updated asset
half now, half later
pay quarterly, etc.
Squarespace can’t give us this level of payment flexibility, sadly!
But ThriveCart with Stripe &/or PayPal can!
Using ClearPay or AfterPay in Squarespace
It’s the same case in Squarespace’s e-Commerce too, where the products themselves don't have multiple payment options necessarily unless you can link your shop to something like ClearPay or Afterpay or something like that, through whichever payment processor you're using, ––which is heavily dependent on which country you're in and accessing Squarespace from.
Also, it’s important to note that using something like ClearPay/AfterPay with Squarespace is an either/or option. Either the customer uses ClearPay/AfterPay and the default split is 4 payments, ––or they don’t & they pay full price. So, while I’m thankful it’s an option (in some countries) it doesn’t really fill the void in payment flexibility.
Taking payments outside of Squarespace, without ThriveCart
There are a lot of variables, of course, and the ones I’ve mentioned so far are all potential reasons why you might be considering using a different tool to collect the payment for something you're showing or selling in Squarespace.
So the positive about being able to do this, is that all of can be flexible.
You can do this really with anything; it doesn't have to be done through Thrivecart. You can do something similar with tools like:
Dubsado (public) Proposals that can generate an invoice, treated like custom order forms
embedding Gumroad products or checkout links
Generic Stripe/Square/PayPal product links
Shopify Lite’s “Buy Buttons” (embedded)
All of these options –and I’m sure there are way more– will allow you to create something embeddable or linkable for you to share from your website, which will allow people to pay through some external platform.
So it doesn't have to be Thrivecart, butwhat Thrivecart really does well is the entire checkout systemfor a lifetime-access price (no ongoing subscription cost).
What happens when they click to view the checkout page?
What’s the conversion rate? Refund rate? (and other financial stats)
What happens after they purchase?
Do you want customized cart pages?
Do you want to customize carts as embeds?
Do you want to customize cart buttons with a pop-up cart?
Do you need a countdown timer?
Do you have/want to have upsells, bump offers, &/or funnels?
Do you want to easily bring customers into your email marketing to help guide them on how to access/use the product(s)? (without Zapier)
So it's a more robust solution than just linking to a public invoice that will send a generic receipt for whatever they purchased.
Next I’ll actually show you what I'm talking about in each stage and how it can be applied to your website.
How to integrate ThriveCart with Squarespace
QUICK REMINDER:
While I’m specifically showing you how to do this with a Squarespace website, ThriveCart is website-platform-agnostic, –meaning this basic process should also work with most, if not all, other website builder platforms too! Including Showit, Webflow, Wix, WordPress, etc.
I’ll be using my demo site with very little, if any, custom code or installed plugins, so these screenshots (or what you’d see in the video for this post) should be the closest to what you are looking at in your Squarespace website if you follow along.
Example: demo services page
Step ❶
Create the sales/product page where you’ll sell it
I created a page in the not linked section using page layouts and a pre-designed new section layout. Let's say that this new page I just made is a service page where I would like to embed a checkout process so that viewers can learn about this service and pay for it all on the same page without involving me manually sending an invoice or other paperwork of some sort.
You need to keep in mind that however, you use this kind of process, whatever they're paying for needs to be something that is not going to somehow take up every available waking moment of your time, whatever the service is.
For example, if this sales page is for coaching services, where it would require my 1:1 attention and time spent with the client, you would want to make sure you put a quantity limit on how many people could check out because potentially you could have a thousand people book this service potentially and you can never give that many people your 1:1 attention.
Let's keep that in mind as we build this out. This will be better for a digital product of some kind, or a group-based service like purchasing a course, etc.
Now, this is NOT a tutorial that's showing you how to design a sales page. This example is nowhere near the length of the sales page that I would design.
W just needed to have something for example purposes and this will fit the bill as far as showing you how and when to embed and where to go for each step. So let's focus on the process, not the design, and go into edit mode.
You need to have a general idea of where you're going to put the cart for this product, so plan a section that has a design which will work with an embedded cart if that’s what you want to use, or a linked button that opens a cart, etc.
embedded carts – where the viewer can see the entire cart, info fields for name, credit card info, etc; all you need to install this is the service which generates the code for the cart and an embed block to add it to your website page.
pop-up carts – where the viewer can see a button that triggers a pop-up window with the cart in the popup; all you need to install this is the service that generates the code for the button/popup cart combo, and an embed block to add it to your website page.
full page carts – where the viewer clicks any normal button, text link, or linked image on your website and is redirected to an external page, where the full-page cart exists; no code or embed block is needed
Squarespace is perfectly capable of handling all of those options, as would most other website builders.
Now that you know that, let's head over to ThriveCart.
Step ❷
Create the product in ThriveCart
Set the Product Details:

Create a new physical or digital product in ThriveCart.
Log into ThriveCart, go into your account, click the second icon in the top nav to see your products list, then click “Create product.”

Choose between making this product a digital or physical product.
I’ll select “Digital” because digital products have a digital delivery and do not require shipping, and typically they don’t require inventory management unless it’s a service that you’d need to set a quantity limit on so that there’s a cap on how many can purchase it from you.

Set the Product details
Give the product a name that the customer can see in the first field. I’ll name this one “Demo Product.”
In the second “Label” field, this can be more descriptive because only you will see it. I’ll name this one “Demo Product (embed)” so I remember what kind of cart it will have.
Set the checkout page URL. This is just the bit that comes after the default ThriveCart link. I tend to just mimic the Product Name here, with dashes for space, like “/demo-product”
I'm going to leave it in “Test Mode” so we can test out the purchase process when we’re done.
Then I’ll click “Next” to go to the next stage of the process.
Set the Pricing Details

Choose the Currency
The first thing you'll need to do on the pricing tab is set your currency. This will be whatever currency you want to use for this product specifically. I'll keep it on U.S. Dollars.
I'm going to set the price for this demo as a one-time fee of $37.00 with no trial period. This “Payment Type” field gives you 3 or 4 options, like
a one-time payment,
split payments with automatic re-bills or charges for each payment & customizable time-frames for paying the full amount,
a subscription, which is an ongoing payment until the customer cancels,
or a ‘pay your own price’ option, which allows you to set parameters (like a minimum amount) and the customer to put in the amount they want to pay for the product.
Each payment option you select will have its own settings you can adjust, and you can have as many payment options per product as you want –but keep in mind that more options is not always better! It can be confusing, so make sure you don’t offer too many ways to pay. 😉
Billing Frequency options for Subscription payments in ThriveCart
Other settings for Subscription payments in ThriveCart
Options for Split Pay in ThriveCart
If this product was $150 and you wanted to split it, for example, into two payments of $75-80/ea, you could do that by adding more pricing options; you’d just go through this cycle as many times as you need to, adding as many options as you want to the same product.
You can even set the preferred (or default) pricing option, which (if set) will be shown to the customer at checkout.
In 1 ThriveCart product, you can provide lots of options for the customer to purchase the product and you don't have to create multiple products in order to do that.
In Squarespace, you would have a lot of trouble with creating options like this because the type of payment you can take per product & the type of product delivery is based on the type of product you selected at the start which can’t be altered afterward, to my knowledge. So if you wanted to offer more payment options for products in Squarespace with only built-in features, you’d have to create multiples of each product listing using different “product types” so you could take different payments ––and of course, that’d be very confusing for everyone (both you and your customer).
Sending Receipts
For one-time payments you can check the box to send a copy of the invoice as a receipt to the customer.
For Subscription or Split Pay options, you can check a box to send the initial one, and then you ALSO have the option to send a new one with every subsequent payment the customer makes. I tend to check both boxes when applicable, –but you do you, boo!
Understanding the payment options you’ve selected
Check the little callout box near the bottom of the payment options window (with the blue line on the left side of it) before you click Next and read what it says. This describes the payment process for you in plain English, based on the settings you chose for this payment option and it can be super helpful to have this extra clarity for yourself if you’re not sure you chose the right settings!
For a simple one-time payment, my demo says, “Your customer will be charged $37.00 immediately.” Easy to understand!
Quantity Limits
You can set a quantity for the digital product underneath the callout with the payment description! This will limit the number of total allowed purchases per product, even if you don’t need to track inventory or don’t have inventory to track, which is GREAT for selling a limited number of seats to a workshop, or to your services, or to your membership, etc.
For this demo, I’m not going to set a quantity limitation, but if this was for something that had some one-on-one aspect to it, this is where you could say, yes, limit it to 5 purchases or 30 purchases. After you hit that number of sales, it would not let future people purchase more until you change(d) the settings in the product.
Naming your pricing option & set the allowed quantity for each checkout/purchase in ThriveCart (different from the total allowed cap)
Name the Pricing Option & Total Cart Quantity Settings
When you click Next on this screen, you’ll then be able to
Name this pricing option (as customers will see it during checkout)
Set whether you want to allow just 1 purchase at a time, or
Allow customers to add more than 1 of these products to the cart.
Make sure that when you do you change the pricing name, not that this is how it's displayed to the customer.
After you've created additional payment options, sometimes it'll keep the original name for the additional price options and you don't want them all to say “One-time payment ($37.00) if that’s not correct for all payment options.
Don’t worry! You can ALWAYS come back and edit these settings at any time, whether the product is Live or in Test Mode.
Adjust the settings to calculate sales tax and customize the emailed invoice-style receipt in ThriveCart
Calculate sales tax
Next, you can turn on or off calculating sales tax if you want to do that AND you’re on the Pro plan of ThriveCart (the base plan of ThriveCart doesn’t calculate tax for you!)
Please note, that in my experience, while it calculates the tax for you, it does NOT tell you where to send the tax you’ve collected.
If you don’t know what to do with that money, you’ll have to hire a tax professional or pay for a tax service like Tax Jar to handle this part.
Customizing the emailed invoice/receipt document ThriveCart sends after purchase
Customize their invoice(s) for this product
You can check this box if you want to customize the way the invoice shows up for them.
This is where you can choose the main accent color that would show up on the invoice, add text here in this text box to the top or bottom of the invoice if you have additional details to communicate or remind them of after they purchase, such as a link to the product they bought o some login area, etc.
How to add a Bump Offer in ThriveCart
Adding bump offers
In this case, I don’t want to have a bump offer on this product. If I did, I’d just check this box & follow the steps here, then edit the bump info in the cart design editor in the “checkout” phase.
If you're unfamiliar with the term, a bump offer is basically just an extra checkbox that lives on the actual cart for this product that presents the potential buyer with the opportunity to easily add a related product to their cart before they begin checkout.
If they check the box to add the bump offer in a ThriveCart checkout, then it will add whatever the price tag is for that extra thing to the total invoice.
This is NOT one of those things where it starts the purchase, and then it takes you to another page that interrupts the checkout process & asks you to add more products (sometimes multiple times) to your checkout. That interruption style of additional product add-ons during the checkout process is called an upsell in ThriveCart.
Bump offers are displayed before they ever decide to start the purchase process, Upsells happen during the actual payment part of checkout.
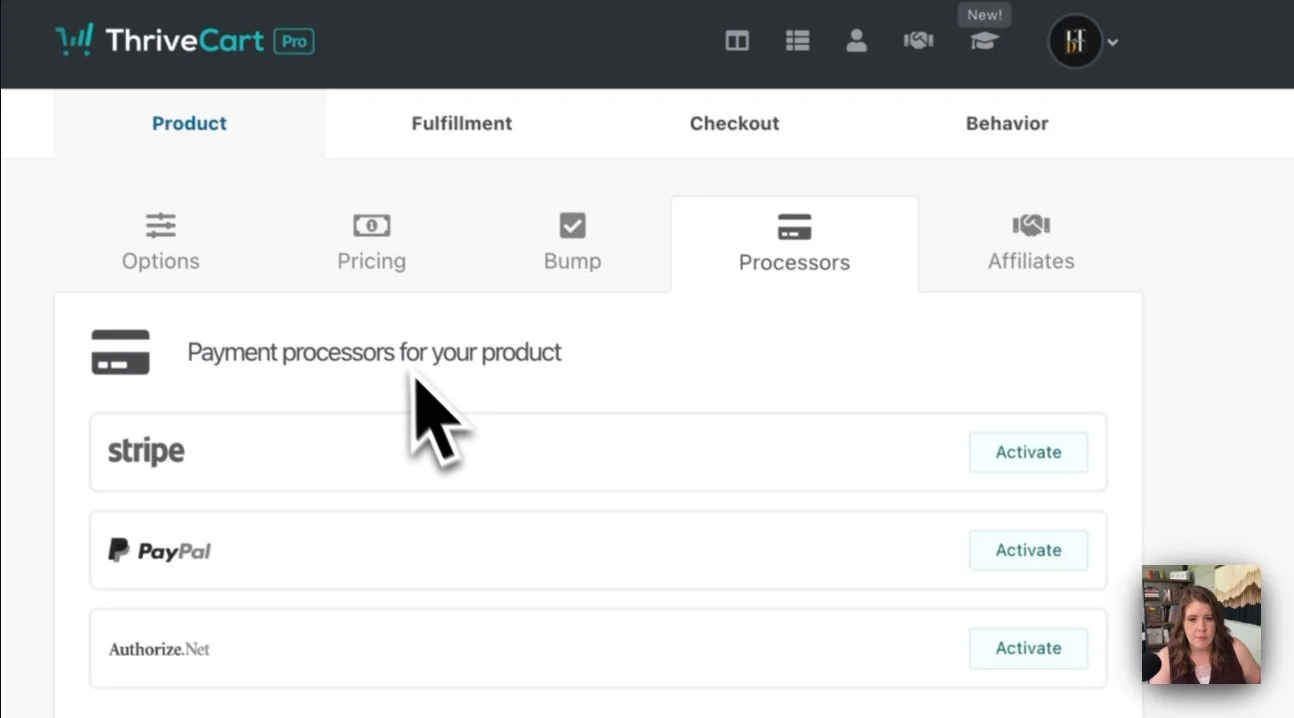
Choosing payment processors in ThriveCart; connecting both PayPal and Stripe to process payments
Choosing payment processors
Thrivecart added extra options for payments in Stripe and PayPal for using things like AfterPay or Klarna which is really neat, but I’ve not seen how it works in practice quite yet because it’s still so new.
For this demo, I'm going to choose my Stripe account with the enhanced settings, and I'm going to activate PayPal with the new enhanced settings, so either option will be available & within each option, whatever additional options the Enhanced connection provides.
Turning on affiliate access to this product in ThriveCart
Will this product have affiliates?
I'm not going to turn on affiliates for this because I have not set that up for myself yet, so I'm not going to walk you through that process.
But, if you have ThriveCart Pro then you have access to their built-in affiliate program manager which will allow you to set up affiliates for your products in ThriveCart and manage their payouts, track conversions, share affiliate links & assets with your affiliates, etc.
Even though I’ve not set this up myself yet, I am in several affiliate programs that use this part of their ThriveCart account, and as an affiliate for THEM, it’s very simple & easy to access and see my sales numbers, upcoming payouts, etc.

Setting your products Fulfillment details & where to contact support in ThriveCart
Fulfillment details
Next, we switch from the Product details to the Fulfillment details, so when we click Next from the affiliate settings in this product, it will take us to this next Fulfillment section where we can set what happens after a customer purchases.
We told Thrivecart at the beginning that this is going to be a digital product. Now we are telling them what we will actually give them as the digital product.
You can type in your support email address in the first field.
In the next field, we’ll decide what should happen after the purchase. This is up to you, depending on how you want the process to go.
There are 3 options for what happens after purchase and I’ll list them from the simplest option to the most complex option:
OPTION 1 – EASIEST
Send the customer to a URL (link) after purchase. This is a very easy way to redirect the customer from the finished checkout process to the file itself, wherever it lives on the internet, whether that’s to a page where videos are hosted, where they can log in somewhere, or directly to a template link, etc.
OPTION 2 – EASY
Display their total invoice after checkout on a ThriveCart-hosted success page where you can put whatever you want, including links, buttons, GIFs, a welcome/thank you video with instructions, etc. I believe this is the default option, so it’s usually pre-selected.
OPTION 3 – COMPLEX
You can also add them to a membership site. This is easy to set, but does require some forethought on how to connect the customer to whichever membership site they’ve just purchased a seat inside. For example, you can use ThriveCart’s built-in Learn (or Learn+ if you’ve upgraded) platform where you can host course content (videos being the exception; they can be embedded but need to be hosted elsewhere), or something like Teachable. ThriveCart doesn’t limit the number of integrations so you can have multiple options integrated with your ThriveCart account & available to connect to any of your products at any time.
What makes this last option more complex is that if you’re ‘dumping’ customers into a platform outside of ThriveCart (not using Learn or Learn+ for your membership) then you need to set up all the emails and funnels associated with a customer paying in one platform and being granted access to or removing access from another, helping to onboard them (show them where to go & how to get inside), or offboard them (removal notices when they cancel their membership or have too many delinquent payments), etc. Normally, if they’d be paying in a platform like Teachable, many of these emails are built into the platform’s normal processes, but when you invite members in through an integration like this, sometimes additional setups are necessary.
ThriveCart pricing plans for lifetime access, no subscription (current as of summer 2023)
ThriveCart’s pricing model & plans
Currently, ThriveCart’s pricing is in tiers of one-time payments for lifetime access.
There's a basic ThriveCart account, which is about $495 USD.
You can upgrade (bump offer!) to Pro for another $195 USD ($690 total), which includes basic Learn features for basic course content hosting (does not include hosting videos, but you can embed them from elsewhere).
From inside your ThriveCart account, when setting up Learn, you can opt to upgrade to Learn+ for another $195 USD, which is the last upgrade that's currently available.
ThriveCart’s Learn+ upgrade cost, no subscription (current as of summer 2023)
So if you get Thrivecart Pro with Learn+ you've upgraded to everything they can offer you.
Going back to the previous section, where your product delivery is adding the customer to a “Membership” area:
If you have access to Learn, then your “membership area” could just be your student portal within ThriveCart Learn/+.
If, however, you're using something like Teachable, you'd have to integrate that first in your account settings, in order to select that option in the product fulfillment stage because then you’d have to select where in Teachable you’re granting access as a result of buying this product.
IMPORTANT NOTE: What ThriveCart calls a “membership” area, I would call a course hosting platform. In my mind, “memberships” have a community or forum platform like Teachable or Thinkific, or Kajabi. Using the term ‘membership’ makes it sound like you can add customers to a group, like in Facebook, Circle, or Mighty Networks, etc. –and that is a feature that ThriveCart currently does not offer or natively integrate with, –not without using Zapier to map customers into those external platforms (Circle, etc). So, don’t let that term usage mislead you while you decide how to deliver your digital ‘product’ in the fulfillment stage!
Choosing your checkout page style, before you begin design edits in ThriveCart
Designing your checkout page
Now, we're finally on checkout design edits, which is almost the last step in this process!
We’ve created the product, set the fulfillment, now we're on checkout, and the last step will be setting the after-purchase behaviors –if that’s even necessary for this product.
In this checkout stage, you can select the type of checkout you want to use before you start designing.
A standard checkout will be a full-page checkout with its own link. This will work great for any website builder, because you can always use a button, text, or image/ad design that links to this standalone cart page. This is probably the most commonly used option among ThriveCart users, if I had to guess.
A sales cart is sales page builder with a cart, so this is great if you don’t want to build the sales page on your website for some reason. A great example of other software that offer this are Leadpages, ClickFunnels, and FunnelGorgeous, etc.
Embeddable carts are simplistic cart ‘blocks’ you can embed basically anywhere that allows code embeds, on your website’s sales page, on a product page, in a blog post, –wherever you want! ThriveCart provides the code for the embed, and you design the cart here before you get the embed code.
Popup carts are similar in style to the embeddable carts, except they are not immediately visible once embedded. Instead the cart literally “pops up” when the trigger is clicked, which can be a button or an image you can embed anywhere. ThriveCart provides the embed code for the trigger which pops up the cart on click.
Importing, Sharing or Designing your carts from Scratch in ThriveCart
For this demo, I’m going to use an embeddable cart, because that's the whole purpose of this tutorial! If we click Next we're going into the checkout section, from Type, over to Design and then we can launch the editor to start the cart design from scratch with the default elements that ThriveCart gives you.
Alternatively, you can also import a design by clicking that option, and pasting the share link, –but you do have to know the link for the cart template to do that. Here’s a great ThriveCart template shop with some really badass funnels, templates, tutorials & bonuses if you don’t want to start this from scratch.
Pro Tip! Once you've created your own unique, from-scratch, cart designs you really like & have go-to’s for your products, you can share your designs with other people, which may help with collecting affiliate revenue by sharing ThriveCart with your audience, to make back some of your initial investment in the platform. This is exactly what that shop is doing, linked above!
I don't have a cart template to use for this demo, so we're just going to start with the Launch Editor and make a simple one from scratch.
Next, you’ll see what the builder/editor looks like for designing your soon-to-be embedded cart.
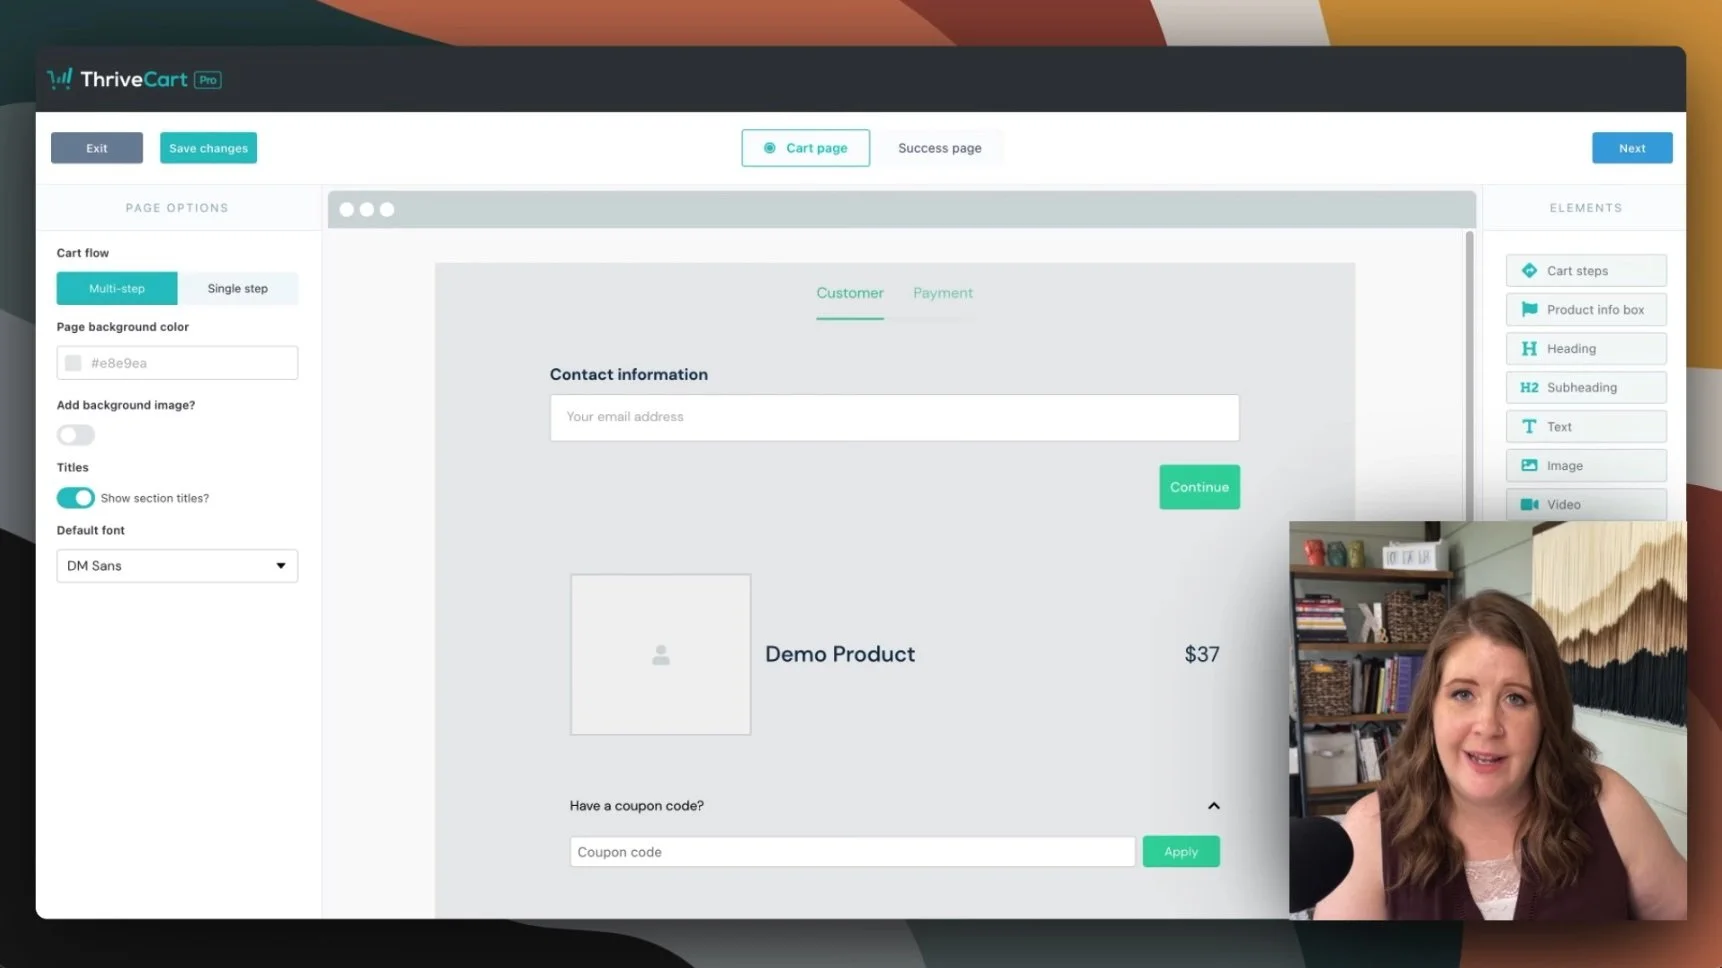

Single-step vs Multi-step checkouts
By default, you may have a two-stage customer + payment setup or a “multi-step” checkout, which is similar to many other checkouts you’ve experienced in most online shops. It’ll get your basic customer info up front, then ask for billing/shipping + card info with a review before you actually purchase. This “multi-step” option is akin to something like those: more clicks, longer process. I think most people use this on the sales pages built in ThriveCart, because it “feels” (looks) more simplistic & clean with less on-page clutter.
I feel like ––and this is just my opinion/observation–– most people that use Thrivecart checkout pages are using the single-step option, which I think is ideal for many cases. A single-step cart just means (typically) only basic info is collected & it’s all gathered in one page; that means fewer pages, fewer clicks, and a shorter checkout process.
If you want your cart’s background to match the background of wherever you plan to embed it on your website, you can use a free Chrome extension like this one to grab the hex code from the page (if you don’t already know what color it is) and apply it to the background color setting in your ThriveCart editor.
Now I have the hex code for the background color I want, then paste it in, then this cart background color will match my website page’s background color.
I want to turn on the section titles, which segment the different fields in the checkout process & help clarify each stage of information that’s requested from the customer.
Design Settings vs Design Elements
Before I get too far into this overview of the editor in ThriveCart, let’s first establish where to look for what thing and how to use it!
👈🏼 On the LEFT side of the page, you have the design settings panel. What shows up here will depend on whether you’ve selected an element in the design preview in the center of the page. If you’re not selected on anything in the preview, then what shows on this panel are just standard design settings for default fonts & spacing, checkout design options, etc. If you have selected an element in the preview section, then what will show are the settings specific to whatever you’ve selected.
👉🏼 On the RIGHT side of the page, you have a list of available elements (much like blocks in Squarespace) which you can click and drag onto the design preview to add additional content to the page. The options include basic things like Headers and subheaders, text blocks, numbered or bulleted lists, HTML embeds, images, FAQ dropdowns, and more.
In the MIDDLE of the page, you have the design preview. When you hover over the elements there you can see options for duplicating any current blocks, selecting &/or moving blocks around on the page, and deleting blocks/elements you’ve added. When you want to add text or adjust what’s inside the block, you can just click on it to select it, then click again to edit the content inside that element. For anything that has editable text, you’ll see a rich text formatting bar for further text edits such as linking text, changing color, bold, italics, etc.
Adding product Terms & Conditions &/or an opt-in checkbox to your ThriveCart checkout
Customizing the checkout fields
If you click the block in the preview that shows the Customer information, you can use the lefthand design settings panel to show/hide fields that can be included in this area. This should include basic information like the customer’s name & email address.
I typically like to get the customer's name because I like to be able to personalize their interactions with me and I need their email address to be able to deliver their receipt & access to the product they purchased.
Best practice is to NOT collect any information you know you won't use and are pretty sure you don't need. So I won’t typically collect information like the customer’s business name, address, phone number, etc. because I have no reason for needing that information & frankly don’t want to be responsible for storing that extra & unnecessary information.
You can add additional custom fields if you want to.
For example, you probably need (and I’m not a lawyer, so this is not legal advice) terms and conditions that are specific to having an online shop. These are a different set of terms and conditions than the ones that are for the use of your website.
They are NOT the same thing. If you have T&Cs for your products, you can link that here with a Custom Field in ThriveCart.
If you don't, you can get an e-commerce-specific set of T&Cs at Creative Law Shop with 10% OFF if you use my affiliate code, LAUNCH10 at checkout.
Are you a fan of Termageddon (or Iubenda, etc)? This type of T&C is NOT something that Termageddon provides if you already have/use them for your website.
This is a different set of terms and conditions that specifically dictate how people can use this product, ––whereas the website T&Cs that Termageddon provides are specifically for how visitors can engage with & use the content on your website.
Another type of custom field you can add is to allow people to add themselves to your email list. If you add this checkbox, you can set the behavior for that action before you finish this process, which basically just says checking that box is the trigger, and you can decide what happens if selected & where it happens (ie: what integration it happens in).
Random note:
With both of these checkboxes, when selected by the customer during checkout, they will turn this hideous bright-ass green and I’ve not yet found the design setting to change that to an on-brand color.
The “Tabs” layout vs the previously showed “Accordion” layout in the Payment Information section of your ThriveCart checkout
For the payment information, you have two basic design options. You can show them as tabs or show them as an accordion. By default it shows as an accordion with long full-width buttons, but if I switch to tabs (you may have to also save your changes, exit the editor, do a “hard refresh” –that’s Shift + Command/Ctrl + R on your keyboard– and then come back into the editor to see this update) it changes to a more clean/compact tiled look which I personally like better.
The new “enhanced” payment options in Thrivecart (which we chose earlier in the Product Pricing area) give you the option to also let customers pay with something like Afterpay, Affirm, Klarna, etc., and then a similar set of options within PayPal.
For the active buttons, you can change the color in your design settings panel, add additional elements if needed. Or keep things very simple & short, because remember this whole thing will be embedded elsewhere, so we don’t want it to be a super long embed.
Editing the success page in ThriveCart, for what happens post-purchase
Editing the “Success page”
If we click Next, it's not going to leave the editor just yet because we still have the success page to tweak before we wrap up Step 2 of this overall setup process.
Remember earlier that we chose to fulfill the product by showing the invoice page? This is where you edit what that looks like.
To keep it pretty basic for this demo, I'll choose to hide the PDF, and show the ‘contact support’ button.
If you wanted to embed a video with a 'thank you message, or a fun/celebratory GIF, grab the HTML block from the righthand panel and drop it where you want it on the page, then click on that block to see it’s design settings on the lefthand side and paste in your HTML embed code for that video/GIF/whatever you’re embedding.
Once you get the design done, you’ll click Next.
Using tracking services with ThriveCart checkouts
Tracking settings
This is where you can put in your Facebook pixel, your Google Analytics ID#, or whatever you need to be able to track purchase-related analytics, if you want to use this section.
To collect basic analytics via Google, just check the box next to Google and paste in your Google Analytics 4 ID#.
To collect analytics via Facebook Pixel, check that box & paste in your Pixel #, then you can use this checkout with Facebook Ads & such.
Beyond that, I can’t help you bc these are not my zones of genius! 😂 Each of these options (Google Analytics and Facebook Ads) are entire industries in their own right, so consult an expert if you get hung up here!
When you’re done, click Next to move to the LAST part!
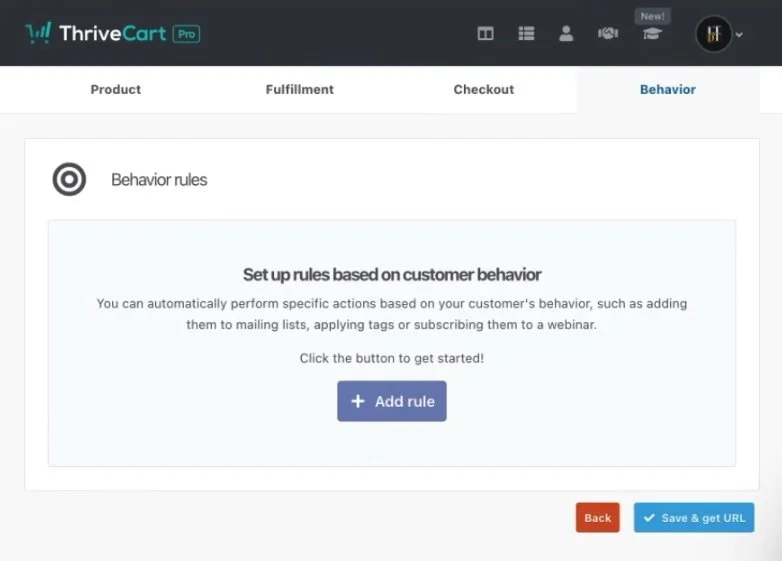
Post-purchase “Behavior”
This area of the checkout setup is NOT mandatory, so if you don’t understand why you’d need to use it, then just skip it!
However, if you’ve turned on that opt-in checkbox setting in the cart page that will allow customers to voluntarily add themselves to your email list, then NOTHING WILL HAPPEN unless you finish that setup here.
First, you should have your integrations already connected to your ThriveCart account, because the options won’t appear here, otherwise. Not every email marketing platform is available. For instance, last time I checked, Flodesk is not a native integration option without also needing Zapier, but ConvertKit, MailChimp, MailerLite, ActiveCampaign, Drip, and a few others, are direct integration options you can use for this type of thing.
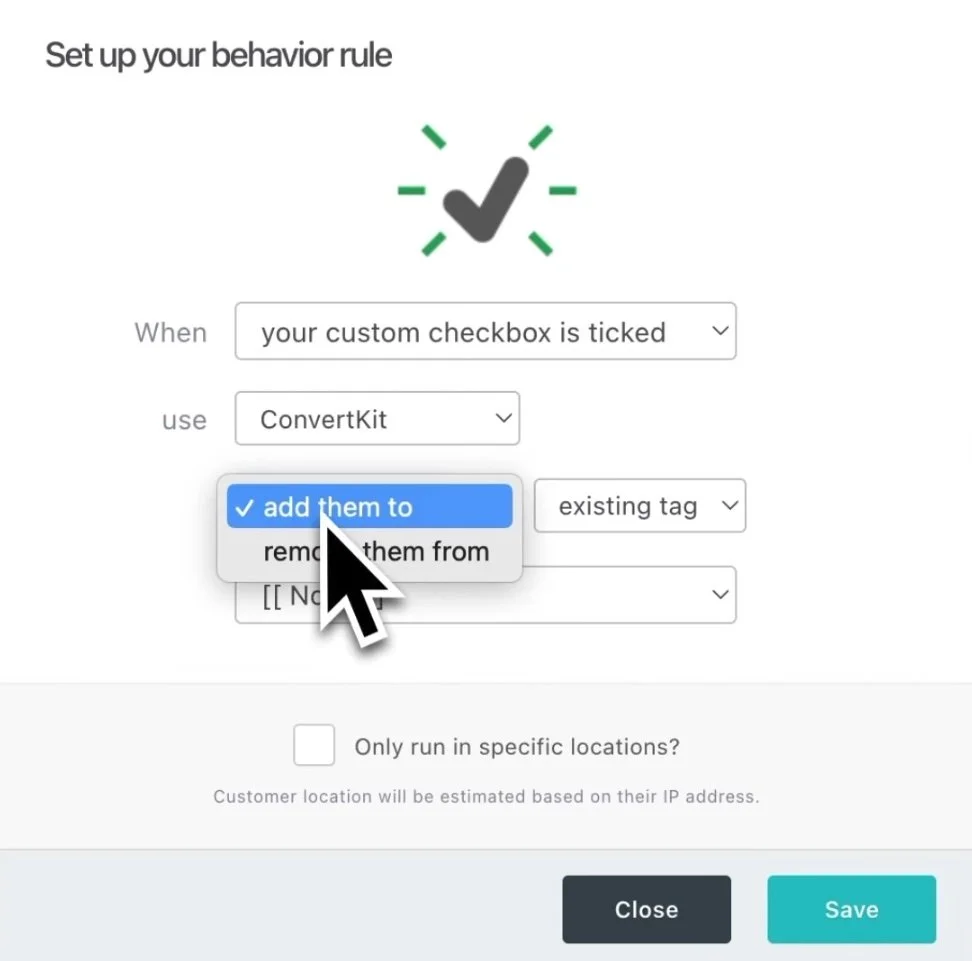
Next, we’ll add a “rule” which will say, ‘when your custom checkbox is ticked, add them to, an existing tag or sequence in ConvertKit.
With that set, when customers check that opt-in box, ThriveCart will add their Name & Email info to my ConvertKit account & tag them or drop them into a sequence. You can only do one action per trigger in these rules, so if you want to tag AND add them to a sequence, just add 1 rule for each action you want ConvertKit to handle.


Get the checkout URL (for full-page checkouts) or the embed code to use this ThriveCart cart page on your website, etc.
Save & get URL
(& embed code, where applicable)
Finally, we’re ready to click ‘Save & get URL”, because that was the last step!
This is the embed code that we want, so we’ll click the button to copy the code to our clipboard, then we'll go over to Squarespace & navigate to the page where we want to embed this cart.
(🔕 There’s no audio for this clip!) How to add an Embed block & where to embed ThriveCart’s code in Squarespace.
Step ❸
Embed the cart on your website page
⚠️ IMPORTANT UPDATE:
On Squarespace v7.0 websites, you’ll want to go into Site Styles & disable (uncheck) the Ajax Loading checkbox! Otherwise, your embedded cart will generally have trouble loading on the sales page you’ve built, without a page refresh (reloading the page a second, third, etc time).
Back in Squarespace (or another website builder)
In Squarespace’s editor, we'll click edit, then scroll down to that last section where I showed you we’ll be placing this embedded cart. Next, we'll click the + Add Block button, find the embed block, and select that to add to our Squarespace page.
Once you have the embed block on the page where you want it, then click on the pencil icon to edit that block’s settings & paste in ThriveCart’s code.
Inside Embed blocks, you’ll always have 2 options: use an ‘embeddable link’ which almost works like magic, or pasting in the ‘code snippet.’
ThriveCart’s embeddable carts are not using links, so in this case, we’ll choose “Code Snippet,” then we click “embed data,” and then paste the embed code Thrivecart wrote for us.
You're not going to be able to see the newly embedded cart while you're in edit mode, because Squarespace’s editor is in safe-mode (essentially) so doesn't let you see it until you save your changes & exit Edit mode.

Watch the accompanying YouTube video, starting at timestamp 25:50, to see how to test this in Test Mode while inside the Squarespace editor.
Testing the checkout process
When you exit Edit mode, you can preview the cart as it will appear for your customers, so now it’s time to TEST out the process & see if any settings need to be tweaked before you change the product status to Live.
In this clip, you can see (when I begin testing the embedded cart) the ugly-ass bright green I mentioned earlier, that shows up when customers check those boxes for terms & conditions &/or opt-in agreement.
When it's in test mode, it will give you a fake card number to use to test the whole checkout process, so you will actually be able to go through it just like your customers will, but without needing to pay for it in order to do that.
We'll copy the fake card number it gave us. Then it says to enter any expiration date & CVC (security code) numbers in the right format, so today’s date and 000 as the CVC should work just fine. Then we're going to put in a fake zip or postal code, and (fake) “complete” the test order.
Depending on what you selected as your fulfillment setting, now it should redirect you to whatever option you chose, whether that’s to a Success page (the “invoice” or receipt page), the membership account page, or redirected to an external URL where the product is linked/displayed.
They will also get a purchase confirmation email from Thrivecart with basically the same details as the Success Page would have, and a copy of the actual invoice/receipt.
(🔕 There’s no audio for this clip.) Where to edit the product status in ThriveCart’s product settings.
Changing the product status in ThriveCart to Live
Once you have confirmed that your test purchased is working the way you want, we’ll go back over to ThriveCart to change the product status & move it OUT of Test Mode so customers can start purchasing.
Please don't forget to do this final step! If you don't, people may put in their real credit card numbers or use the fake one as instructed while in Test Mode, won’t get charged but they WILL still get the product, as long as the product is still in test mode.
To do this, you’ll go back to your products in ThriveCart, and select the product (which will display an orange banner that says “Test” or something like that, rather than the teal one that says “Live” so you can see which ones are in what status at a glance.
Click edit on the product you want to change the status for, then in that first Product settings tab, select the “Live” option in the bottom righthand corner to switch from Test Mode (highlighted in orange, if active) to Live (highlighted in teal if active).
Then save your changes (ie: “Save & get URL”). That's literally all you have to do!
As soon as we refresh our website page in Squarespace, that ‘Test Mode’ warning across the top of the embedded cart will be gone.
An example of a ‘broken’ embedded cart from ThriveCart, which happens if you’ve switched Cart types in ThriveCart, but not how it’s installed on the website.
Future edits to the cart style & settings
If at some point you want to edit the cart to be a different type, you can edit the checkout design & settings at any time.
Just keep in mind, that if you switch cart types later, you may need to also swap out the embed code used on your website to reflect the new cart type you’ve changed to.
In other words, the embed code for an embeddable cart will be different than the embed code for a popup cart, and both of those are different from the simple link required to use the standard cart (full page) option.
Why? Because for the Standard Cart option, no embed code is used at all; you only need the cart page link from ThriveCart to use it.
In fact, if you keep the embed code on the page for the embeddable or popup cart, but you have switched the cart type to a Standard checkout, the embed code will basically break and become unusable.
Using ThriveCart checkout with Squarespace Shop pages
As you can see, this is sort of a complex process to set up, so you don't really want to do this with something like an actual shop in most cases. It’s much easier to use Squarespace’s built-in e-commerce solution.
That said, if you need the options from ThriveCart enough to warrant this kind of setup, then here’s some basic copy/paste CSS that will HIDE the Add to Cart and quantity areas of product pages (sitewide, –so in the entire shop), so you can forcibly bypass Squarespace’s checkout and use ThriveCart’s instead, while using the rest of Squarespace’s e-commerce areas to manage the product pages & basic details.
Custom CSS code snippet: hide Add to Cart button & Quantity
To add this Custom CSS snippet, go into Design, then click Custom CSS, and then paste in the following code.
/* Hide 'Add to Cart' button */
.ProductItem-details .sqs-add-to-cart-button-wrapper {
  display: none;
}

/* Hide Quantity field */
.ProductItem .ProductItem-details .product-quantity-input {
  display: none;
}
To use ThriveCart’s checkout, now that you’ve hidden these two elements of the product details page, you would need to add extra information to the Additional Details area of the product page in Squarespace.
Then, use an embed block for an embedded cart, or a button, text link, or linked image to redirect potential customers to a ThriveCart checkout, which will also deliver the product.
Keep in mind that when you're using this Additional Details area, it does not yet use Fluid Engine. It still uses Classic Editor and for whatever reason, it has been extremely tricky to manage; it's incredibly glitchy and irritating to use. So don't come in here with the hopes that you can do this crazy-cool design, because it's gonna absolutely kick you in the ass. But you can do a simple embed block and some minor other design changes.
Map out your purchase process
I know on the surface ALL of this seems very complex, but it's not as “bad” as it seems if you know what the process needs to be & get familiar with where each piece goes, and when to handle it during the setup.
It will definitely help you, in the beginning, to map it out using sticky notes or a digital or real-life whiteboard so you can plan everything before you get started, then have a clear idea of what to do & in what order.
Try ThriveCart for yourself!
You can learn more about it in this video, and why I’ve switched my educational content over to ThriveCart Learn+ from Teachable in this video.
As you saw, I have my own account which I’ve used for a few years now, and I love having access to ThriveCart in my back pocket; it’s come in handy so often in my ever-evolving business.
TBH, using it does feel a little bit dated (read: its UI is a bit “ugly”), quite frankly, but it is so powerful, and for all that power, it’s actually pretty easy to pick up & start using.
They’ve introduced some new features in the past couple years & have more on the way so for me it's been worth every penny.
It’s also NOT a subscription cost, so that’s a huge win for anyone who feels subscription’d to death.
If you want to test it out for yourself, unfortunately, there is no free trial for it (that I’m aware of), so you do have to pay for it upfront. But you don’t have to jump in all the way, right away, paying for all-access ($495 + $195 for Pro + $195 Learn+). Those upgrades are available when you’re ready, and if you need help with that, just email their support for help!
They have said they WILL eventually change their pricing model from lifetime access with a one-time payment, to something else, but haven’t given us a timeline to share with others.
So, if it’s in the budget, I’d suggest grabbing it soon before it becomes another subscription service, so you can lock in your lifetime access on the current plans because they’ve also said that new pricing isn’t likely to affect current users.
Then you'll have it in your back pocket too for things like creating your own affiliate program and managing automatic affiliate payouts, creating your own digital products, and physical products using print-on-demand options like Printful. You can also create basic sales funnels with upsells, coupon codes, bump offers, and more. They even have product countdown timers you can use on carts.
So, it’s a really robust system that you can start using minimally with what I showed you today, if you're interested.
…And if you're not, why the hell are you aaaaall the way down here reading this? 😂 Just sayin’.
I hope that helps get ya up & running! I'm curious to see what you come up with, so leave a comment below & share your experience with us!