

Getting creative with client forms in Dubsado
What's inside this post: Hide
Back when I started freelancing in 2015, I just worked around my full-time job. Maybe I didn’t wake up Wednesday morning to find there’s suddenly like 12 meetings on my calendar for that week and only half of them were done already (true story!), but there were other problems:
A. I didn't know what a CRM was, so I didn't use one.
B. I sent invoices through my PayPal business account because my first few clients weren't local, but I knew I had to make paying me easy (digital)
C. I didn't use contracts, because none of my past employers did & I never even thought about it!
Scary. Right? 😬
After a while of juggling a few hourly projects between different clients, I suddenly realized I needed a way to organize everything.
#duh 🤦🏼♀️ (belatedly says the Enneagram 6, INFJ-T, Analyst/Nurturer leadership style + basically pro-level organizer... 😂)
Not only because Client A wanted their project done by X date, and Client B didn't need theirs done until X date, and each one had email communication, different invoice links, different files in different folders and how would I share those designs with them, and where was I storing proofs, and how would I get them to sign off on it? And I just found out about contracts, but how do I get digital signatures? Do I have to literally mail one to them or have them print, sign & mail it to me? 😰
One thing I HAD learned at my 9-to-5 (anyone else notice a trend to start typing that as 925? 🤔) was that they didn't make customers sign or approve their designs in writing, digitally or ... analog? –In print. You get what I mean!
So, one thing I did want was for clients to say, 'yes definitely that is what I approve and I won't change my mind.'
Then I came across 17 Hats ––couldn't tell ya where or how or who referred it. I don't even remember if I had a paid plan or not.
What I do remember, is that it was overwhelming and HID.E.OUS. 🤮
I started asking around in all the design communities (read: Facebook groups) I was in, "What can I use INSTEAD of 17 Hats, y'all?! I'm dyin!"
I then found Bonsai* on the "Clients from Hell" podcast, which was run by the owner of a hysterical and all-too-real blog my coworkers & I would peruse on our lunch breaks so we could laugh at the horrifyingly RIDICULOUS freelancer situations and not feel as bad about our own work-situations.
Now I think it's called " Not Always Right " (way to become basic, yo.) –Side note if you ever want to know for certain you're not alone with your jerk of a client, make sure ya check it out! I haven't needed that outlet in a long while, but the blog & its anonymously submitted stories is still going strong.
Anyway... Bonsai* seemed like the answer to all my problems. It was lightyears better than 17Hats, simple to use, and really cheap. I used it for a few months and then hit a wall because at the time I needed more features than they had available. Since then they’ve added the features I’d needed back then, like splitting up larger invoices into multiple payments or setting recurring reminders for invoices, etc.
So... I went on the hunt –yet again.
This time the resounding answer I got was Honeybook or Dubsado*. ––And this was back in 2016, by the way.
I researched both, heavily, & at the time Honeybook was 2x or 3x as much, their free trial was/is ridiculously short, and my newbie budget just couldn't justify that. So I went with the Dubs, got started for free with access to all features for up to 3 clients before I ever had to pay a dime.
By the way, that's STILL how their free plan works. Just sayin'.
So, when I hear people say they prefer Honeybook over Dubsado because it's "pretty" –I hear you. It IS prettier than the Dubs. Not gonna lie.
But what I learned from the 17 Hats jump, over to Dubsado, is that whether you think the UI is "ugly" or "pretty"
–its “prettiness” doesn’t matter if you're not using the tool efficiently.... or not using it at all.
I can't (won't) sell you on using a CRM you don't need or won't love –the ultimate goal is to use something... that you'll actually use. Right?
That said, depending on what you want to do with said tool, you will naturally gravitate toward one or the other.
If for example, you are fed-up with creating brochures in Honeybook or ya can't get the forms (whatever they're called in your CRM) to do what or look how ya want –you're gonna love the creative freedom in Dubsado's. End of story!
If you just want simple and don't care about the details, maybe Dubsado isn't for you. 😬 #realtalk
That said, if you want (––NEED, who are we kidding here?) to see what Dubsado forms can do, especially if you loop these forms into automations as we discussed last time, or if you're just curious, then check out today's video to get some inspiration and see how I'm using forms in Dubsado.
**looks around** Because some of them don't even have fillable fields... 🤯
READ MORE:
How to streamline client onboarding & processes with Automations (workflows)
Yep. You heard me! Find out why in today's video! 👇🏻
NOTE: Today’s post works best as a video, but if you’re more of a reader you can find the transcript below.
TRANSCRIPT:
Using a CRM like Dubsado can be a little bit intimidating, not going to lie. When I first set up my Dubsado account back in 2017. Yes. That's how long I've been using it.
It was a little confusing having to set up contracts and forms and getting used to invoicing and handling all of these things in the same app.
And what did that entail and where did everything go? And how did it actually work and what if I use workflows? And that seems a little bit––
just stop.
You only have to use the pieces that you need right now when you first create your account and you can build those things out as you get used to the platform and you understand what the tools are.
They actually have a great checklist in their help center. I encourage you to go check that out. It'll walk you through everything that you need to set up.
Just know that you don't have to do everything right out of the gate. Don't expect to be a first time Dubsado user and come into an account that looks like mine because I've been using it now for like six years.
All of that aside, I did want to dive in to how Dubsado can give you the ability to create flexible forms that you can send your clients as a service based business and how that's probably different than a lot of other CRMs out there, including the ability to embed code. Which means you can embed videos into these forms and build those into your automations.
In the last video we talked about all of the different types of automations (or workflows is what Dubsado calls them) and how I use those in my onboarding and offboarding with my custom client projects.
Now I'm going to show you what some of those forms actually look like when those automations are sending those forms out.
I just totally nerd out on all of this stuff and have to talk about it with somebody, right? Anyway... Now that we're good friends, let's hop on into my Dubsado account –because I don't just share that with anybody.
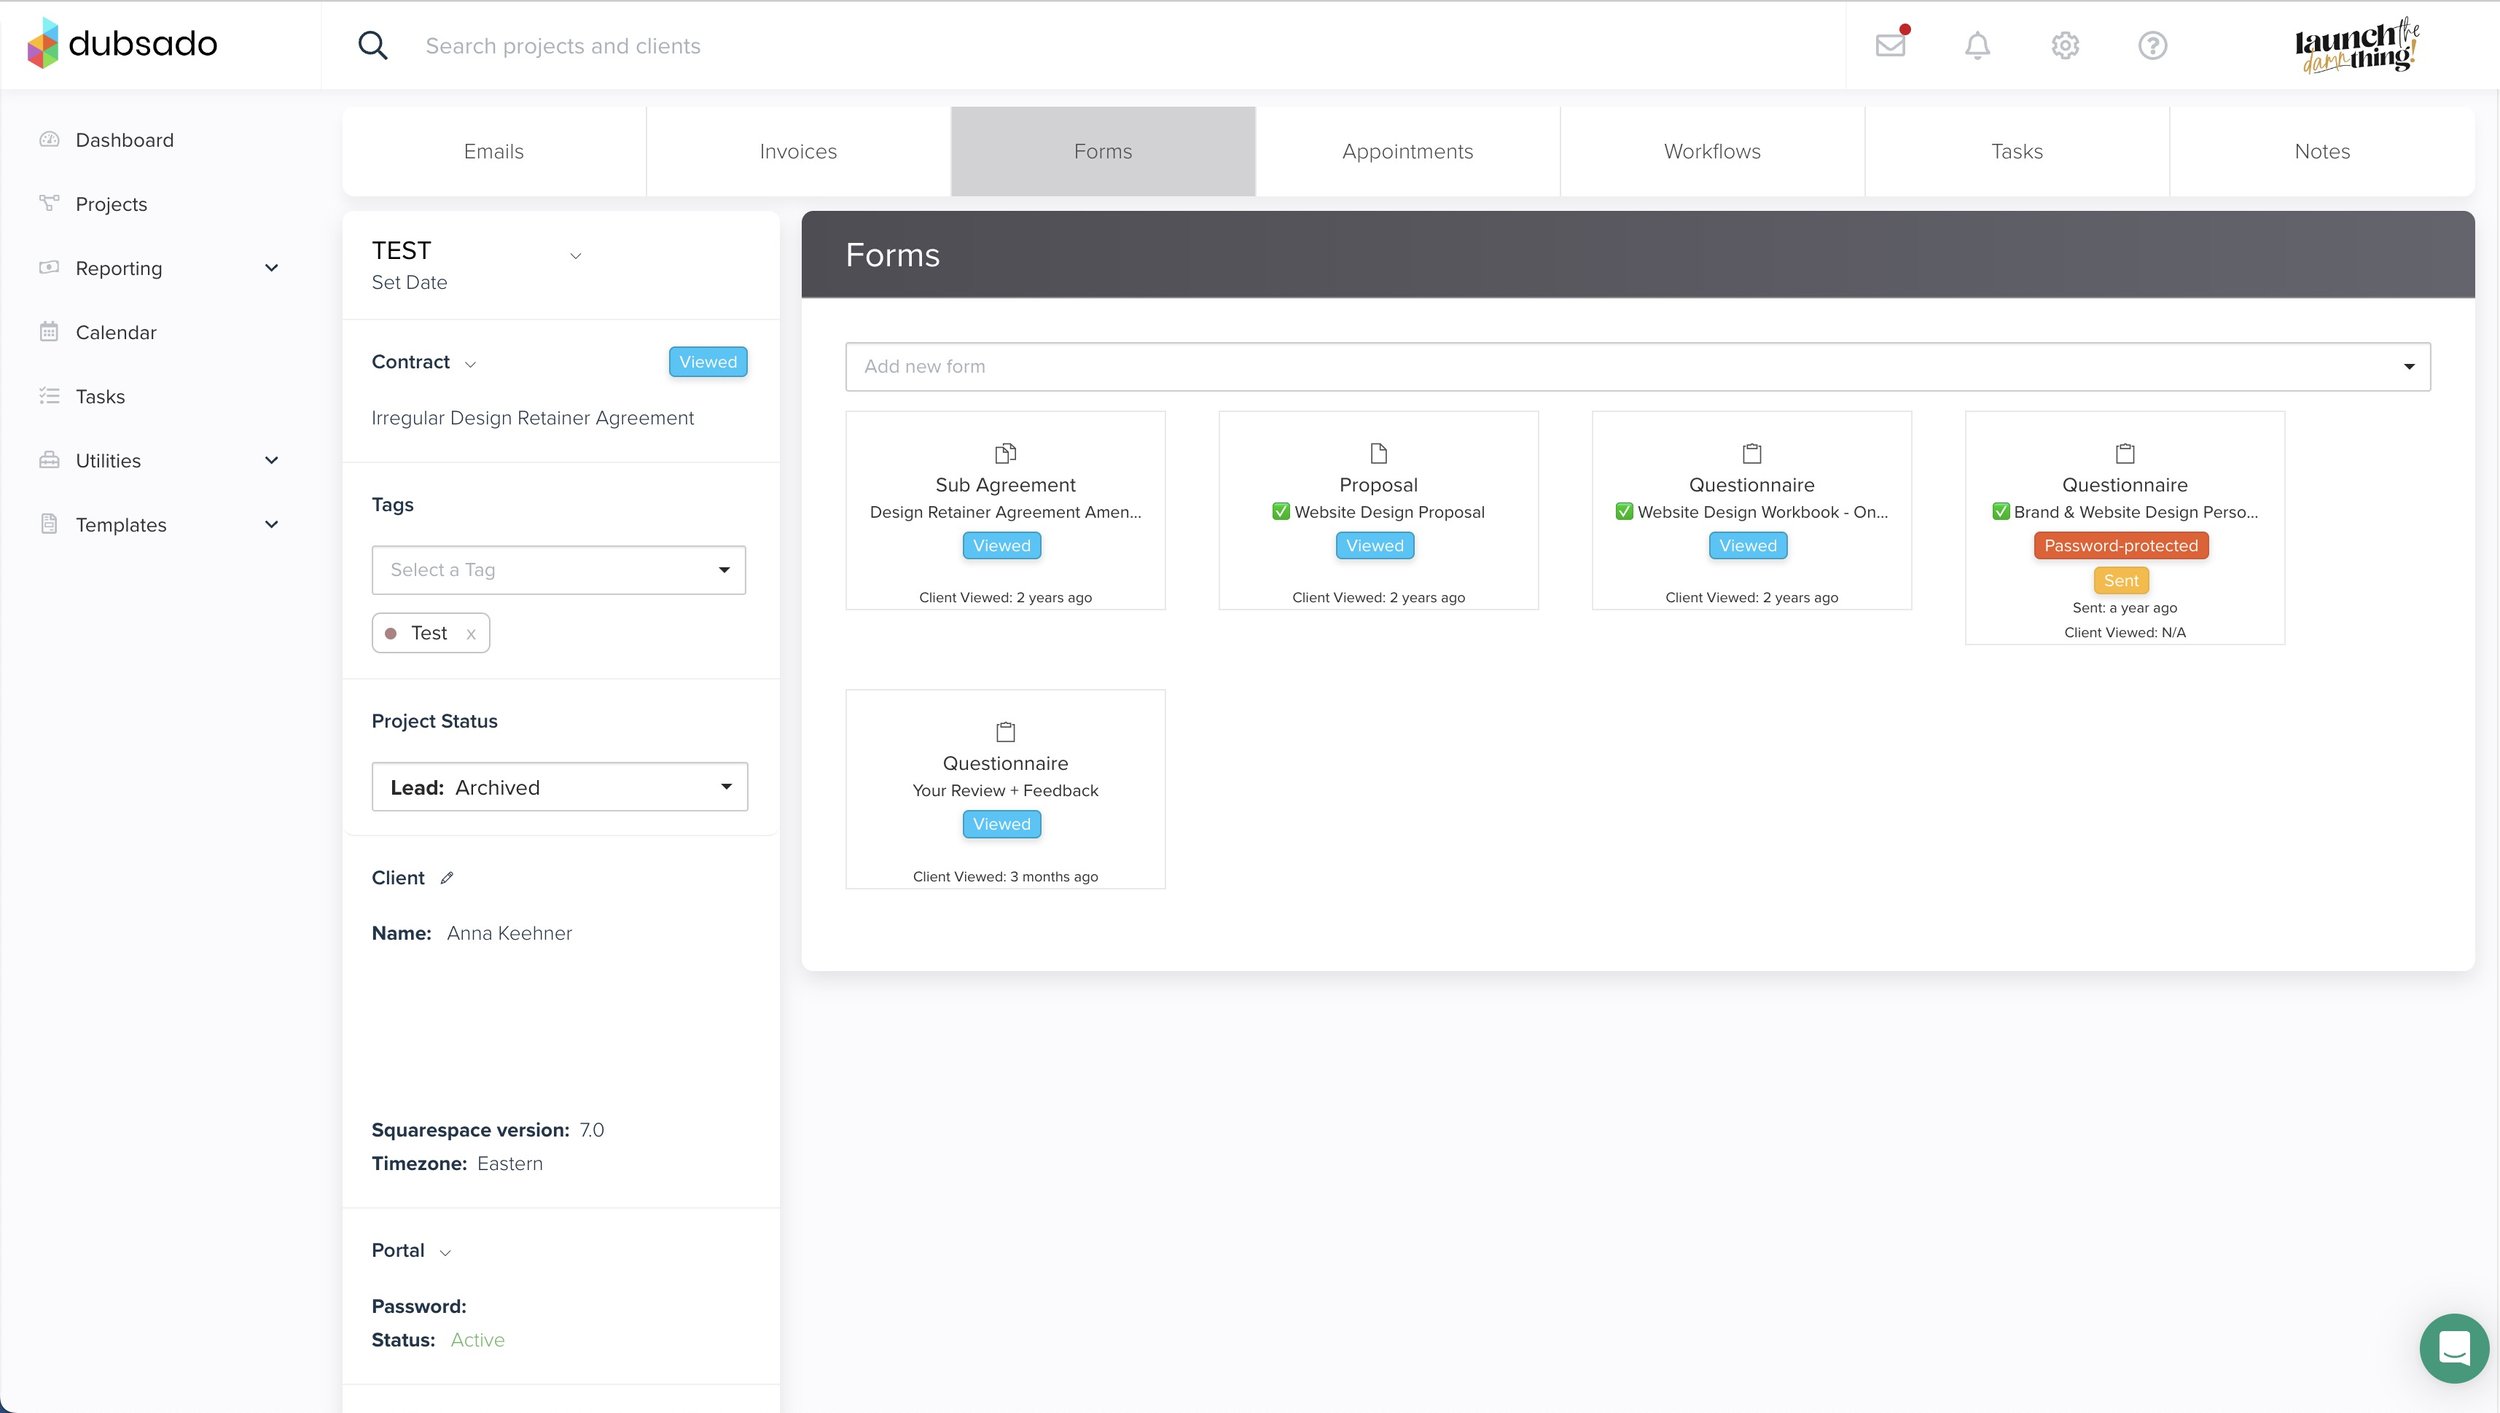
Dubsado Templates area
Now we're in the templates area under the forms of my Dubsado account and you can see that they organize that loosely into columns, kind of like a Trello Kanban board style.
Contracts & Sub-Agreements
So we have a column for all of the contracts that I have in my account. We have a column for all of the sub-agreements.
The way projects work in Dubsado is you have one main contract for the project and you can't add additional unless they are labeled as sub-agreements. They have the same flexibility, the same usability. You can have multiple people sign that way. You just have one main contract for one person to sign with you. And then if you need more contracts for a secondary person, that will also be part of the project, you send them a sub-agreement. But from the standpoint of like how they actually work, they do the same thing. You still get the signature fields which are legally binding digital signatures and you also have initial fields.
Questionnaires
Questionnaires are completely different. There's no signature involved and you can add all kinds of fields in there from text fields, date fields, file, uploaders, check boxes, dropdowns, all of the things that you expect a form to have.
Proposals
Proposals actually generate an invoice if you put package elements inside. So they don't always generate an invoice, but they can, which I think is a really cool feature of Dubsado. That also gives you the ability to send one proposal that you can actually set up like an order form.
So let's say they choose package number one and package number four. It will take the total of package number one and package number four and put them together, generate an invoice and give them that total without you having to do manual labor, as long as your proposal shows all of the packages for them to pick and choose and select.
I know that's –woo! That was a lot. So I'll show you what that looks like in just a minute.
Lead Captures
The last type of form Dubsado offers are lead captures, and those have the share links. That you can link to from your website on any button or any text, they also give you the ability to embed the form directly on your website.
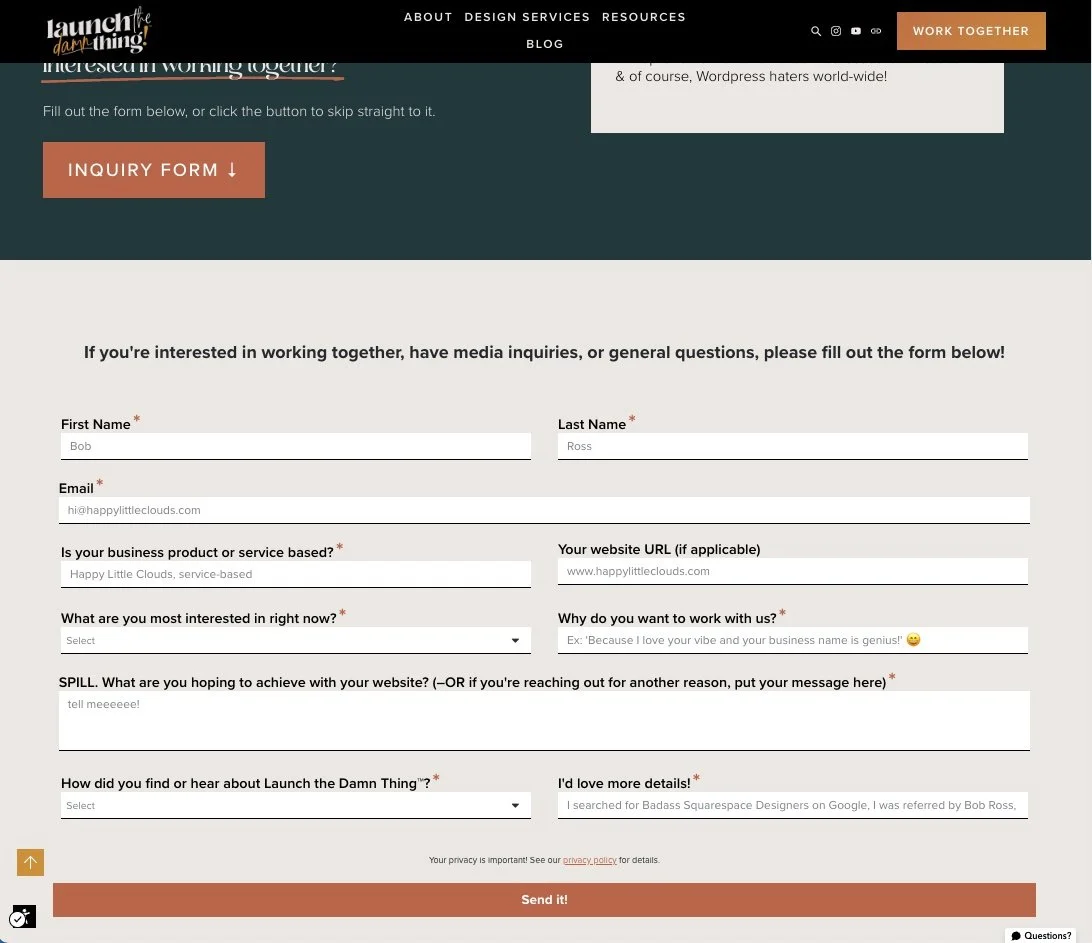
Embedded Dubsado form, Lead Capture
And before I dive into what that form actually looks like, I'm going to show you what my website looks like.
So on my contact page, I have the inquiry form actually embedded in this section. This is exactly the Dubsado form, but it lives on my website. I have styled it with custom CSS so that it actually does look like it belongs in my website and I designed it here. But actually, it's an embed block, so it was never designed in Squarespace.
I have a first name, last name, all the things. Then after I click send, it will redirect whoever is filling out the form to a page on my website that gives them more details on what happens next, a little video to show them my personality and entertain them for a minute while they wait for the automated email responder that says, "Hey, I got your application."
So that's what an embedded form looks like in Dubsado.
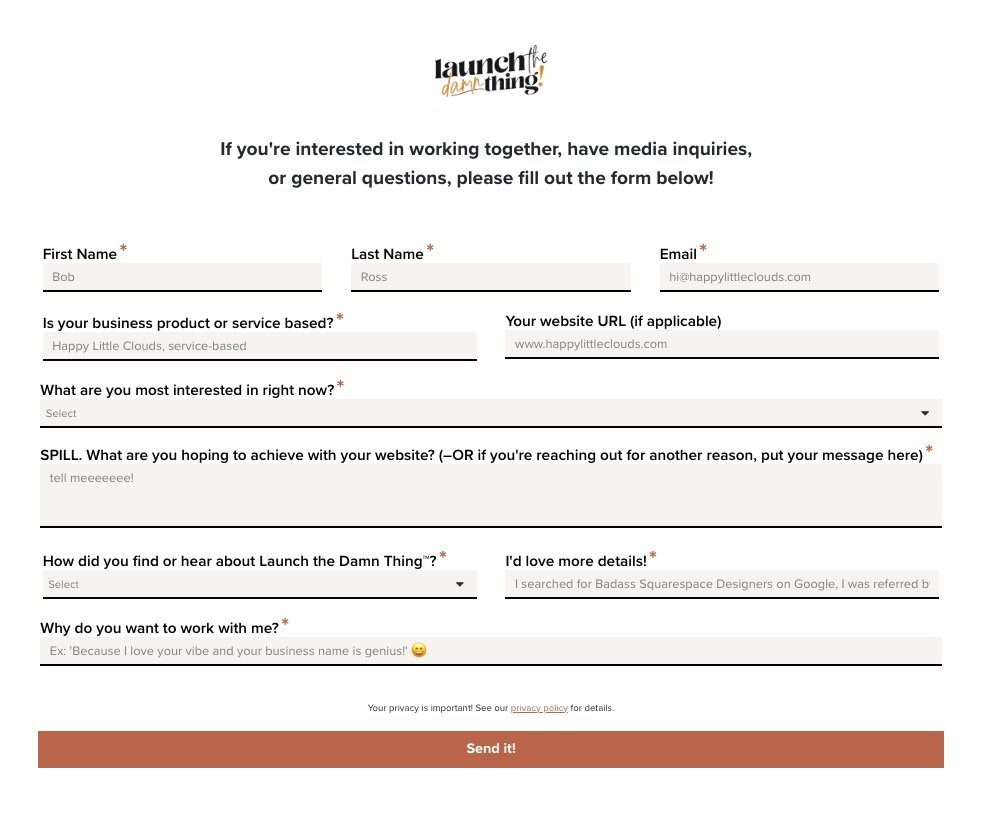
Dubsado form as a standalone page, Lead Capture
Now I have the embedded version, but I also have a separate link version. It's the same form. I literally just made a copy of one, and grab the embed code for the other. If I click on the form page, it has my logo at the top and it has slightly different formatting on the instructions. That is the only difference; everything else is the same.
The reason I have two of them is because I wanted this page to look a little bit different than it does when the form is actually embedded on my website. So they're slightly different.
The cool thing about these lead capture forms is that this field right here is called a workflow element. And when you put in the options, whatever you type in here, you can also set the automation that happens. If that's the answer they select.
Which means you can have a different workflow trigger based on how the answer to this question, which is huge for people that offer different types of services and need to send them different types of confirmations, or maybe kickstart an automated calendar invite, or a call or whatever it looks like for you and your processes.
In the settings, you can also set the redirect URL. You can also change the message in the pop-up, after they hit submit. Like you can say you rock or whatever you want to say there.
You can also apply a default workflow if you don't want to use one of these dropdowns. If it's the same for everybody, you can just set it here to do, to start whatever the automation series is that you want.
You can also change the project status when they have submitted a form, it, they automatically get a status change.
You can also set how the project title is going to be set.
You can also set if team members are going to be related.
You can even make this form expire if you want to set a time limit on whatever this thing is, collecting.
So lots of really cool features there. The form styling is a by default, you can choose the font that everything will show in the size and the color, how much space is added to the top of the form or the bottom of the form.
What the button actually says.
And this is where I added custom CSS to my form to style all of the fields. To add in my brand fonts so that I can use them if I want to. I'm trying to keep this form really simple and really short.
Let's quit and go into the next form.
All About Proposals

Proposal + Contract + Invoice document
I'm a little weird. My proposals are not spectacular. They're not designed and they're not pretty. And that's actually how I want them to be. At least for the time being.
I found that when I had a beautifully designed proposal with FAQ's and drop-downs on all these things, I was getting bogged down and redesigning it for every client. That was spending way too much time on things that. By that point, they already knew because I've already had the conversation with them. So it didn't seem important to me, but the capability is there.
You can find all kinds of Dubsado templates that teach you how to create these things, these proposals that actually look like a website. Unfortunately, I can't show you a personal example of that because I don't do that in my own business, but you can see how I've customized it a little bit. I have my brand font here. I have my brand colors. I have little boxes here.
This is closer to how it would display for an actual client. There's three tabs across the top. So it shows all three documents when I've asked it to.
The proposal can stand by itself, but it can also show the accompanying and contract for the same project, and the invoice for the same project, if you choose, and any combination thereof.
Underneath that I have a text box that will automatically fill in the client name, their business name, and their email. And the start date and the end date based on what I set in the project. I don't have to type that in. There's like one place that put that in and it just shows up everywhere that I have put those variable fields, which is amazing.
Underneath that I put in the project scope, what we are going to tackle, and I edit that before I actually send it out.
Then I put in a table so that they understand what day of the week we are doing what, when, and why. And when to expect meanings, et cetera.
Underneath that I have a section that talks about their investment based on whatever they've asked for and what to do when they're moving forward.
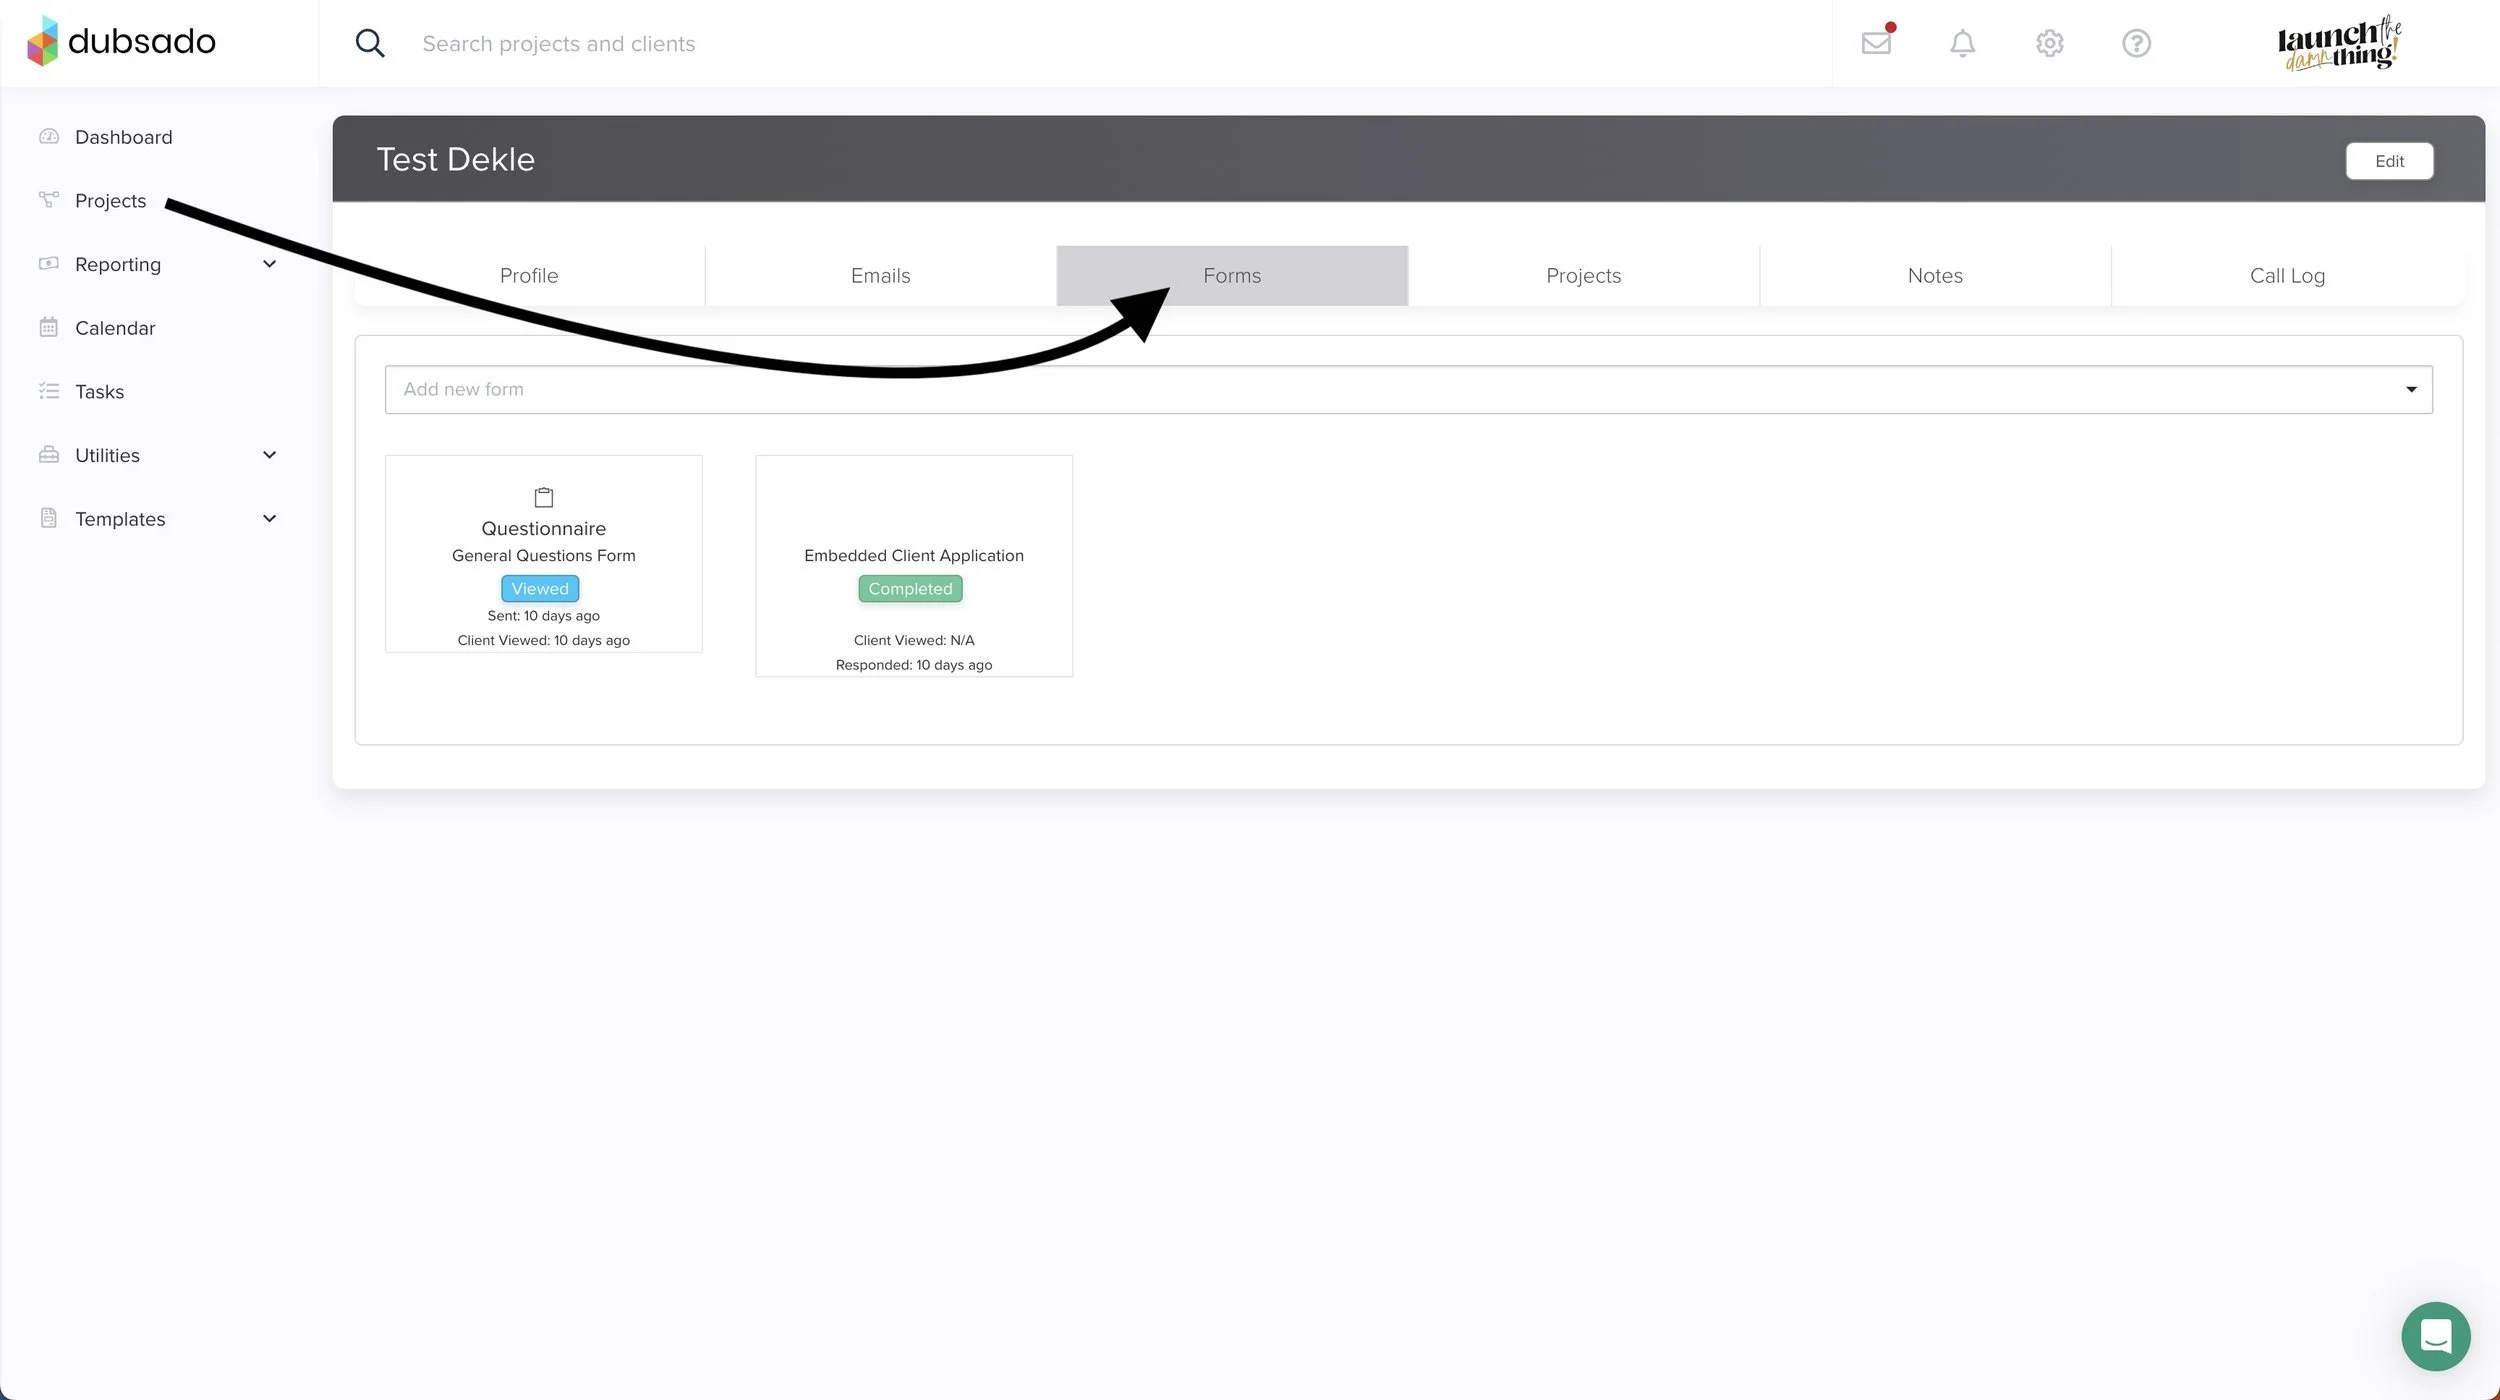
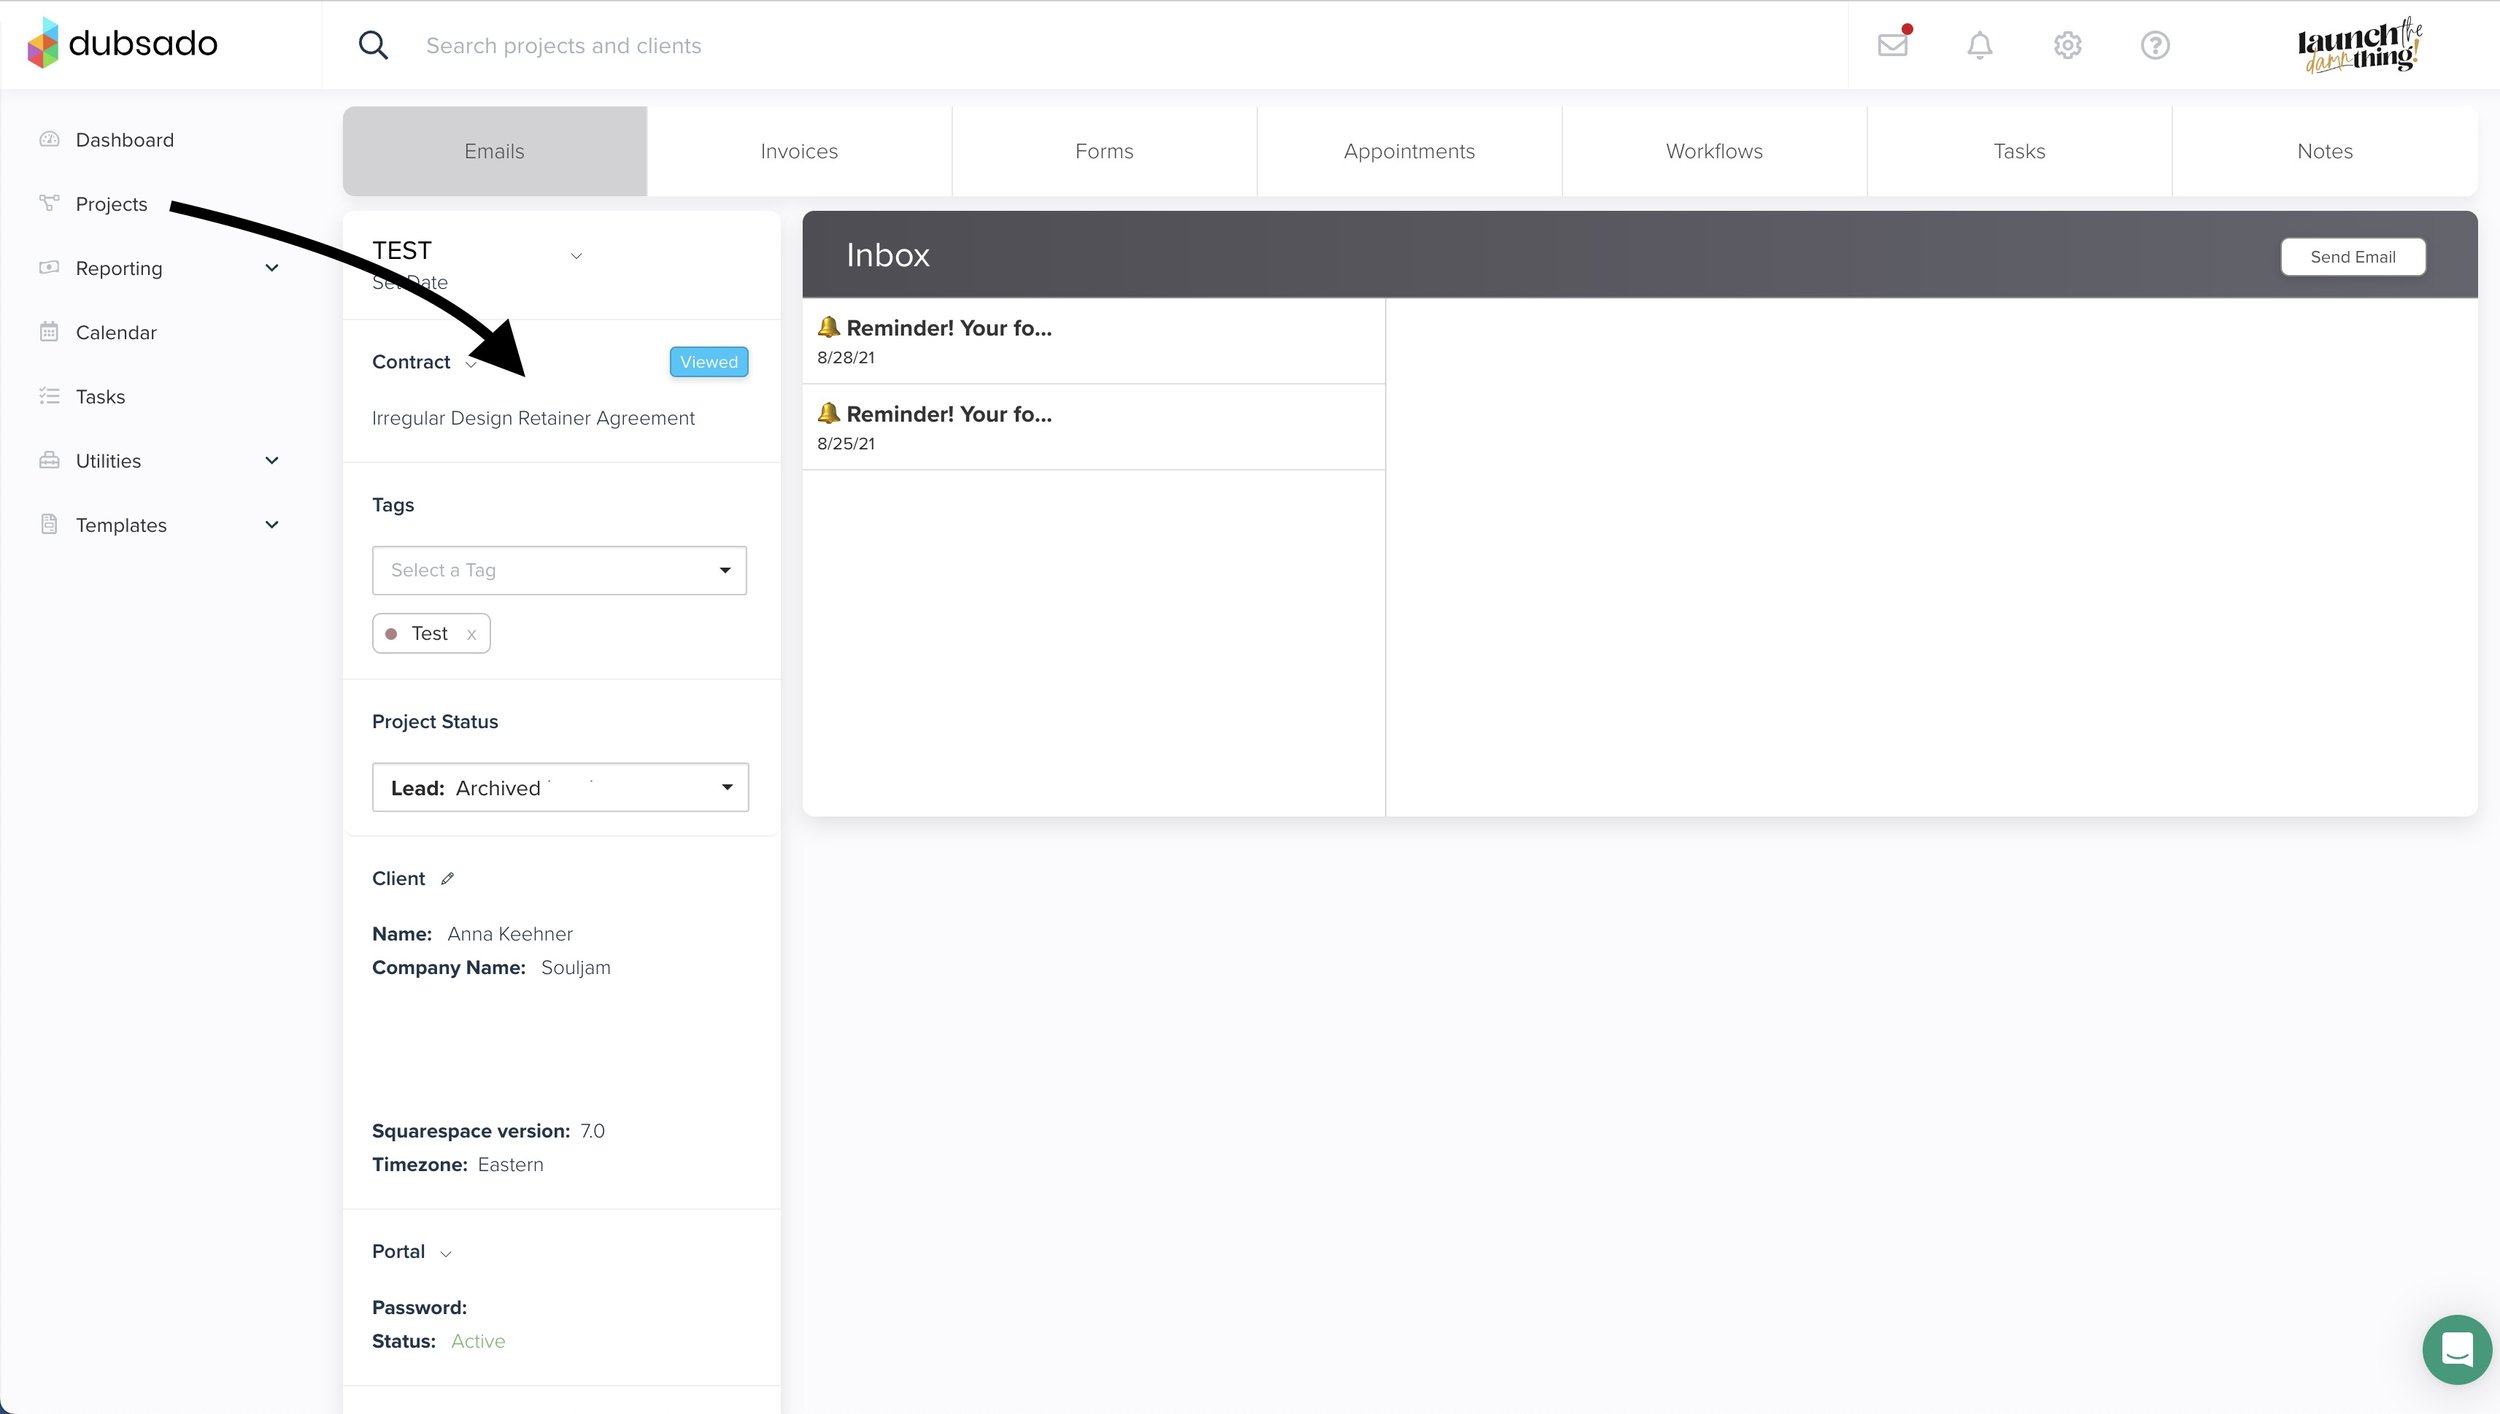
Where to find client’s forms from the client Address Book listing
They fill in their basic details here, all of these map to their client address book details so that they will also fill in on the contract, et cetera.
So that I'm not manually moving data around copying, pasting and doing all that stuff. I don't want to do any of that. You don't want to do any of that. So, this makes that process really easy.
The bottom, I always ask how excited are they to really get started, trying to get back to like, okay, I know you just filled out a form, but let's talk about the exciting part, because I want to get started on the design. You want me to get started on the design.
After that, the button text says submit and next so they know that there's a second step to this. When they hit that button, they actually go over to the contract, which is not part of this form so I can't click on it now, but it will switch over so they can read through it and sign digitally and then it kicks over to the invoice. So this is a three part document with three literal parts to it.
Inside the Form Editor
To dive into the actual editor really quickly, cause there is a lot to it. Essentially you can have containers, which is like div boxes if you code. So you can have a container that you put in other containers. And that is how I am getting like columns with background colors. You can also do really fun stuff with these.
The mobile responsiveness of this is a little shaky. So just make sure that you check it on multiple devices. It's an automatic, responsive thing. It just does whatever it does, so you have to be aware of what that quirk might look like on a smaller screen.
But there's lots of fun things that you can do with this, including the tables and choosing background colors for cells and text colors and whatever.
There's a course text boxes, images, and it can change. Or access any images that you've uploaded to the account, in your centralized media library, which you can pull in at any point.
And all of these little container blocks have a slider so that you can control how wide the content can take up inside that container box.
So if you have one container that is the full width of the screen, it doesn't have to have content that also takes up the full width of the screen. That's the container width versus the content width. I can just show you that really quickly. So if I reduce the width of the content inside the container, Then I can reduce that without changing the background.
You can also set a background color.
You can also send a default text color in case you are doing an inverted style with a dark background with white text, you don't want to go through individually and change all the text colors.
You can send a background image.
You can add spacing on the top, on the right, on the left, and on the bottom of all of these container blocks.
You can also do the same thing for the space outside of it; that's the margin, on the top bottom, left, and right.
So you have lots of control to play around and make this really a beautiful document so that they don't feel so much, like they're filling out a form.
My Questionnaires
That was the proposal. And those are all mostly the same. So let's jump into questionnaires because that is the really fun one.
Fun fact questionnaires in Dubsado don't actually have to have any fields at all.
And you're like, why on earth would do you do that? Actually, it is really handy if you just want to share some information in a way that you can't do in an email.
Welcome Video + Onboarding Intro
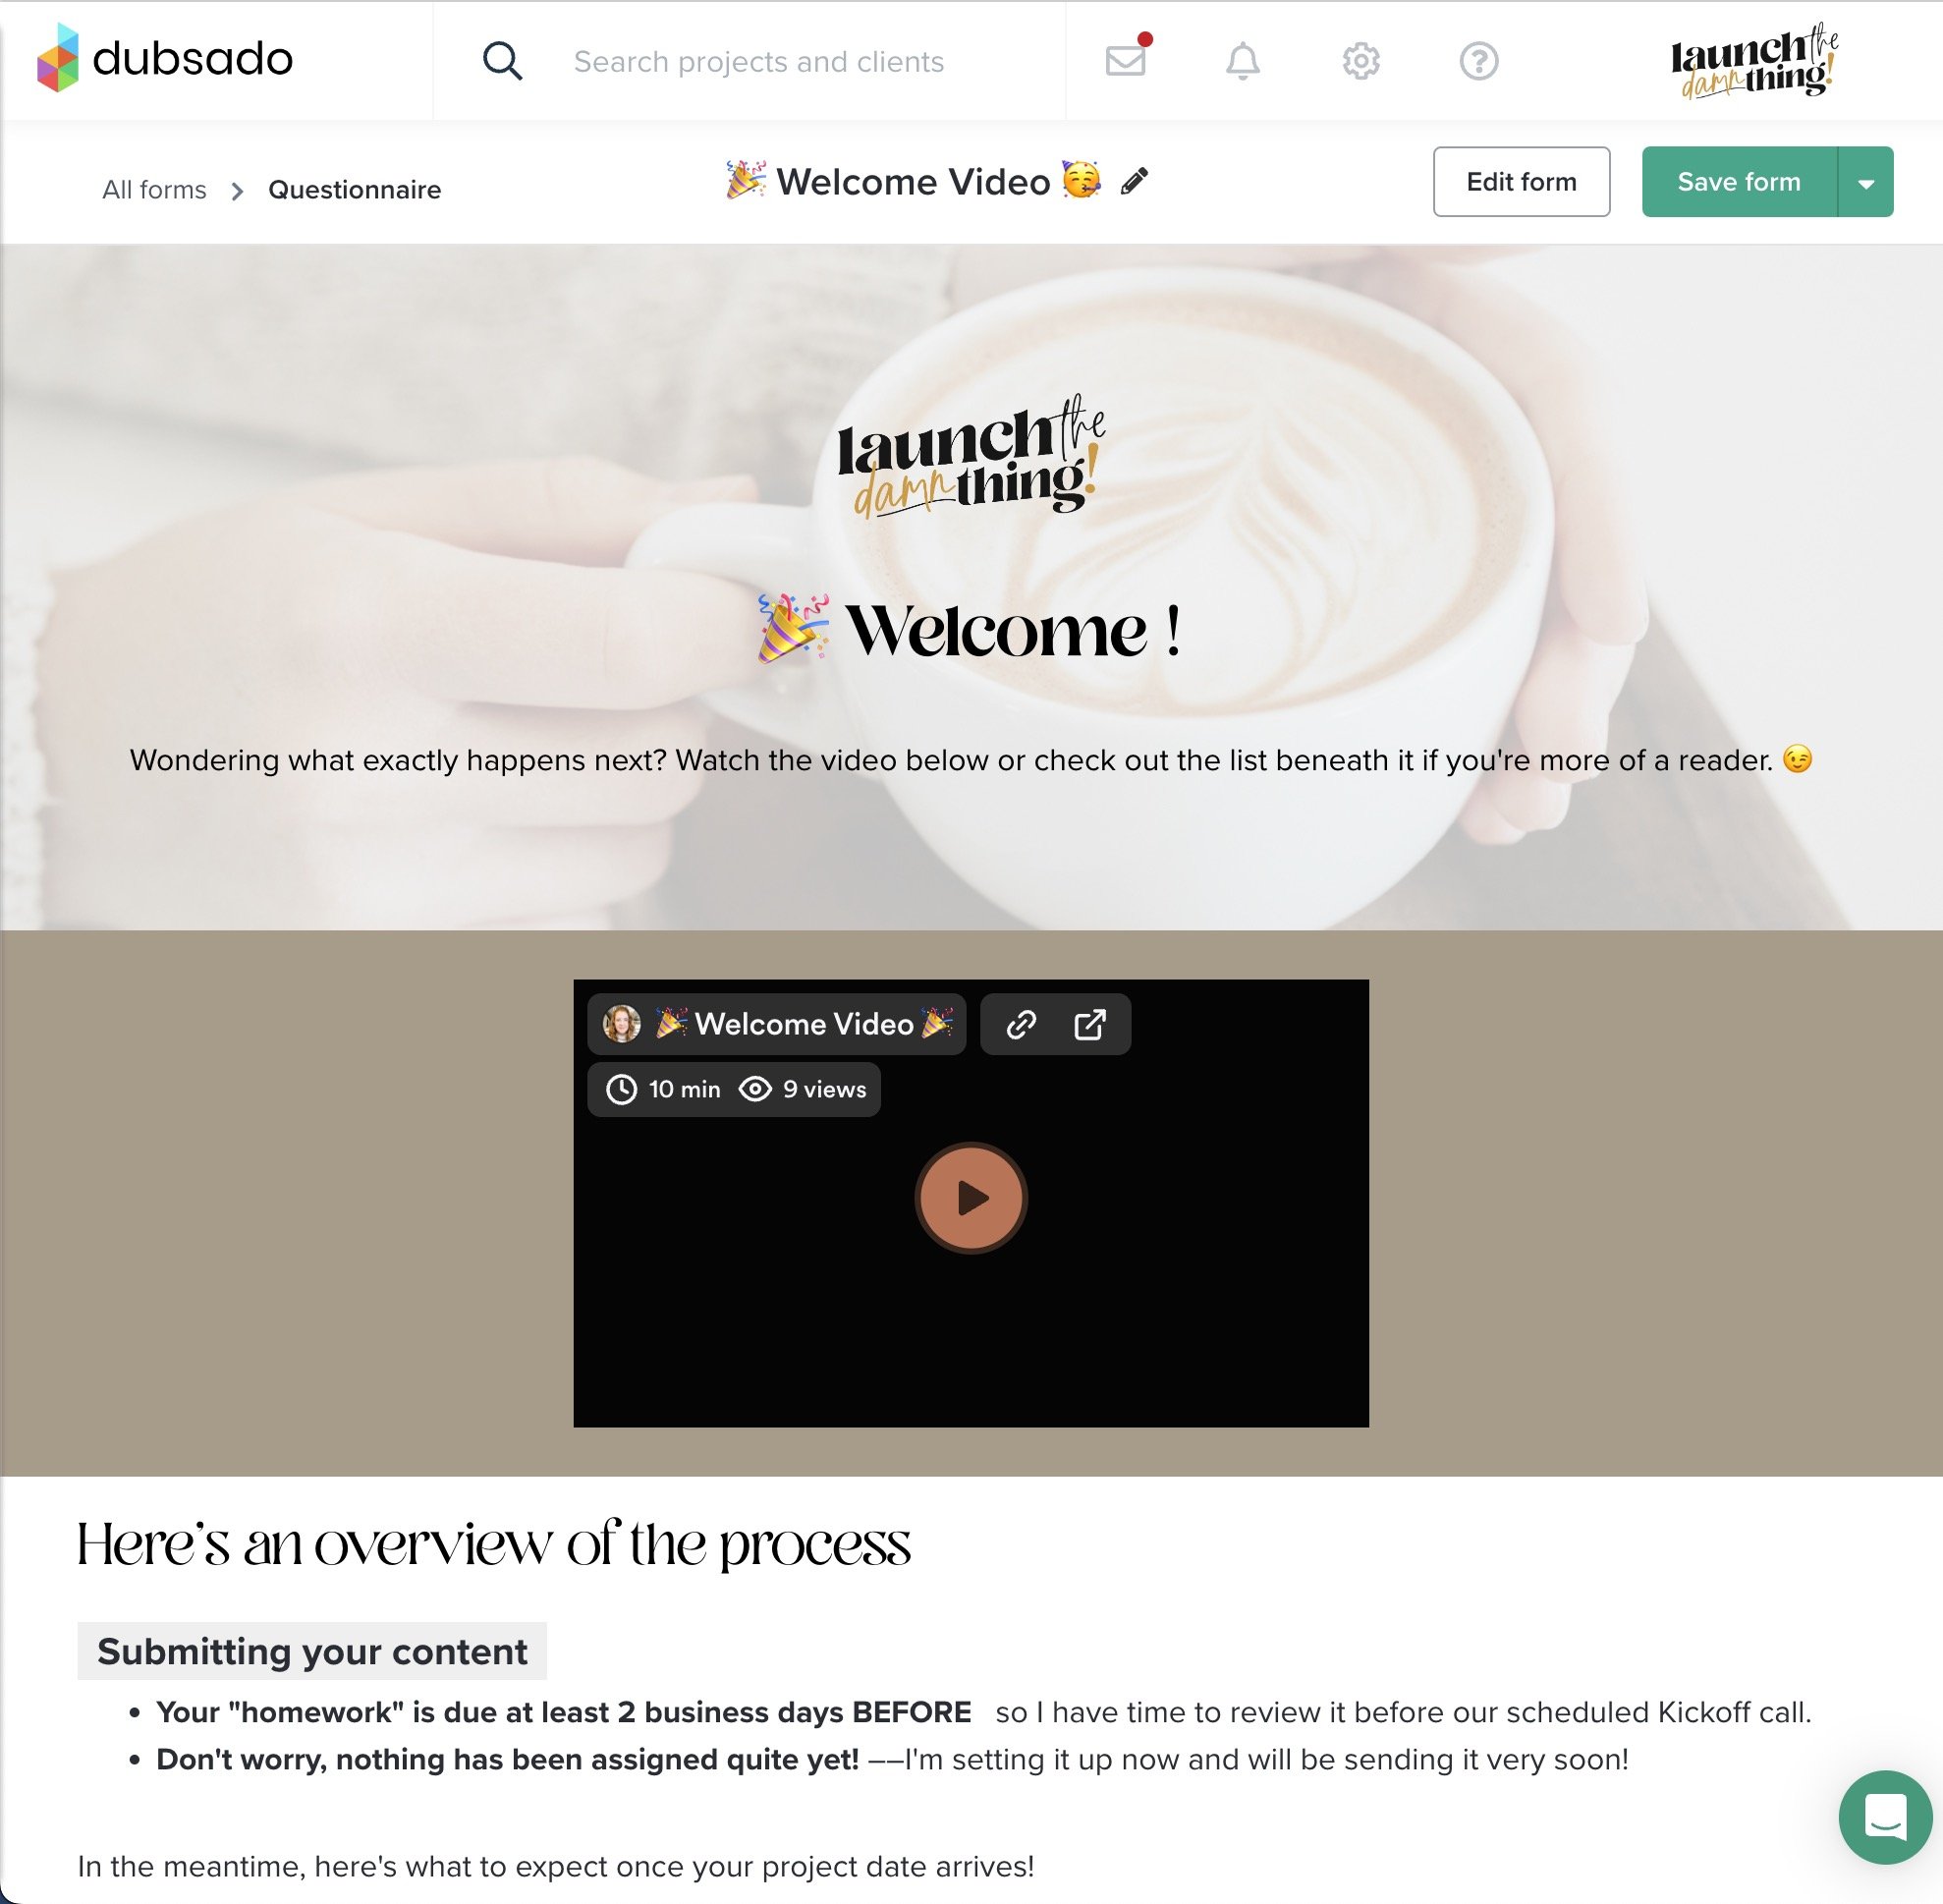
Onboarding, Questionnaire
If I go into the welcome video, this is what sends immediately after they complete their proposal and the contract and the invoice. They make their first payment. This is the form that it sends them immediately following that.
I have the background, I have the welcome. There's a 10 minute welcome video that goes over what to expect while I'm getting all of the like portal stuff set up for them on the backend. It has a video, and then I literally wrote it out here underneath, in case they're more of a reader, they have both options.
As you can see, this is a form, a questionnaire, in Dubsado that literally has no fields. There's no boxes to check. There's no fields to type in. There's nothing to do.
It sends this as part of the workflow automation, just because I want them to know what to expect after they've done the paperwork and they've made the payment. This is part of that onboarding and you can get really creative with that.
This is the opportunity to reinforce your boundaries, to make sure they know how to communicate with you while you're working on getting the rest of their project details together now that it's actually a project.
So that is my onboarding form, that's not really a form.
Brand Personality Workbook
Then I have my personality workbook and I'm not going to show you all of that, but this is a preview. Instructions over on the left side, a fun graphic on the right, and then a whole bunch of questions beneath that.
I got that form from Elizabeth McCravy in Booked Out Designer. So I'm not going to leave that open for too long. There's lots of secret stuff there that she only shares in the course.
So after they get the welcome video and they complete their brand personality workbook, then there are client portal access and instructions.
Client Portal Access & Instructions
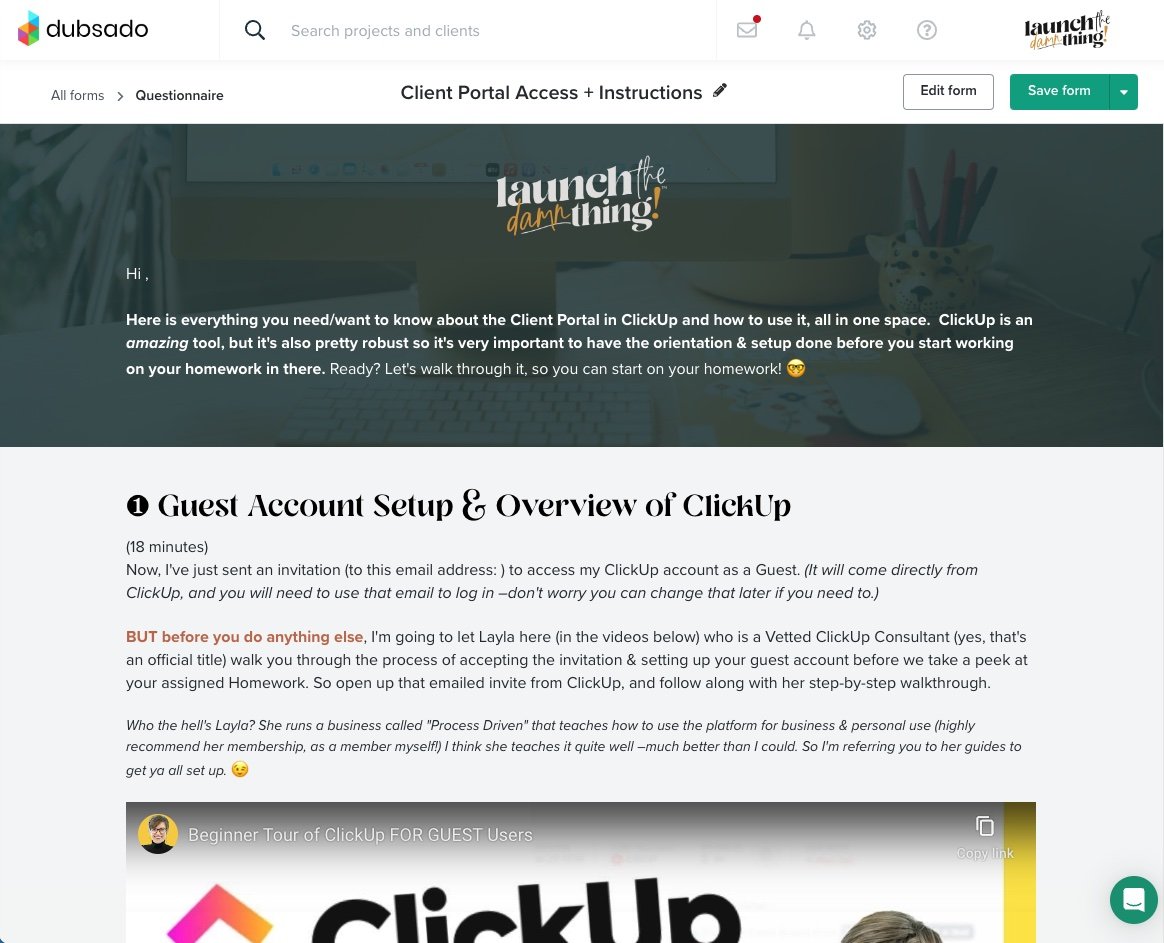
Client Portal Access Instructions, Questionnaire
Basically I'm like, "Hey, this is where we're going to communicate for their project. And this is how to do it."
For large projects, I bring my clients into ClickUp with me so they can see what I'm working on and when. But in order to do that, there's lots of steps because ClickUp is not an easy thing to onboard clients into because it's so complex; it's a robust software.
So, to do that, I have the lovely Layla Pomper here to go through the guest account set up. And once they've done that they will type in their email address for the account they created in ClickUp, which is free. Then I know to send them the invitation to that email address to give them access to the portal as a guest, that I set up in my account.
Now they have told me that they've done, that they've submitted their guest account access. They've adjusted their notifications. I have another video from Layla here. She does it a lot quicker and more efficiently than I probably would. So I'm literally embedding her videos here because they're public on YouTube. They could go find them themselves. And that's just an easy way for me to do that.
Underneath that I'm reminding them not to arbitrarily check these boxes and to actually do these steps because with ClickUp, Asana and a bunch of others, too. If you don't adjust your notification settings, you're going to get notified about everything. And the next thing you know, there's going to be a hundred notifications in your inbox for things that you don't necessarily even need to know yet.
After that we move into step number three of the onboarding process. That's where I go over their homework in the portal, show them where everything is. And then there's a couple of extra steps on how to use the content submission guides to fill out before their project is due, because my projects are pretty content heavy.
And there's a lot of homework because I focus on collecting strategic content, and not bogus content, because I don't want to waste anybody's time. If we're going to do a website, we need to do it strategically so that ideally it can sell and get you clients.
This is how to use the portal and everything inside in smaller kind of bite-sized pieces. And again, I'm asking them to check boxes after each video so that I can see where they are in the process.
There's a couple of short, how tos at the bottom.
There's a link to the portal after they've gotten through all of this stuff.
It will only be there once I put the link in the custom mapped fields. If you need a refresher on how that's done, make sure you go check out the video before this, where I talked about where that is in the Dubsado settings.
The exclusive, but general video library is a Loom video library. And I link that here. And then this is where I fill in their password to their Dubsado Portal.
Because yes, Dubsado has a portal. So when they have submitted their proposal and they've signed their contract and they're paying their invoices, all of that is in a Dubsado-land portal. And in the event that they want to go back and look at any of that. I always give them the access point here.
At the bottom, I'm just like, "Hey, thanks for doing that. I'm really excited to get started" and that's the end of the form.
So that is the client portal access and instructions.
Launch Prep + Video Library Access
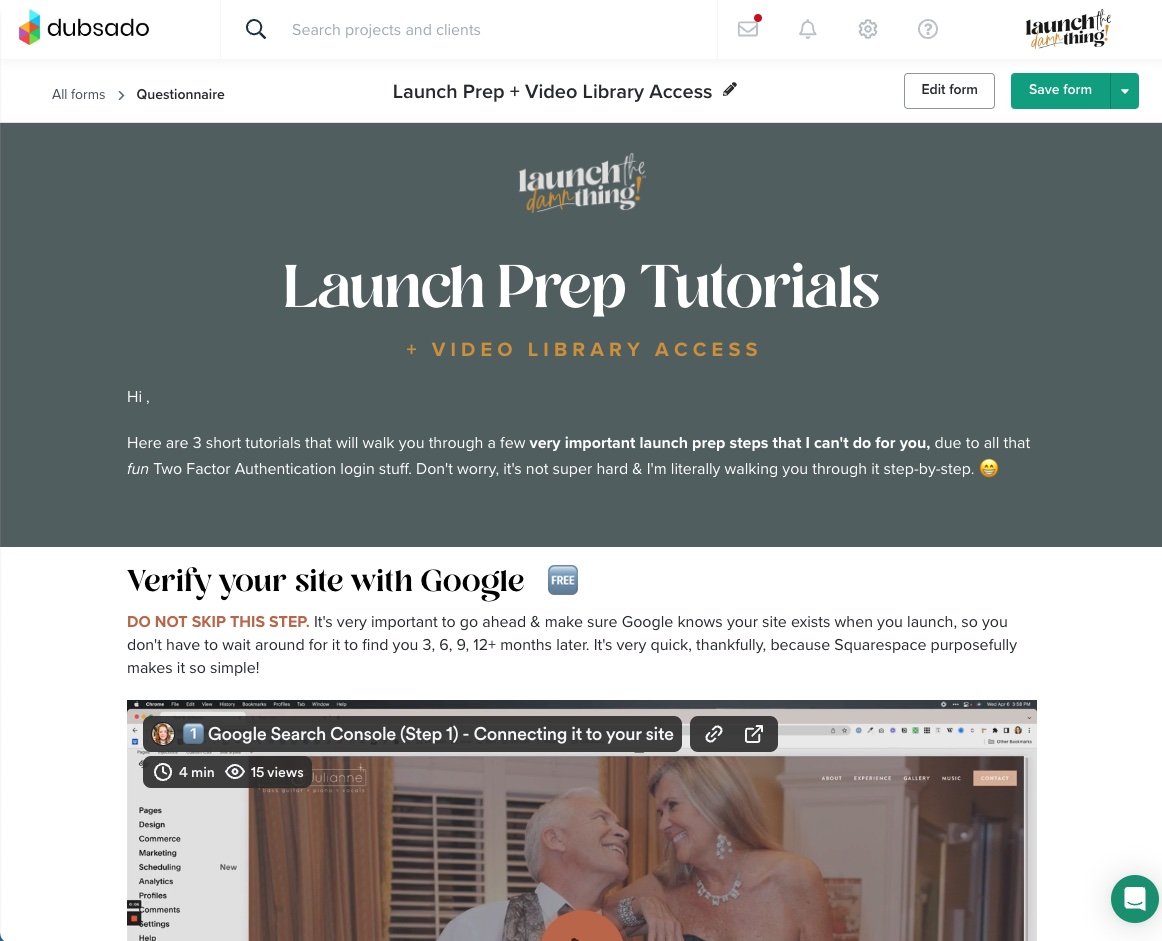
Launch Prep Guide, Questionnaire
Then when we get closer to launching the website design, we have a different form that goes out in a later automation, that gives them access to the step-by-step guide to connect Google search console to their Squarespace website. Walks them through step-by-step, it asks them if they did it now, or if they're going to do it later. It also walks them through how to submit their first site map to Google. And again, do it now or am I going to do it later?
Then how to set up Google analytics, because all of those things are a little bit dicey to do for other people with all the two factor authentication type stuff.
At the bottom, I just have another link to the video library in Loom, and their project specific video library.
So I have one that has generic videos that all clients can access, and I have another folder for every client with specific videos in them, just for that client, that no other clients sees. So there's two links here. I will make this text a button when that link is available and then I send the form. So this is attached to one of those emails that I have to approve in the automation for it to actually go out.
Testimonial Request 1
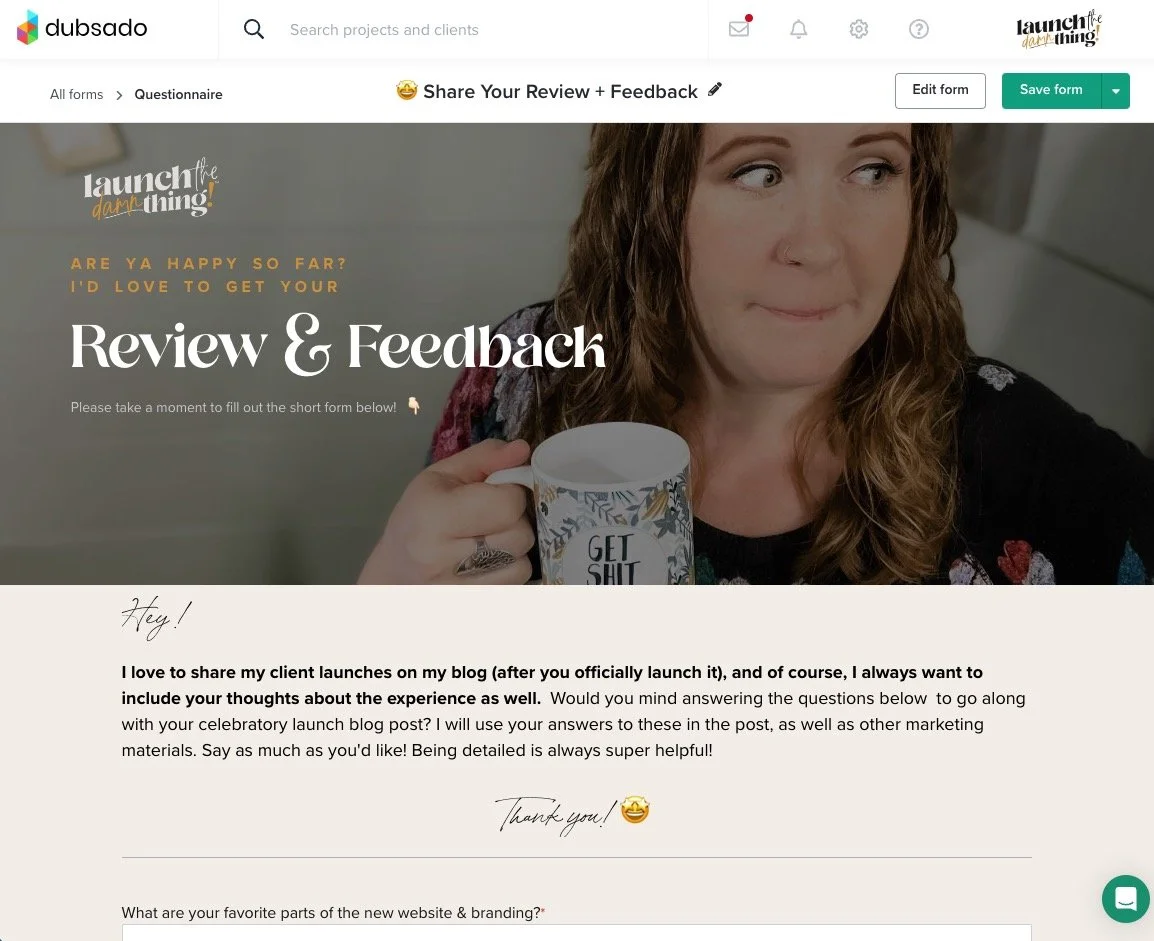
Testimonial Request, type 1, Questionnaire
The next type of form that I have is my testimonial requests. And I have two of them actually. This is 'share the wins' and I also have one that is 'share your review and feedback.'
So this one goes out first in the automation right before we've launched. So it has a brief word, some questions.
And then I'm actually linking here to my Facebook page to leave that review over there. I'm asking them to just copy and paste the generic review and put it in another location also. And I'm doing the same thing for Google. So they have the opportunity to jump over straight into Facebook and also over into Google-land and leave me a review there.
This is something that I just recently started doing and it's actually working pretty well.
Underneath that I'm saying, by the way, if I have any room for improvement, please let me know. Is it okay if I need to make corrections to your review? Like if they forgot a period or it needs a quote. So I'm asking for permission for that. And also when it's okay to announce the website design on my own website and share the link.
Sometimes the launch when we launch is not the public launch date. And I always want to check to make sure that I'm announcing it on time.
Underneath that I have a call-out because I try to record all of the meetings that I have with clients and share those video files. Because I have real genuine reactions to their presentation during the call. I always ask if I can get permission to use those snippets as testimonial videos.
This is also something I've been doing recently that I haven't always been doing, but it gives some great video clips. Because this is their genuine reaction. The first time they're seeing the thing. And their thoughts. Aren't scripted. It's a great practice. I encourage you to do that too. It's been really helpful in the past few months.
At the end. I'm just saying, thank you for taking the time. Put in a GIF again, this is another use of why it's awesome to have embed blocks in Dubsado, where I can put in code or images, however I want. So that's the first review and feedback form.
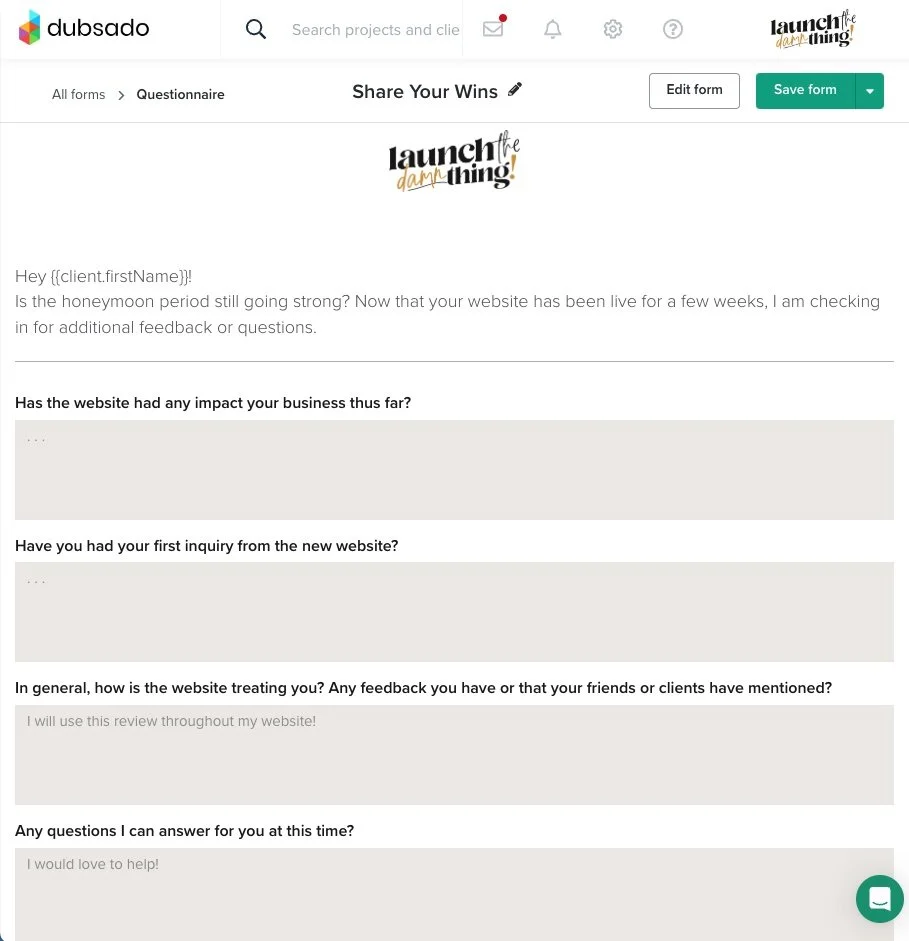
Testimonial Request 2
The second one is just asking like, 'Hey, since we launched, what's been going on.' This one's really similar to the other one, but a lot simpler and a lot shorter.
So similar questions, but mostly all like, ' what's been happening since you announced the launch of your website. Have you gotten your first client? Have you gotten your first sale?' All of those things.
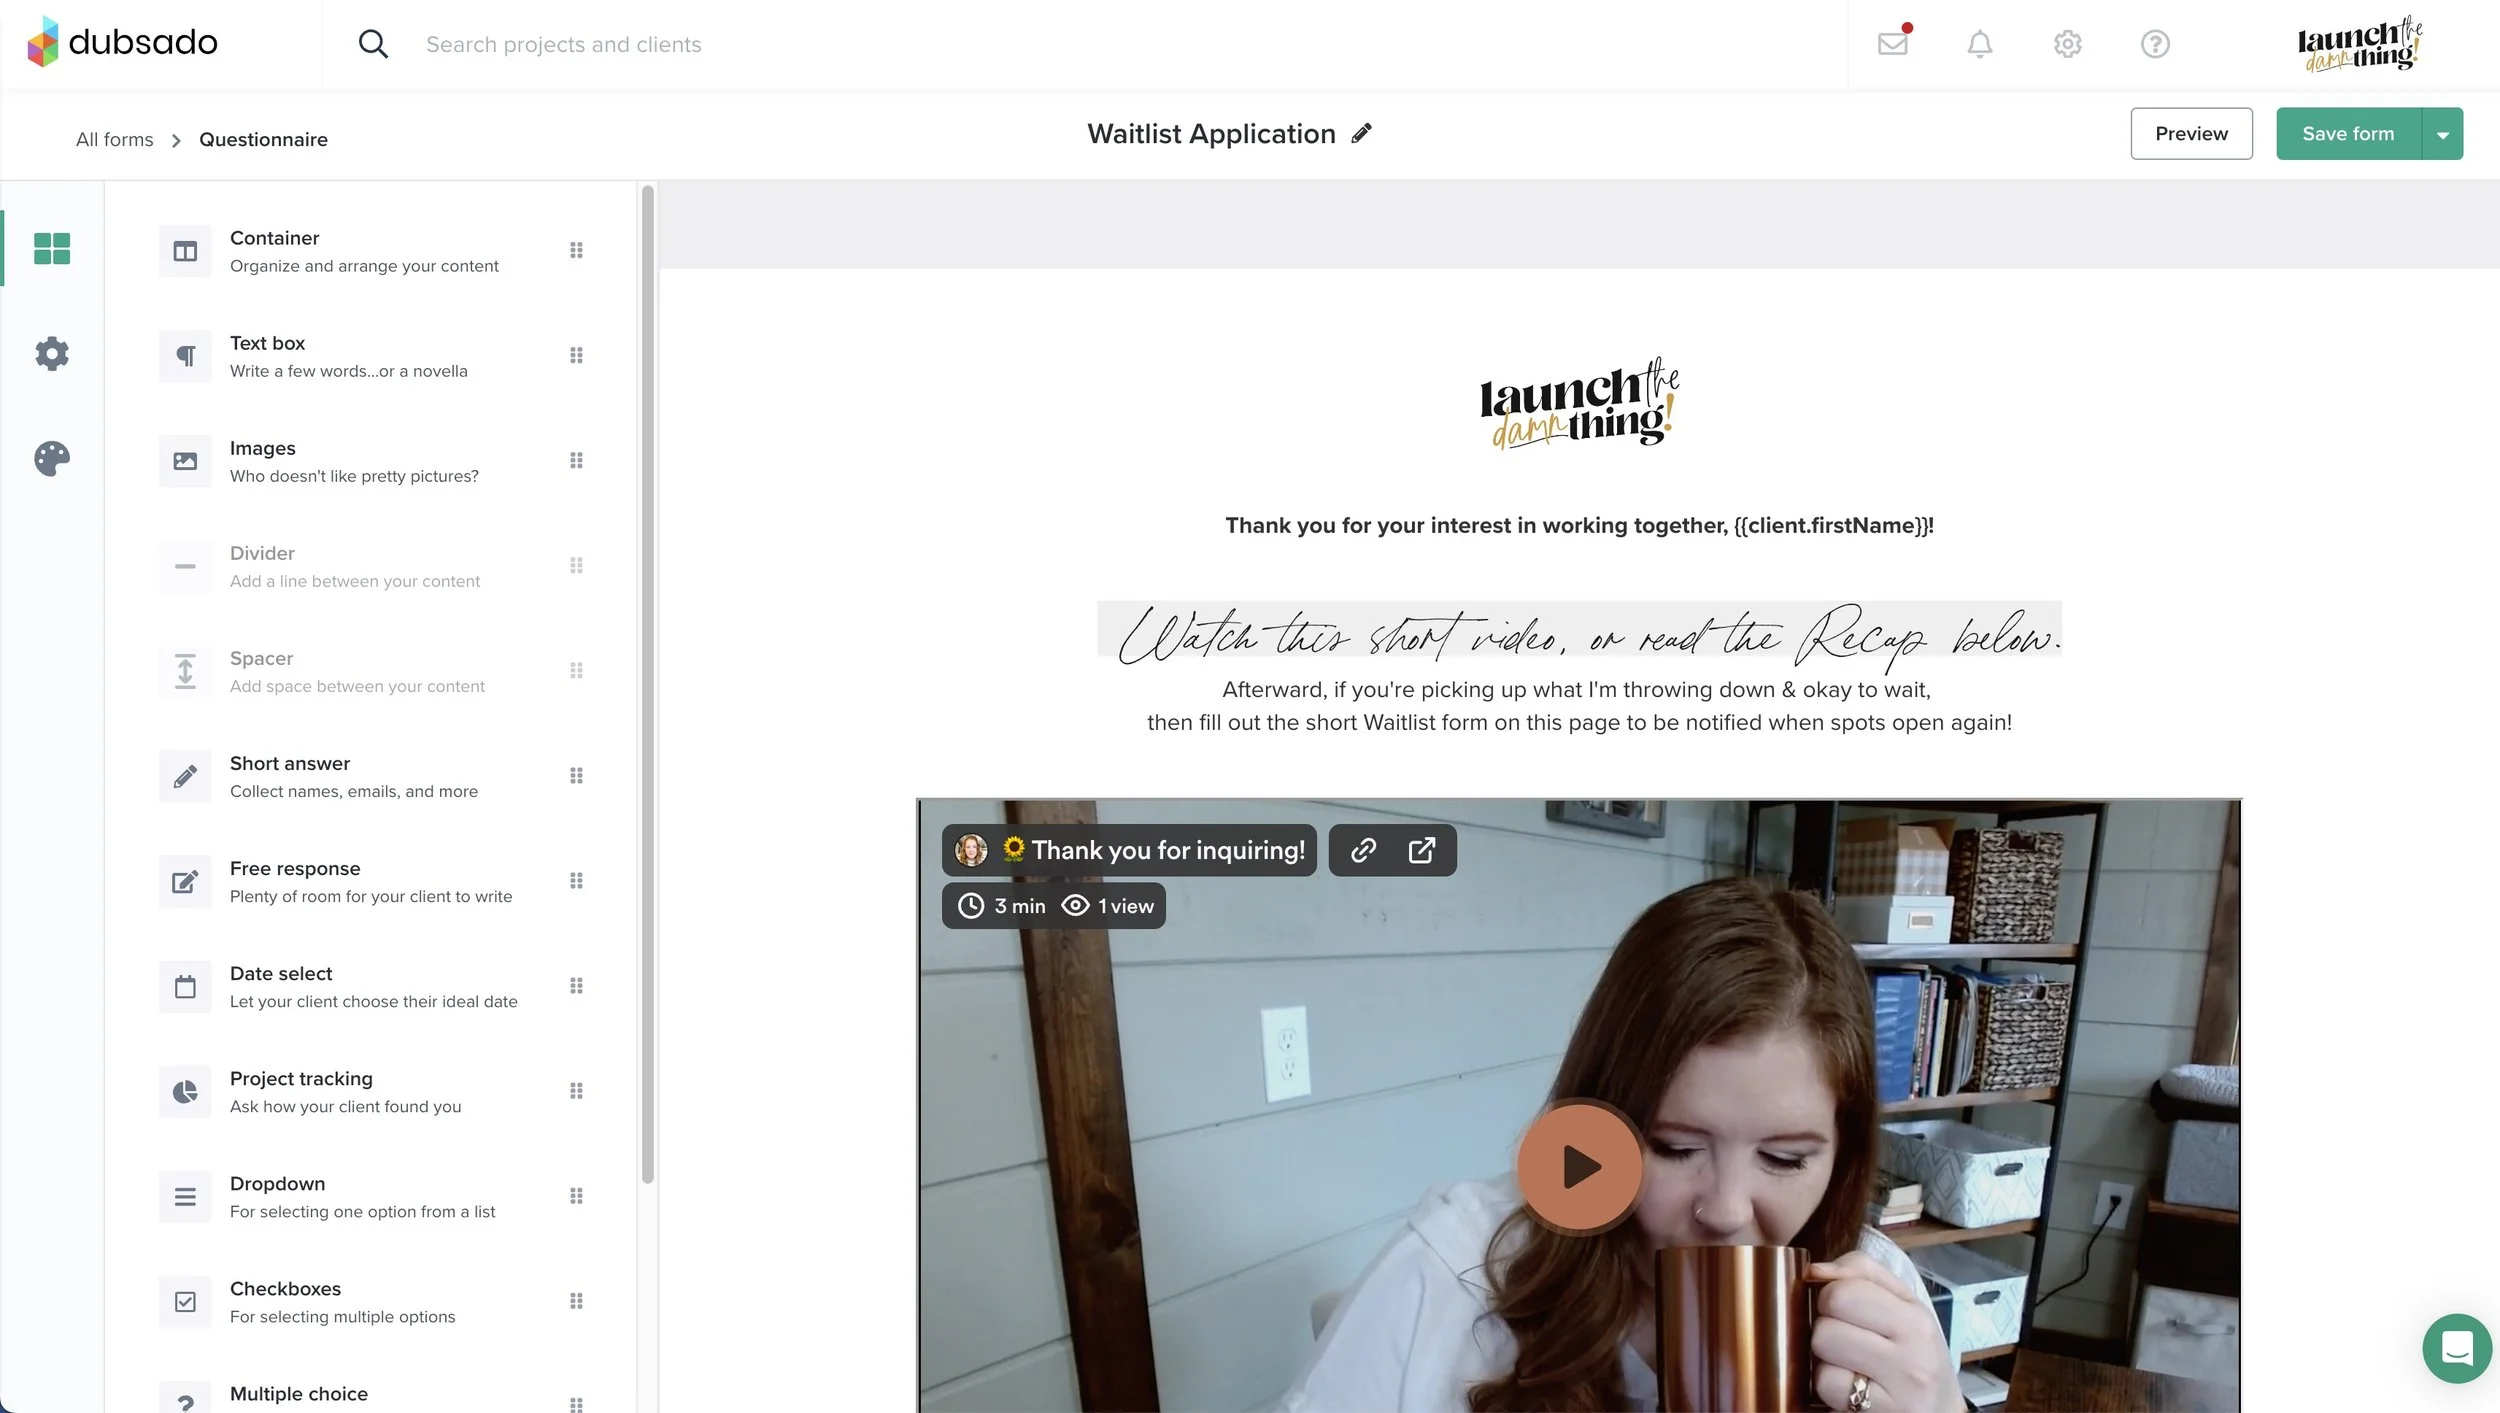
Waitlist
I also have a waitlist application for when I've booked out so far that I'm not comfortable continuing to take more projects.
My Sub-Agreements
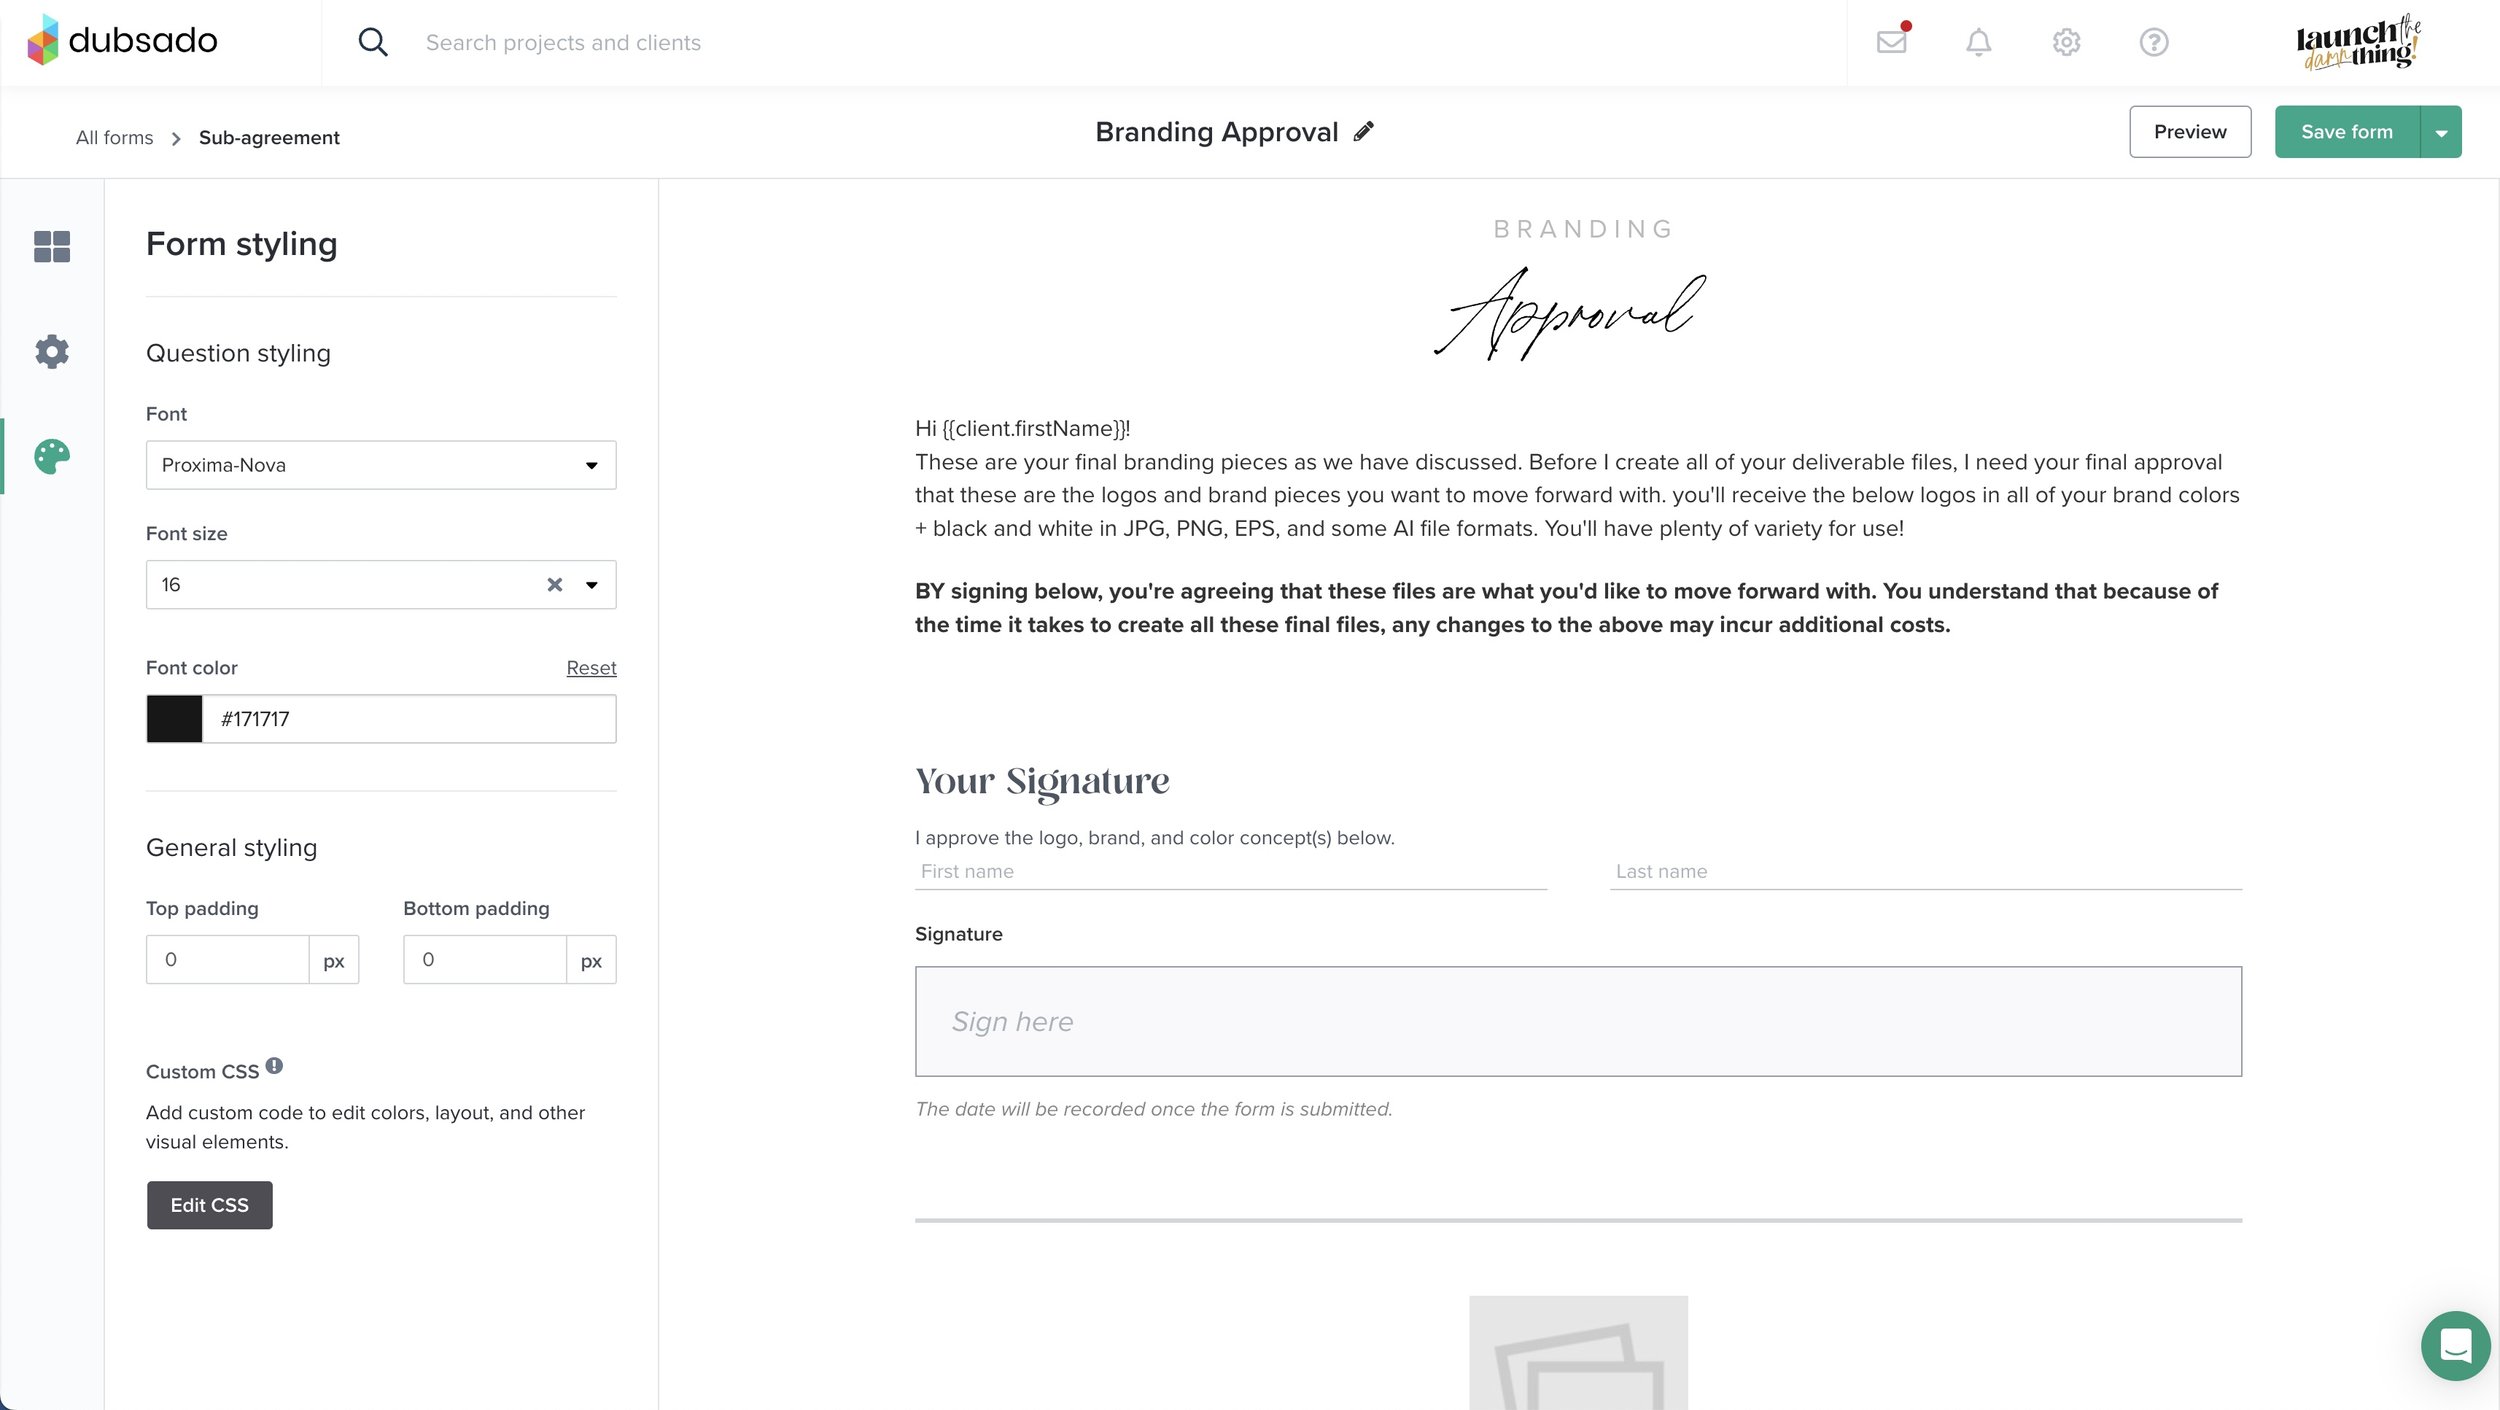
Then I also have a branding approval sub agreement because again, all projects in Dubsado can only have one main agreement or one main contract and that's usually the project contract.
So if I'm doing a web design for someone, that contract is a web design agreement and I can't also put a brand approval agreement in there. I can't also put a rescheduling agreement there. Those go in the forms area of the project, and so those become sub-agreements. They have the same status, but they're called something slightly different.
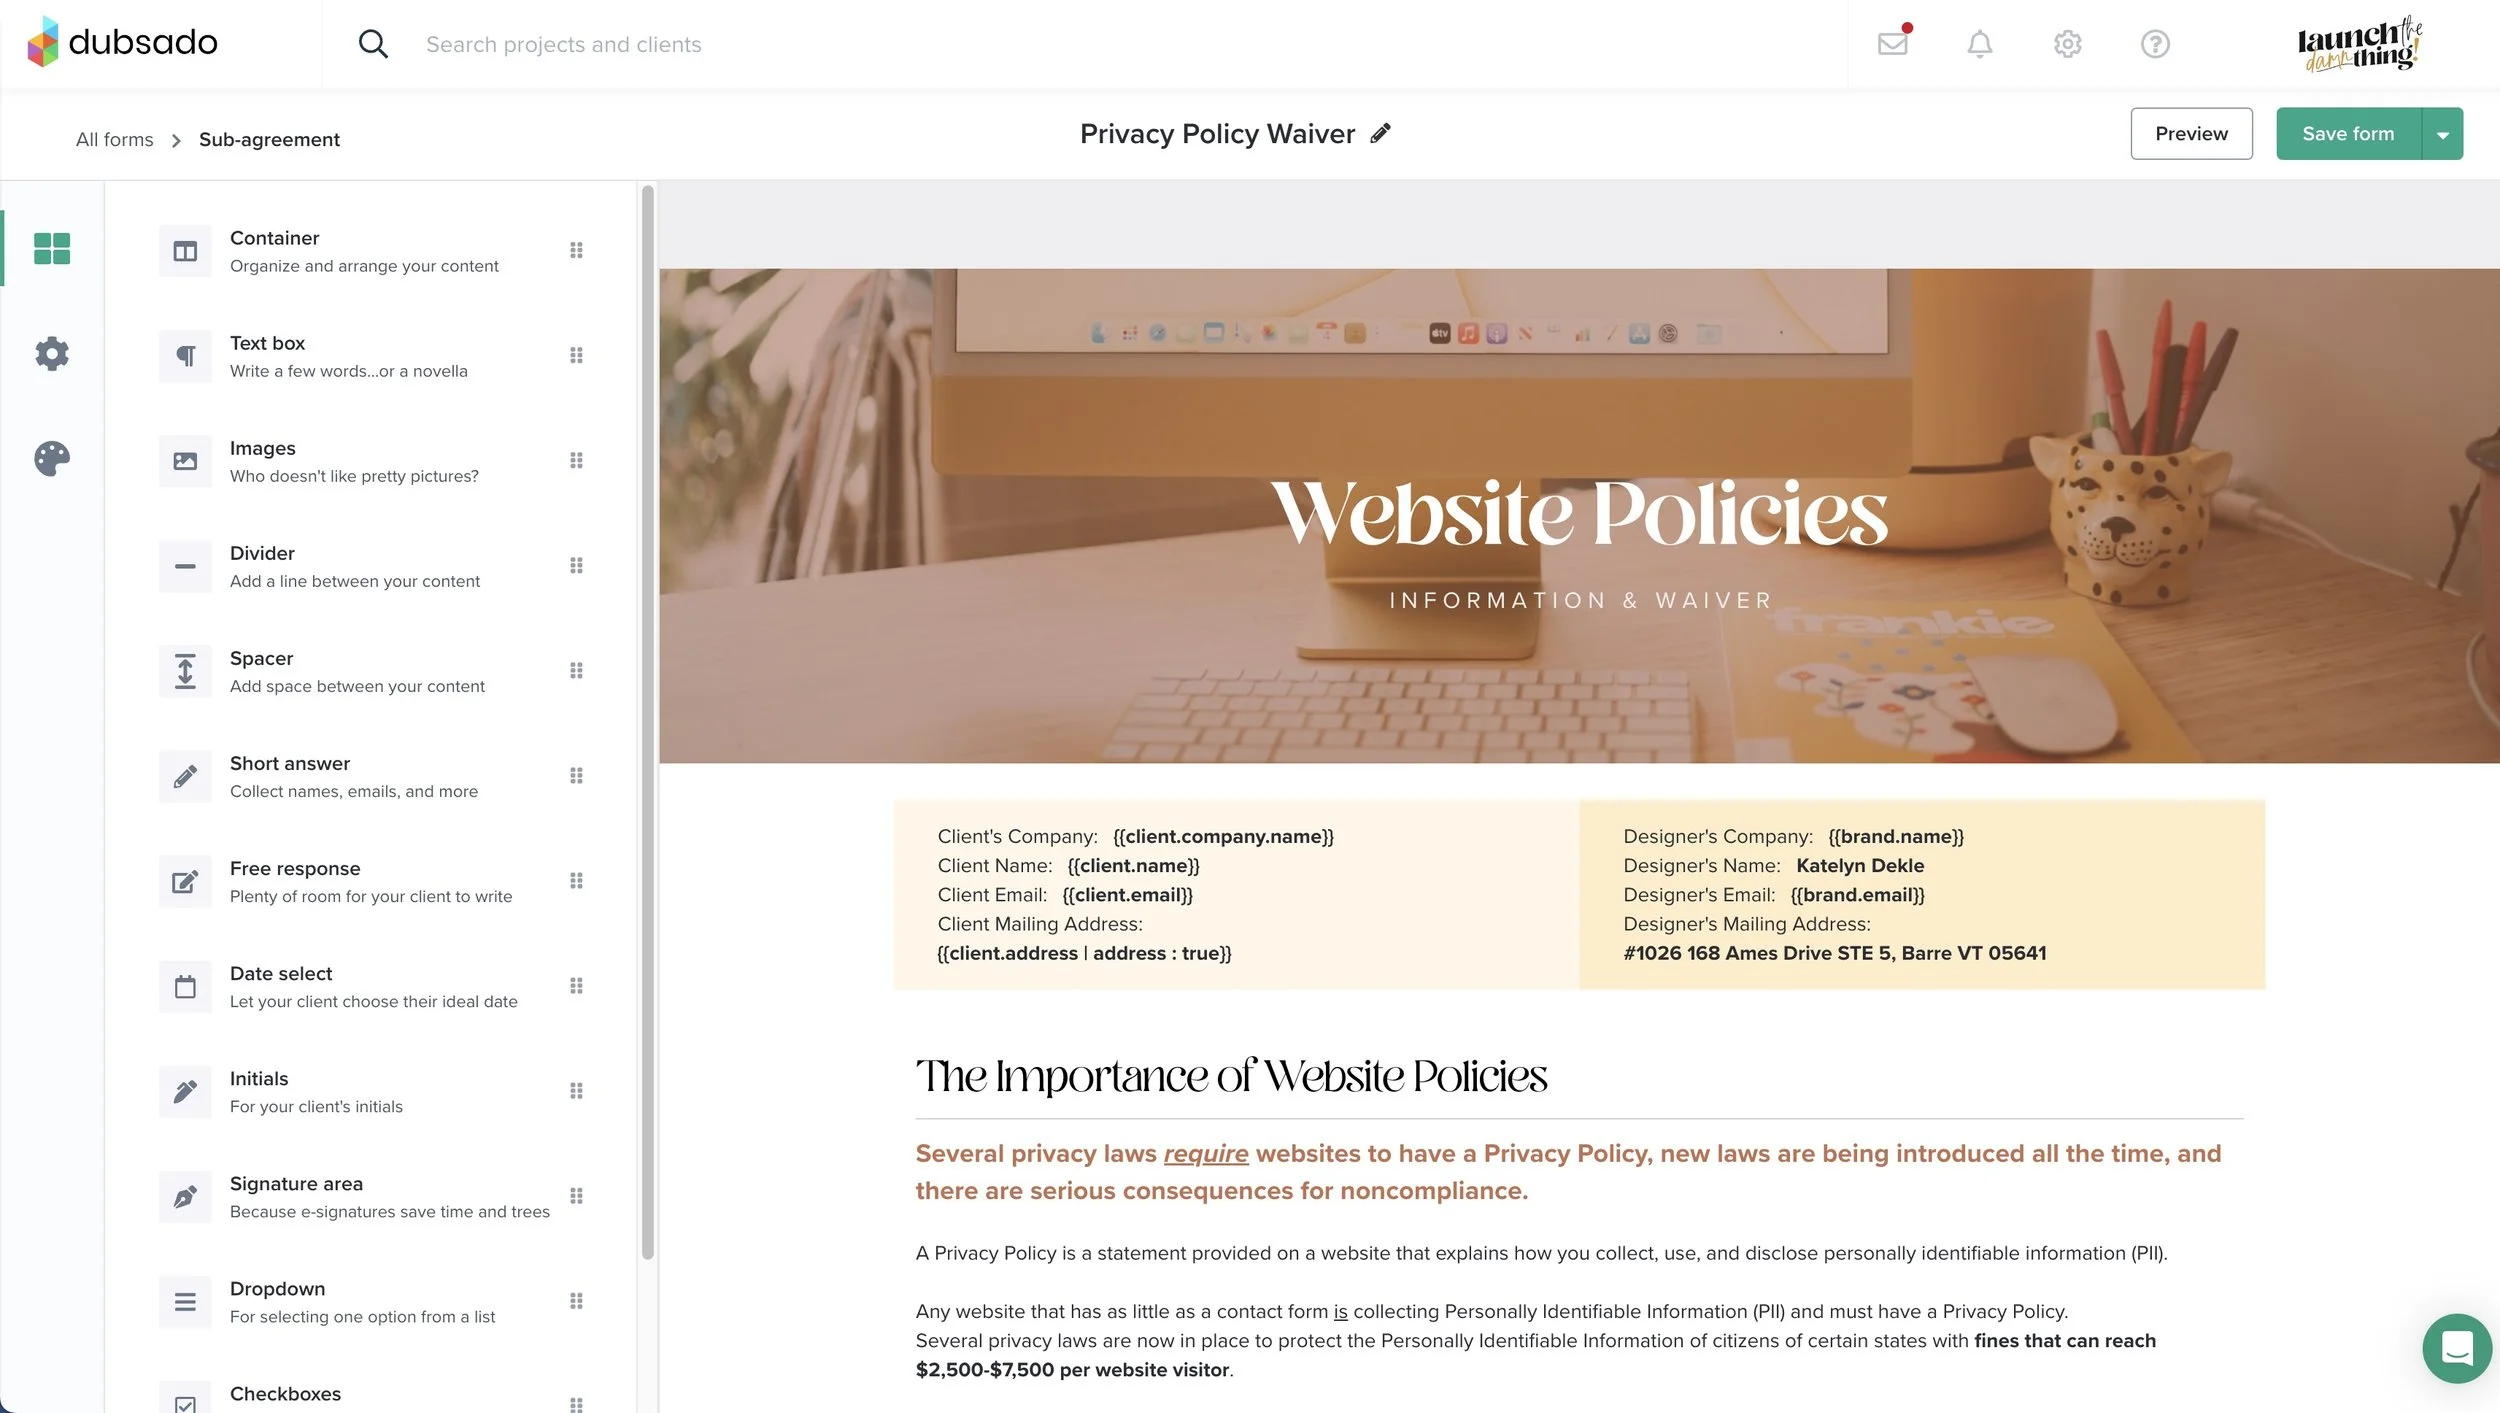
I also have a privacy policy waiver if they choose not to let me put one on their website.
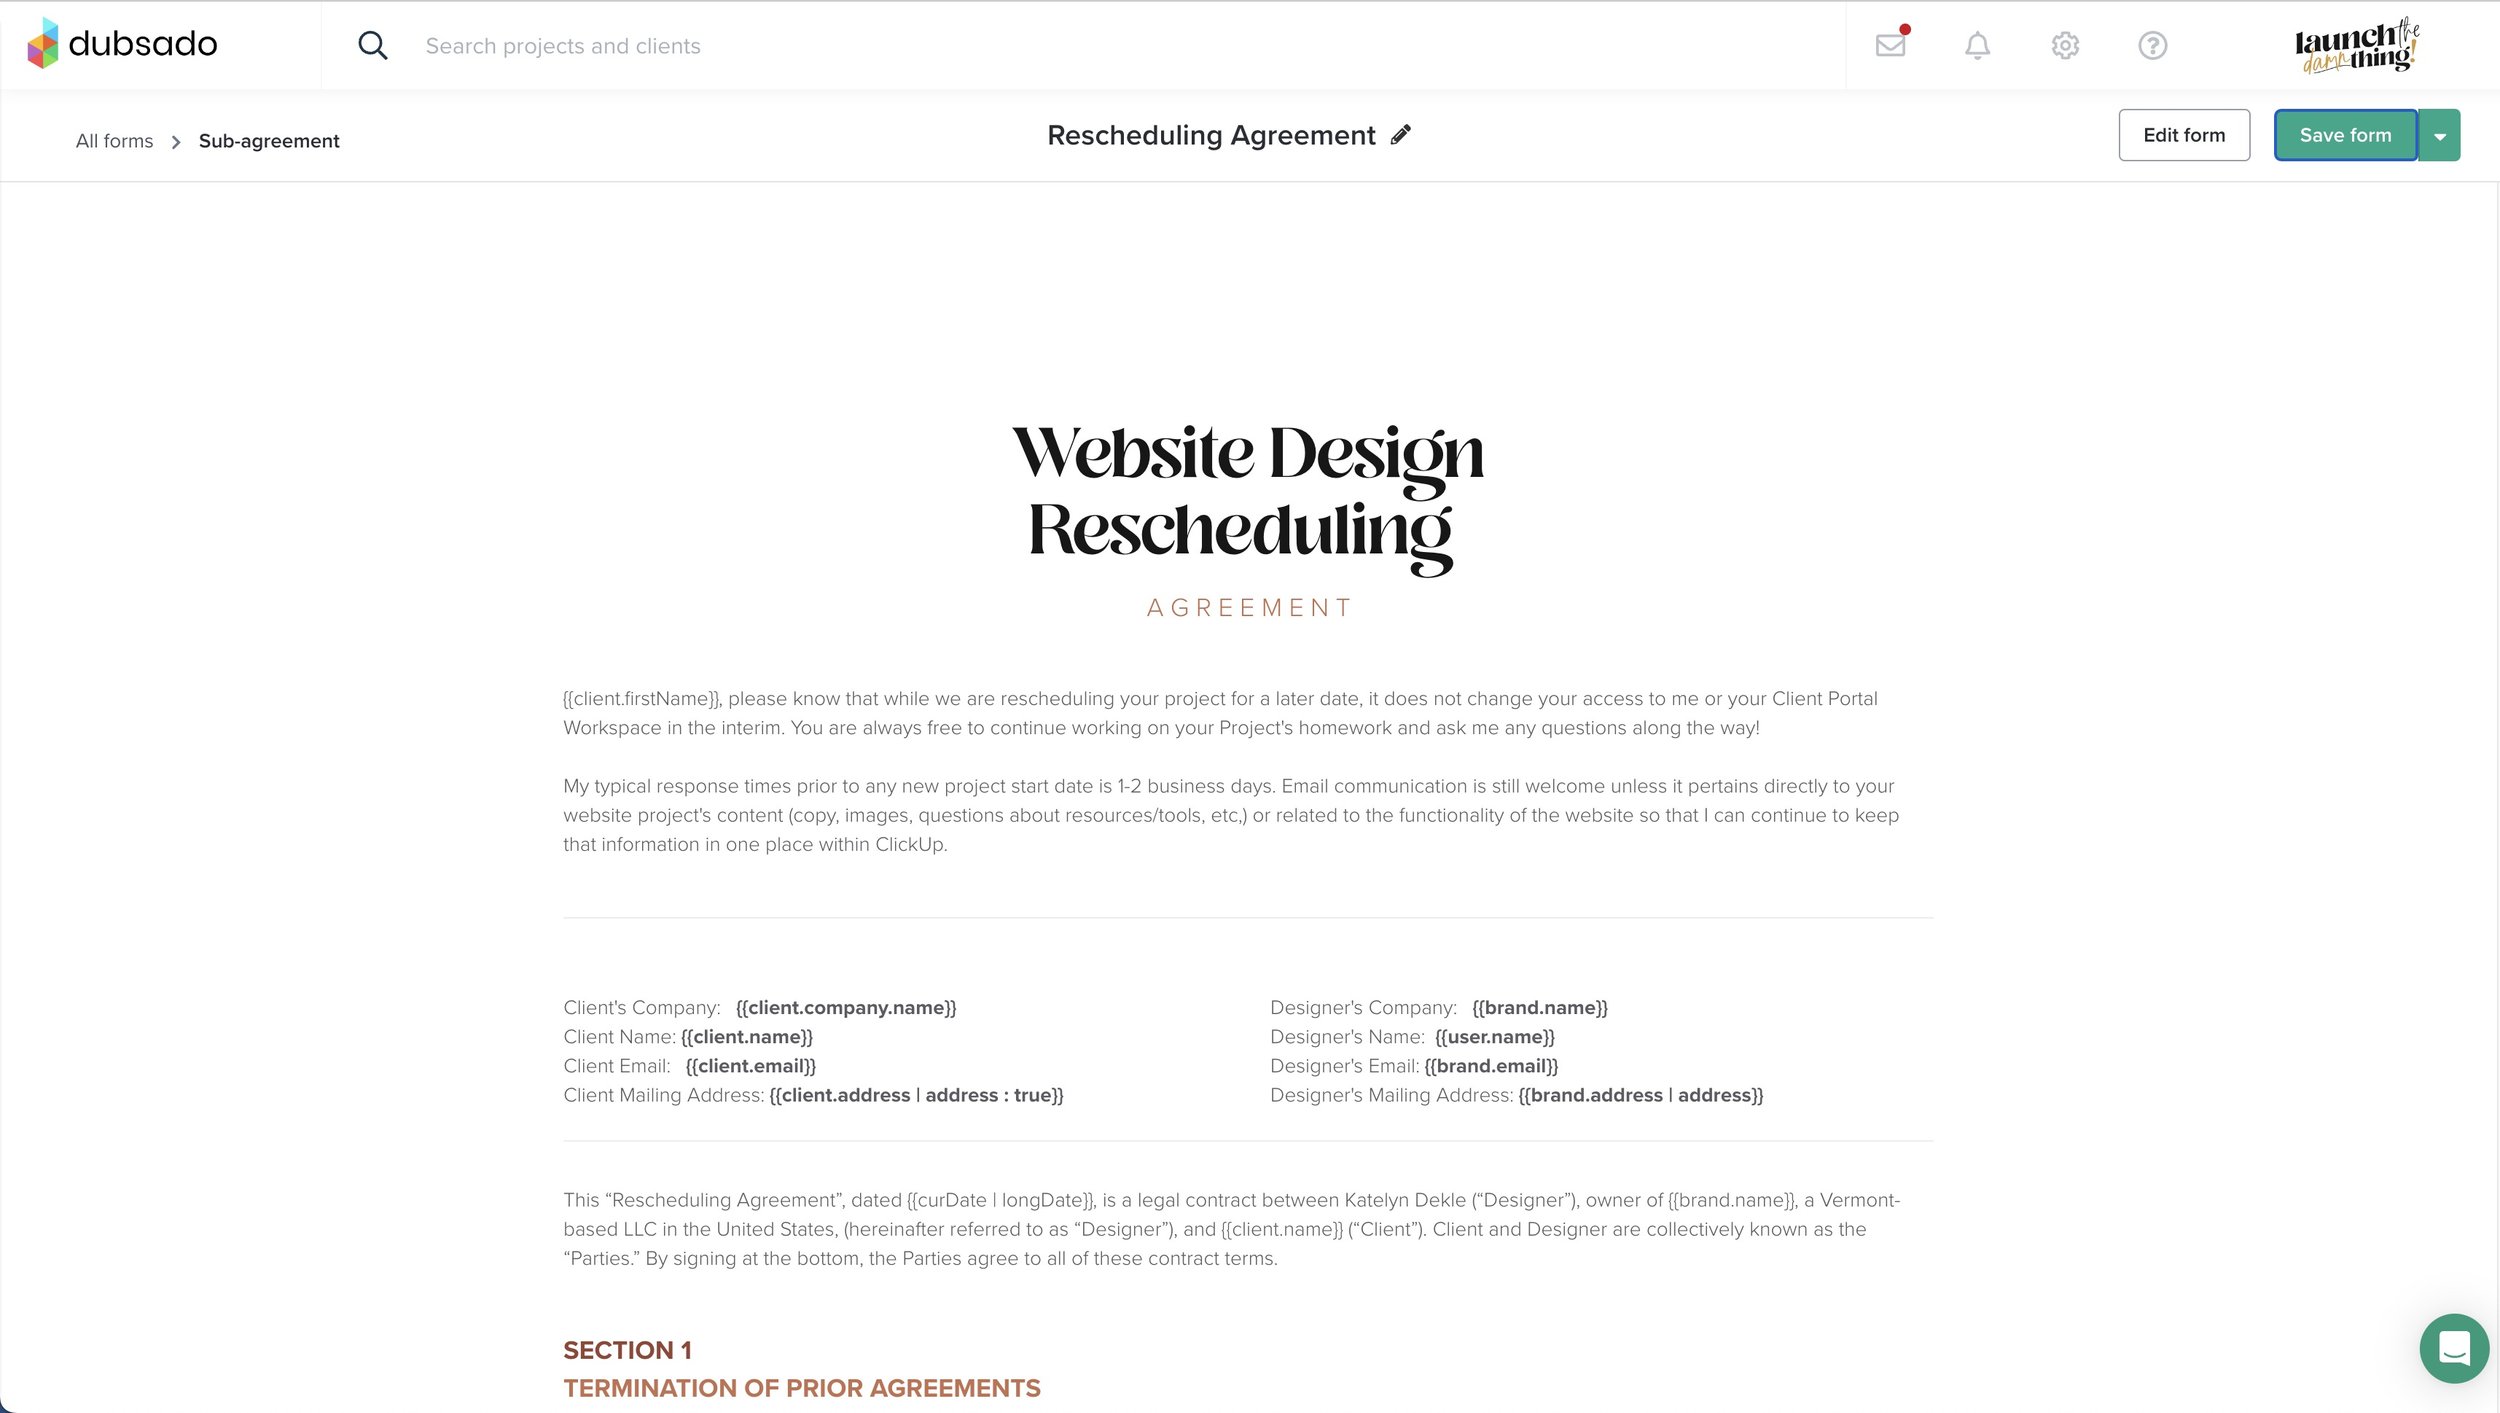
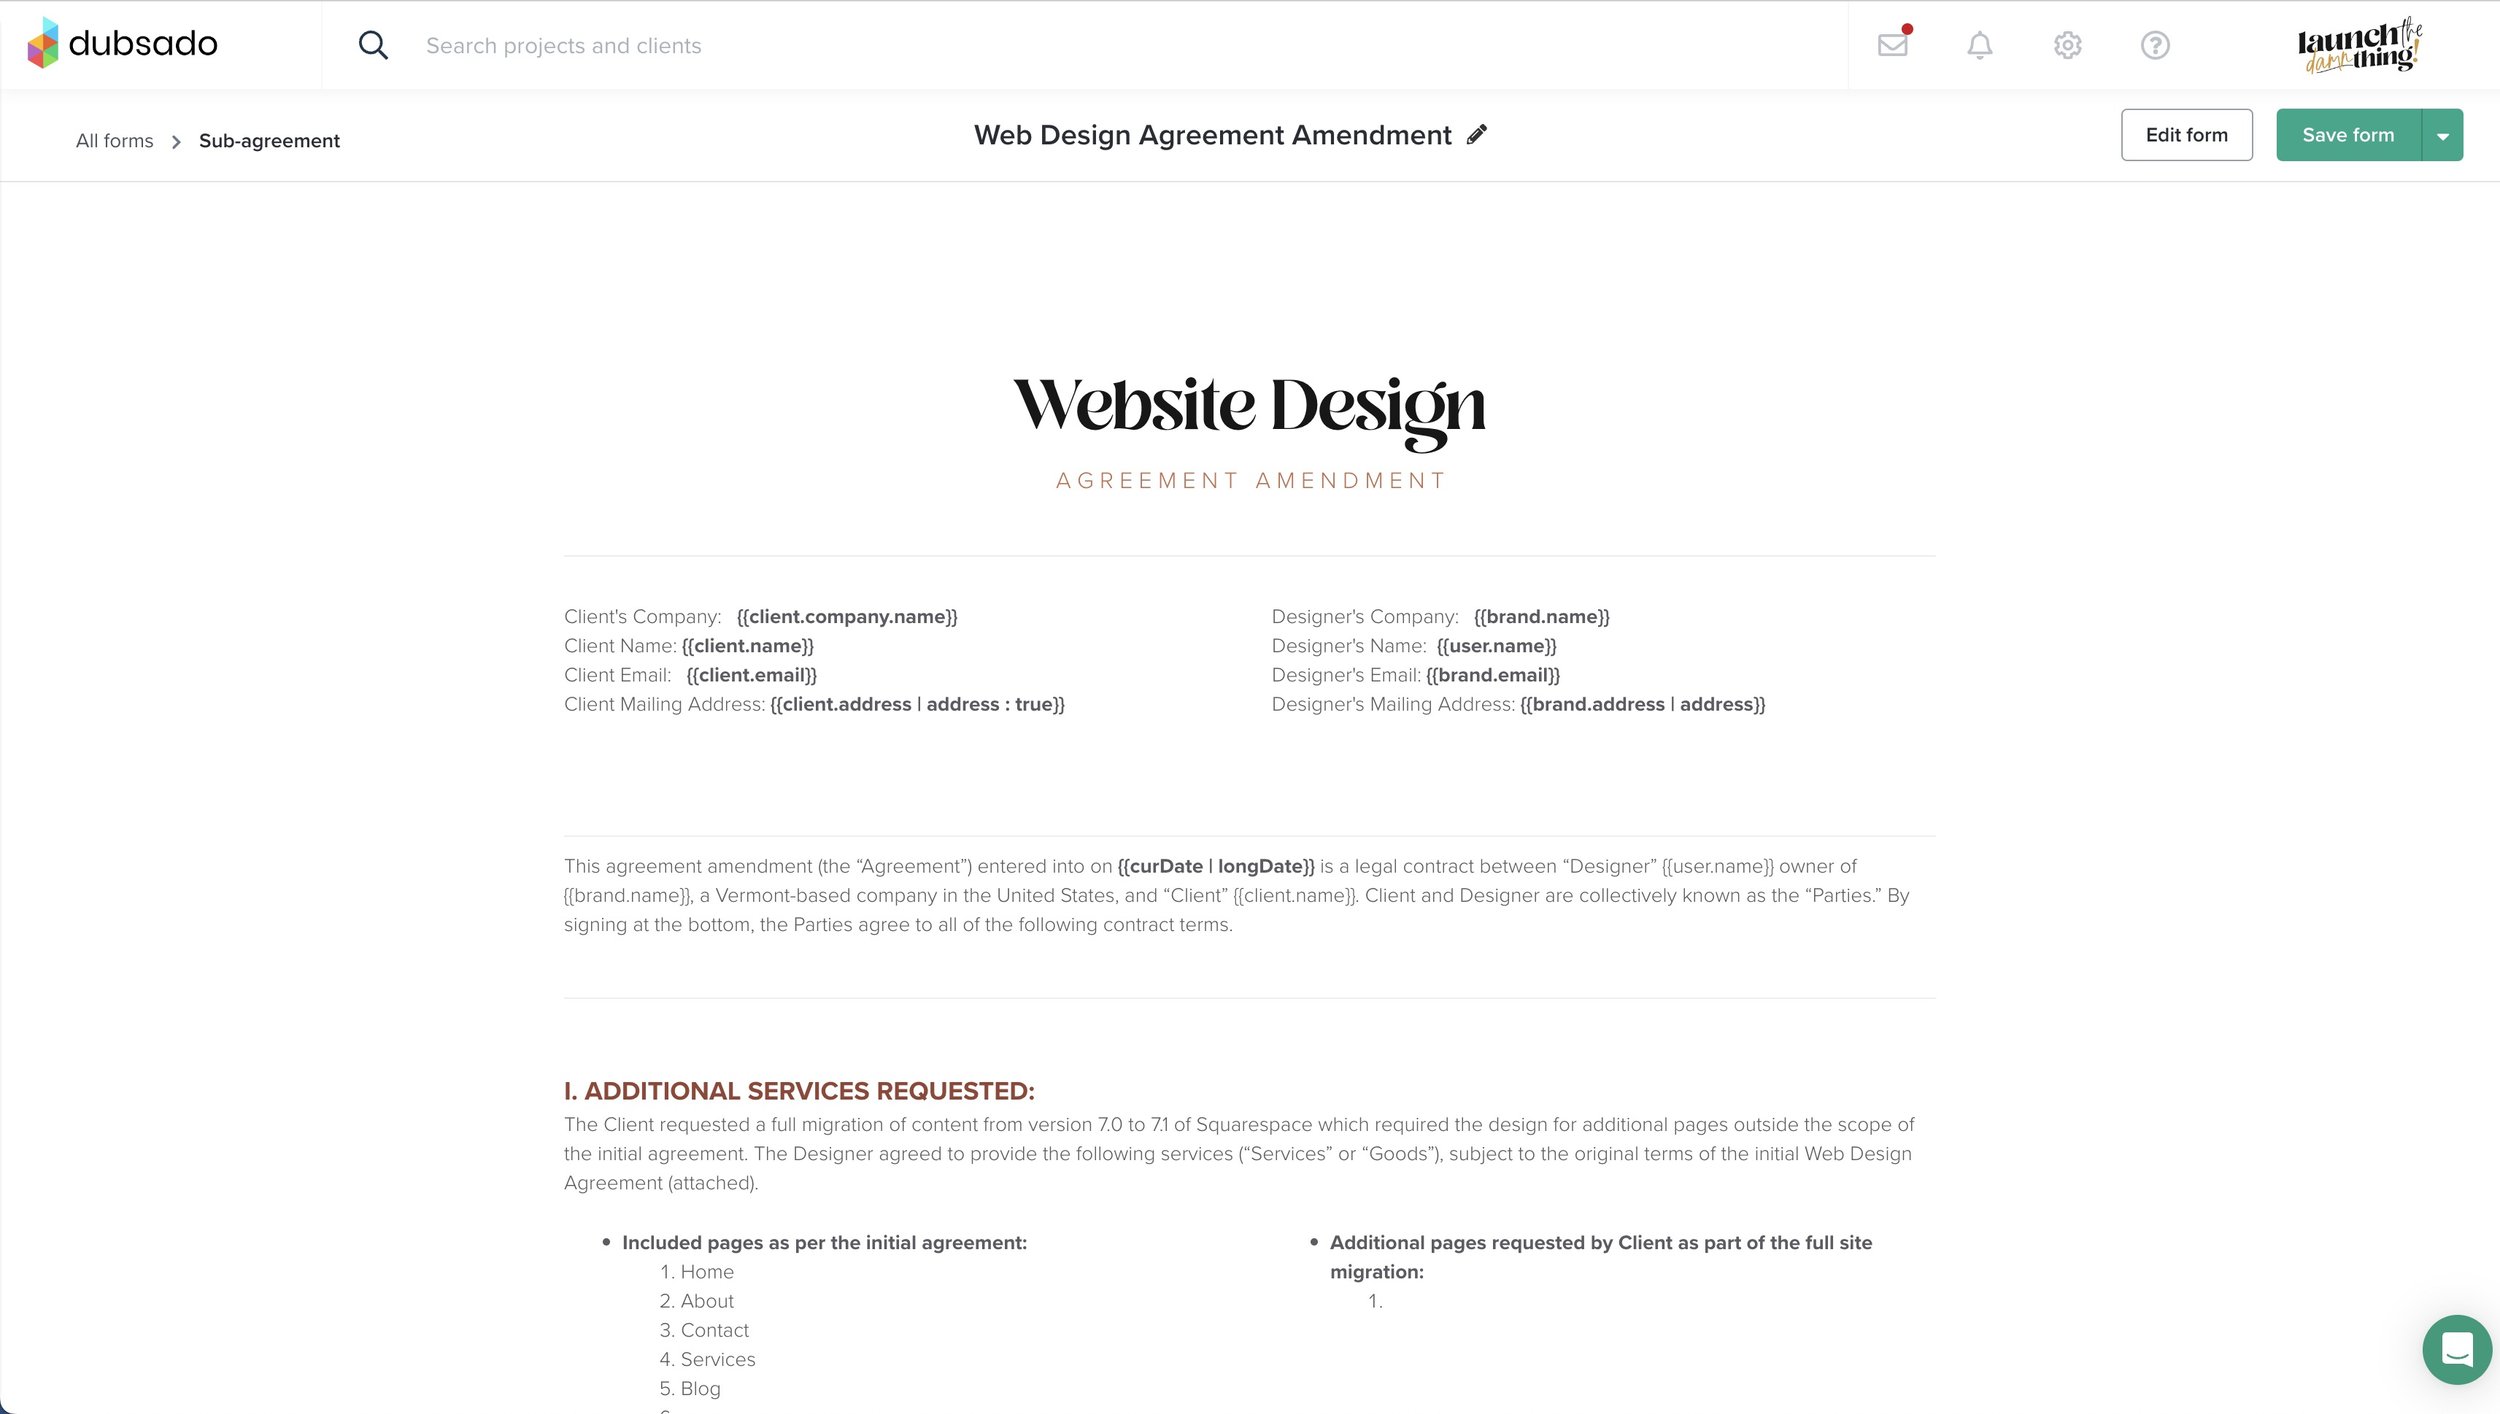
There's a rescheduling agreement that I can put in there and of course, an amendment, if we have to extend or add to the original contract that we both signed, because in Dubsado like many other tools, once one party has signed the contract, you can't edit anything in it anymore.
Once one party has signed, the only edit you can ever make is the other signature. So it's a good thing, but if anything needs to change, you do need an amendment as a sub-agreement, instead. Or to remove the contract altogether and put in a new one and get new signatures, which isn't always the right thing to do.
My Project Contracts
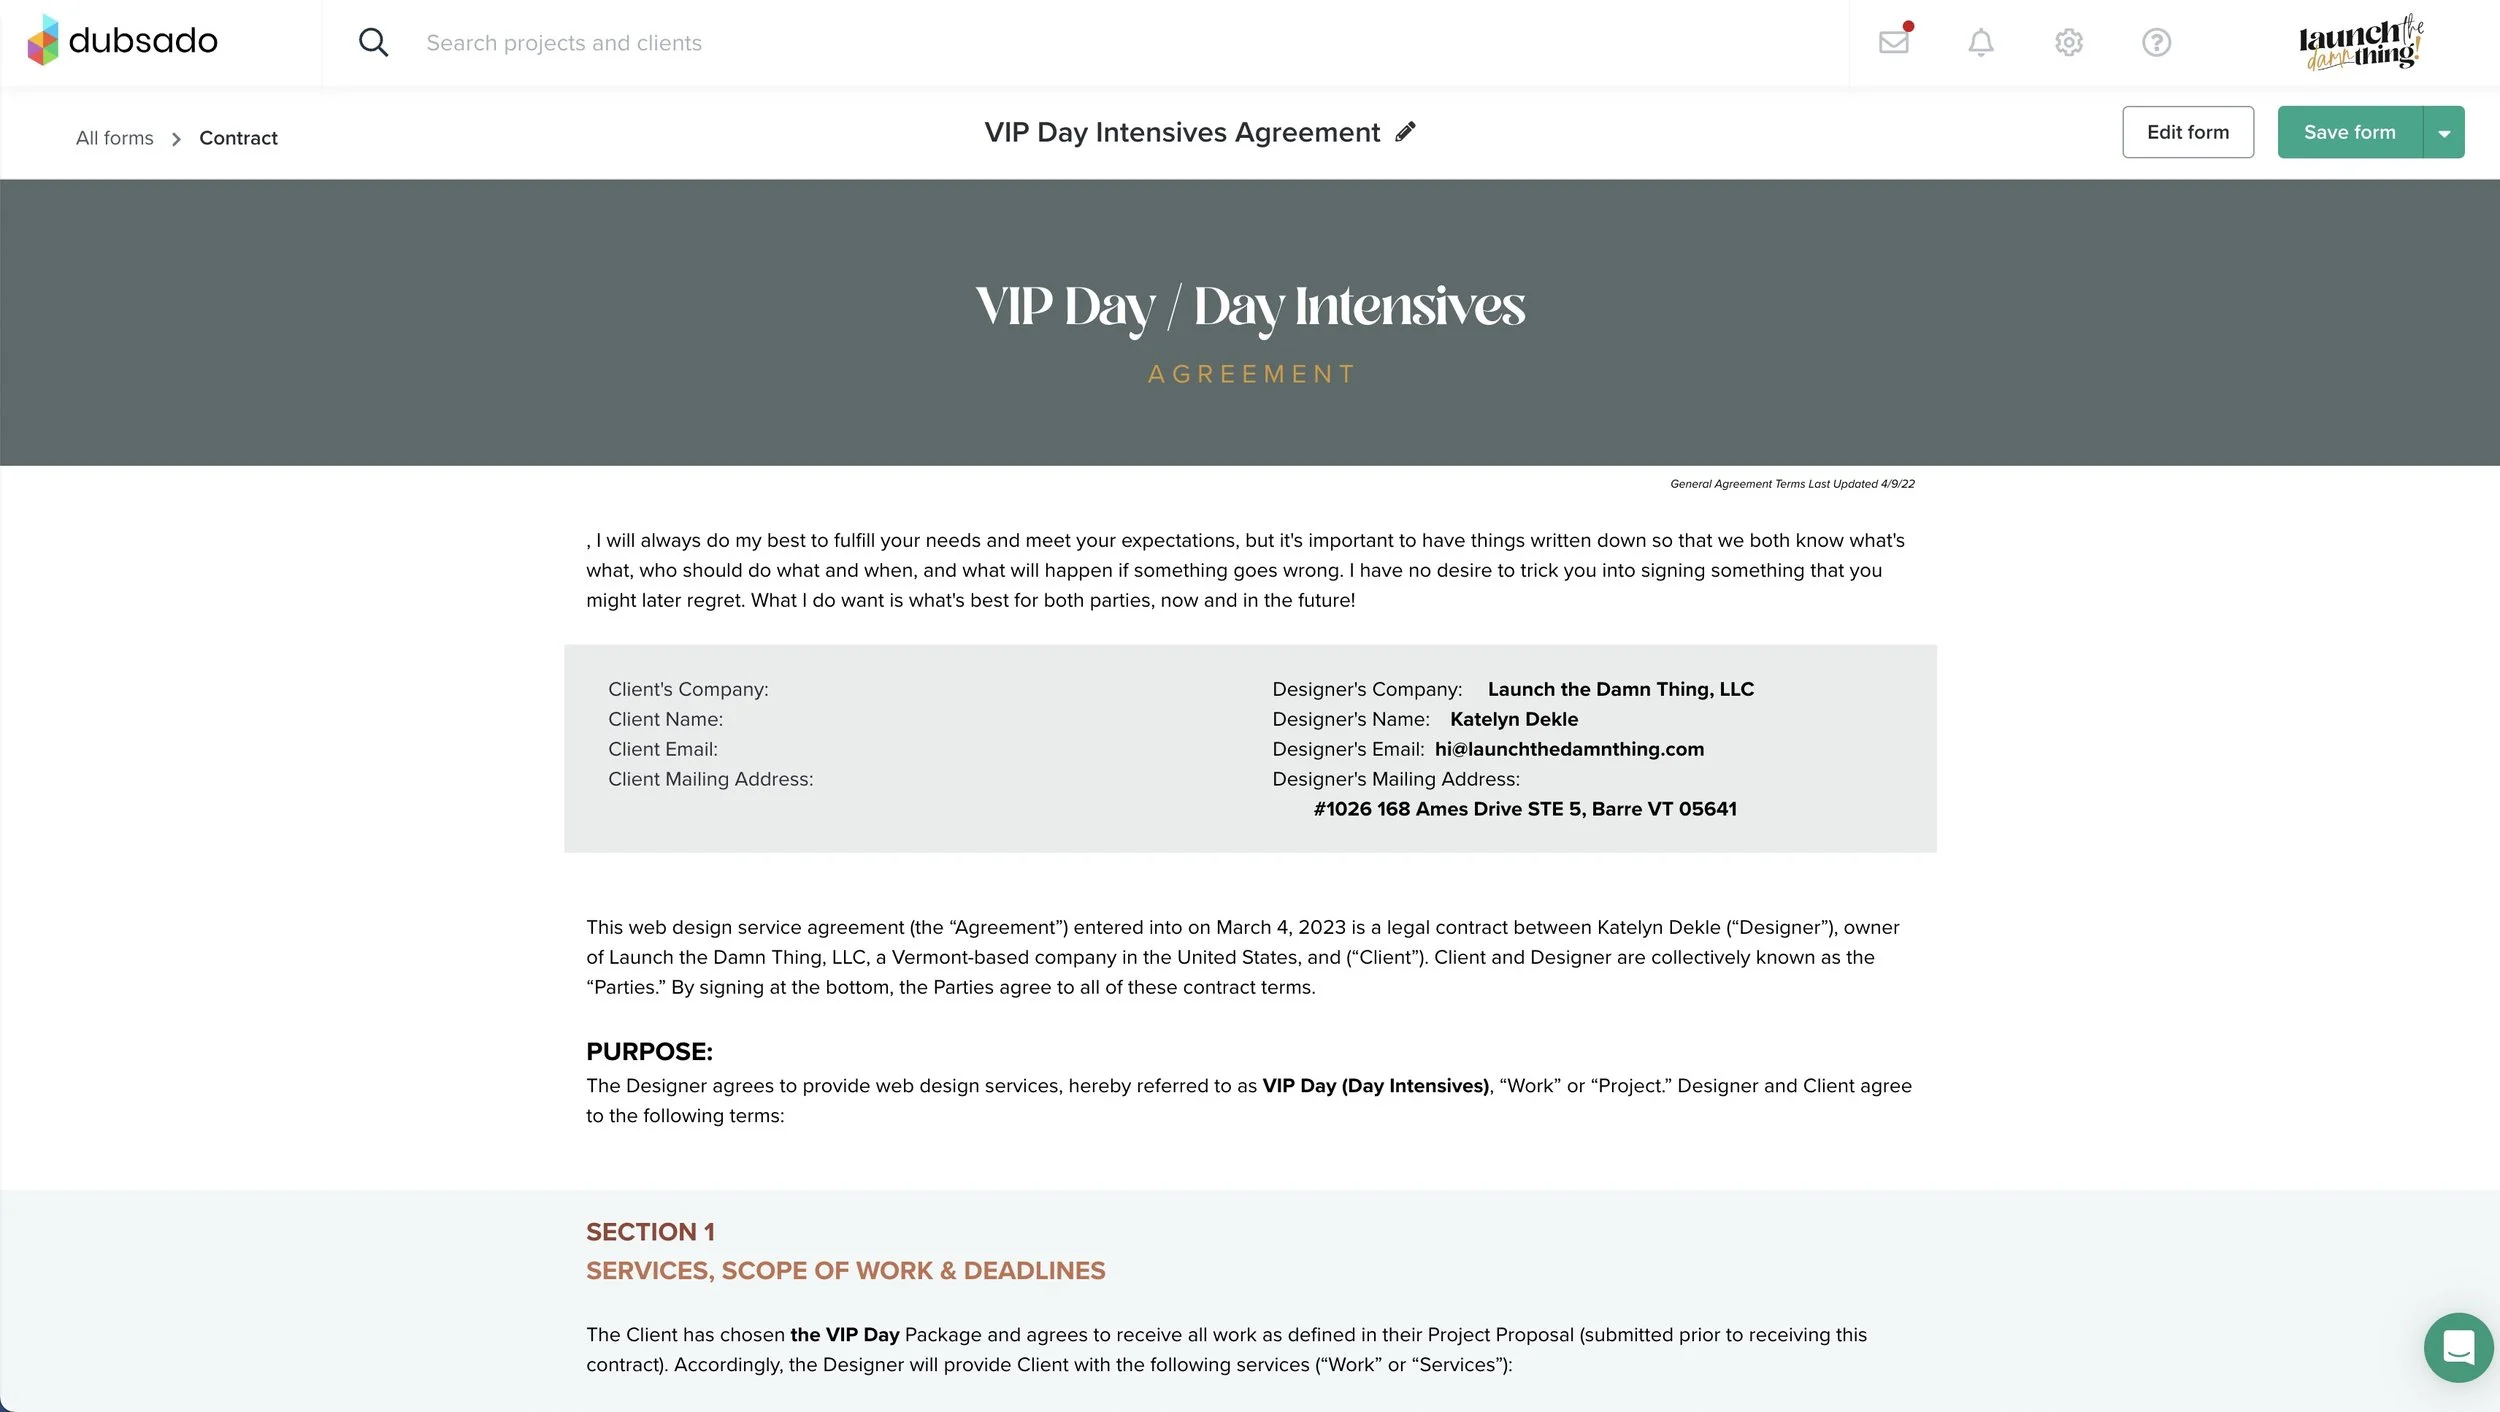
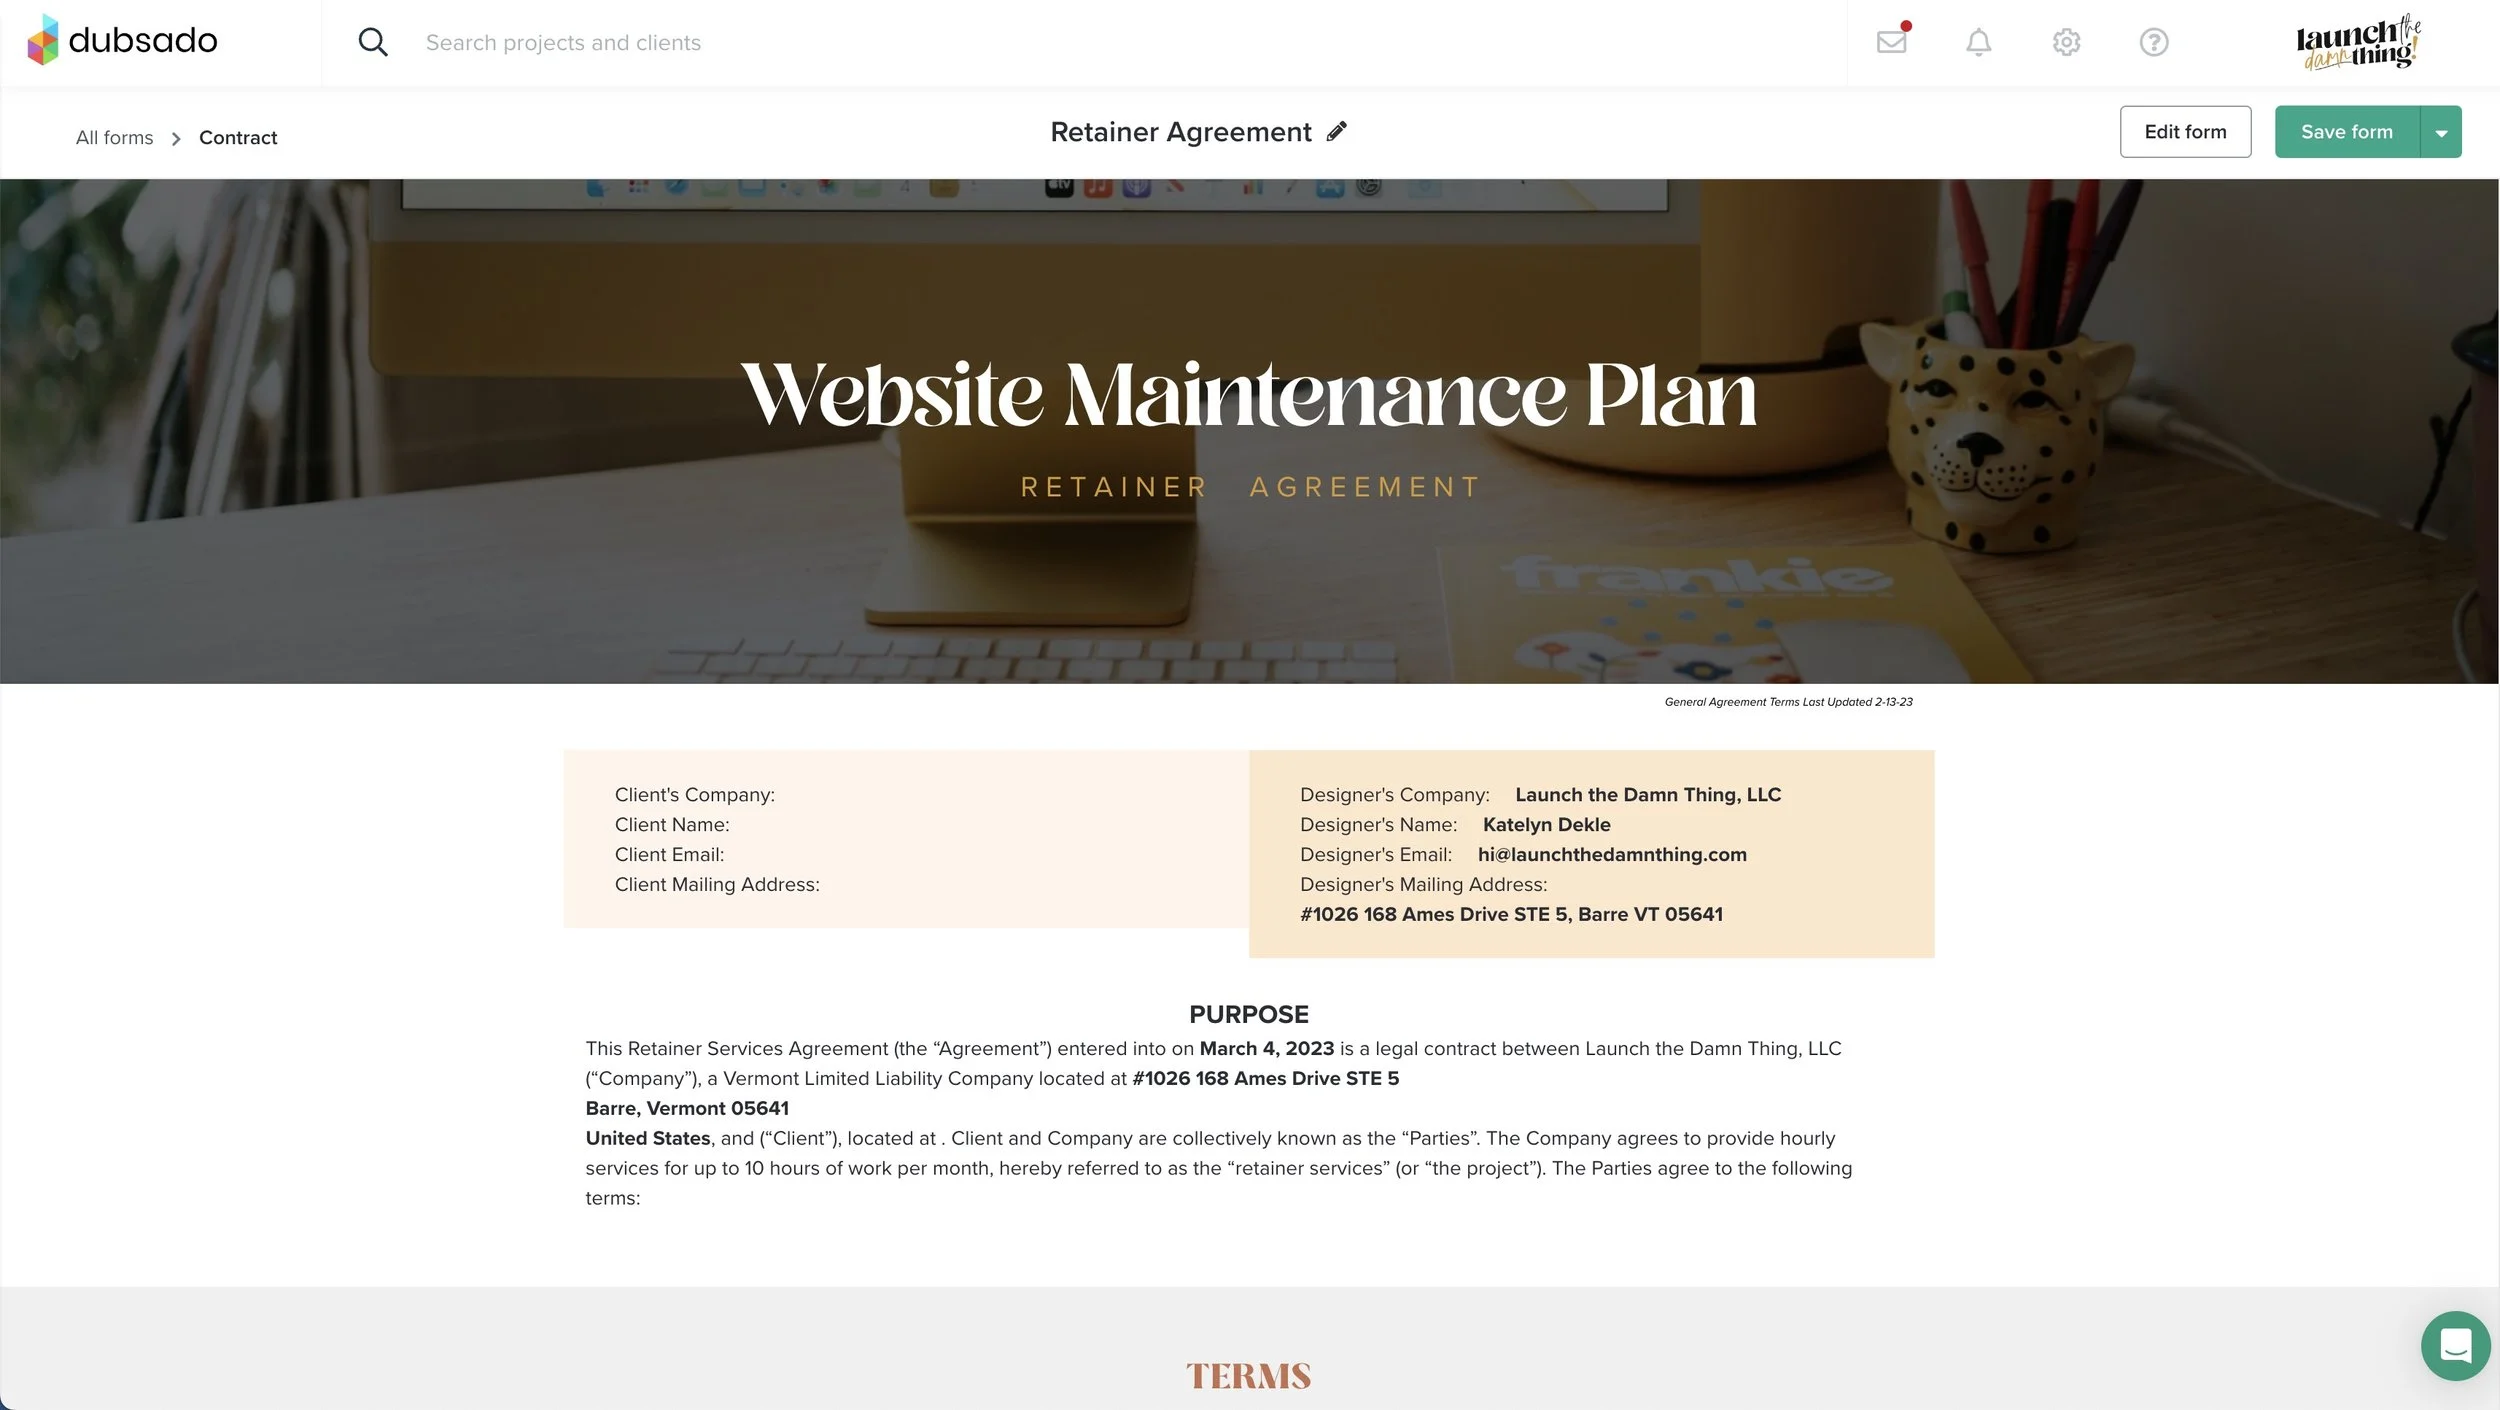
For contracts, you can see, I have a lot. I have retainer agreements, VIP day agreements, website agreements, coaching and consulting.
The list goes on; that's not even all the contracts that I have. in my actual files, I have way more than that.
Creative Law Shop
I got all of them from Creative Law Shop. Those are the ones that I actively use myself. And that's the one that I prefer to tell people about because they have lifetime updates on everything you buy from that shop, which is nice. because they give you lifetime updates. If the law ever changes and they update the contract, you can log back into your portal and download the new copy for free. I am not aware of any other contract shop that does that.
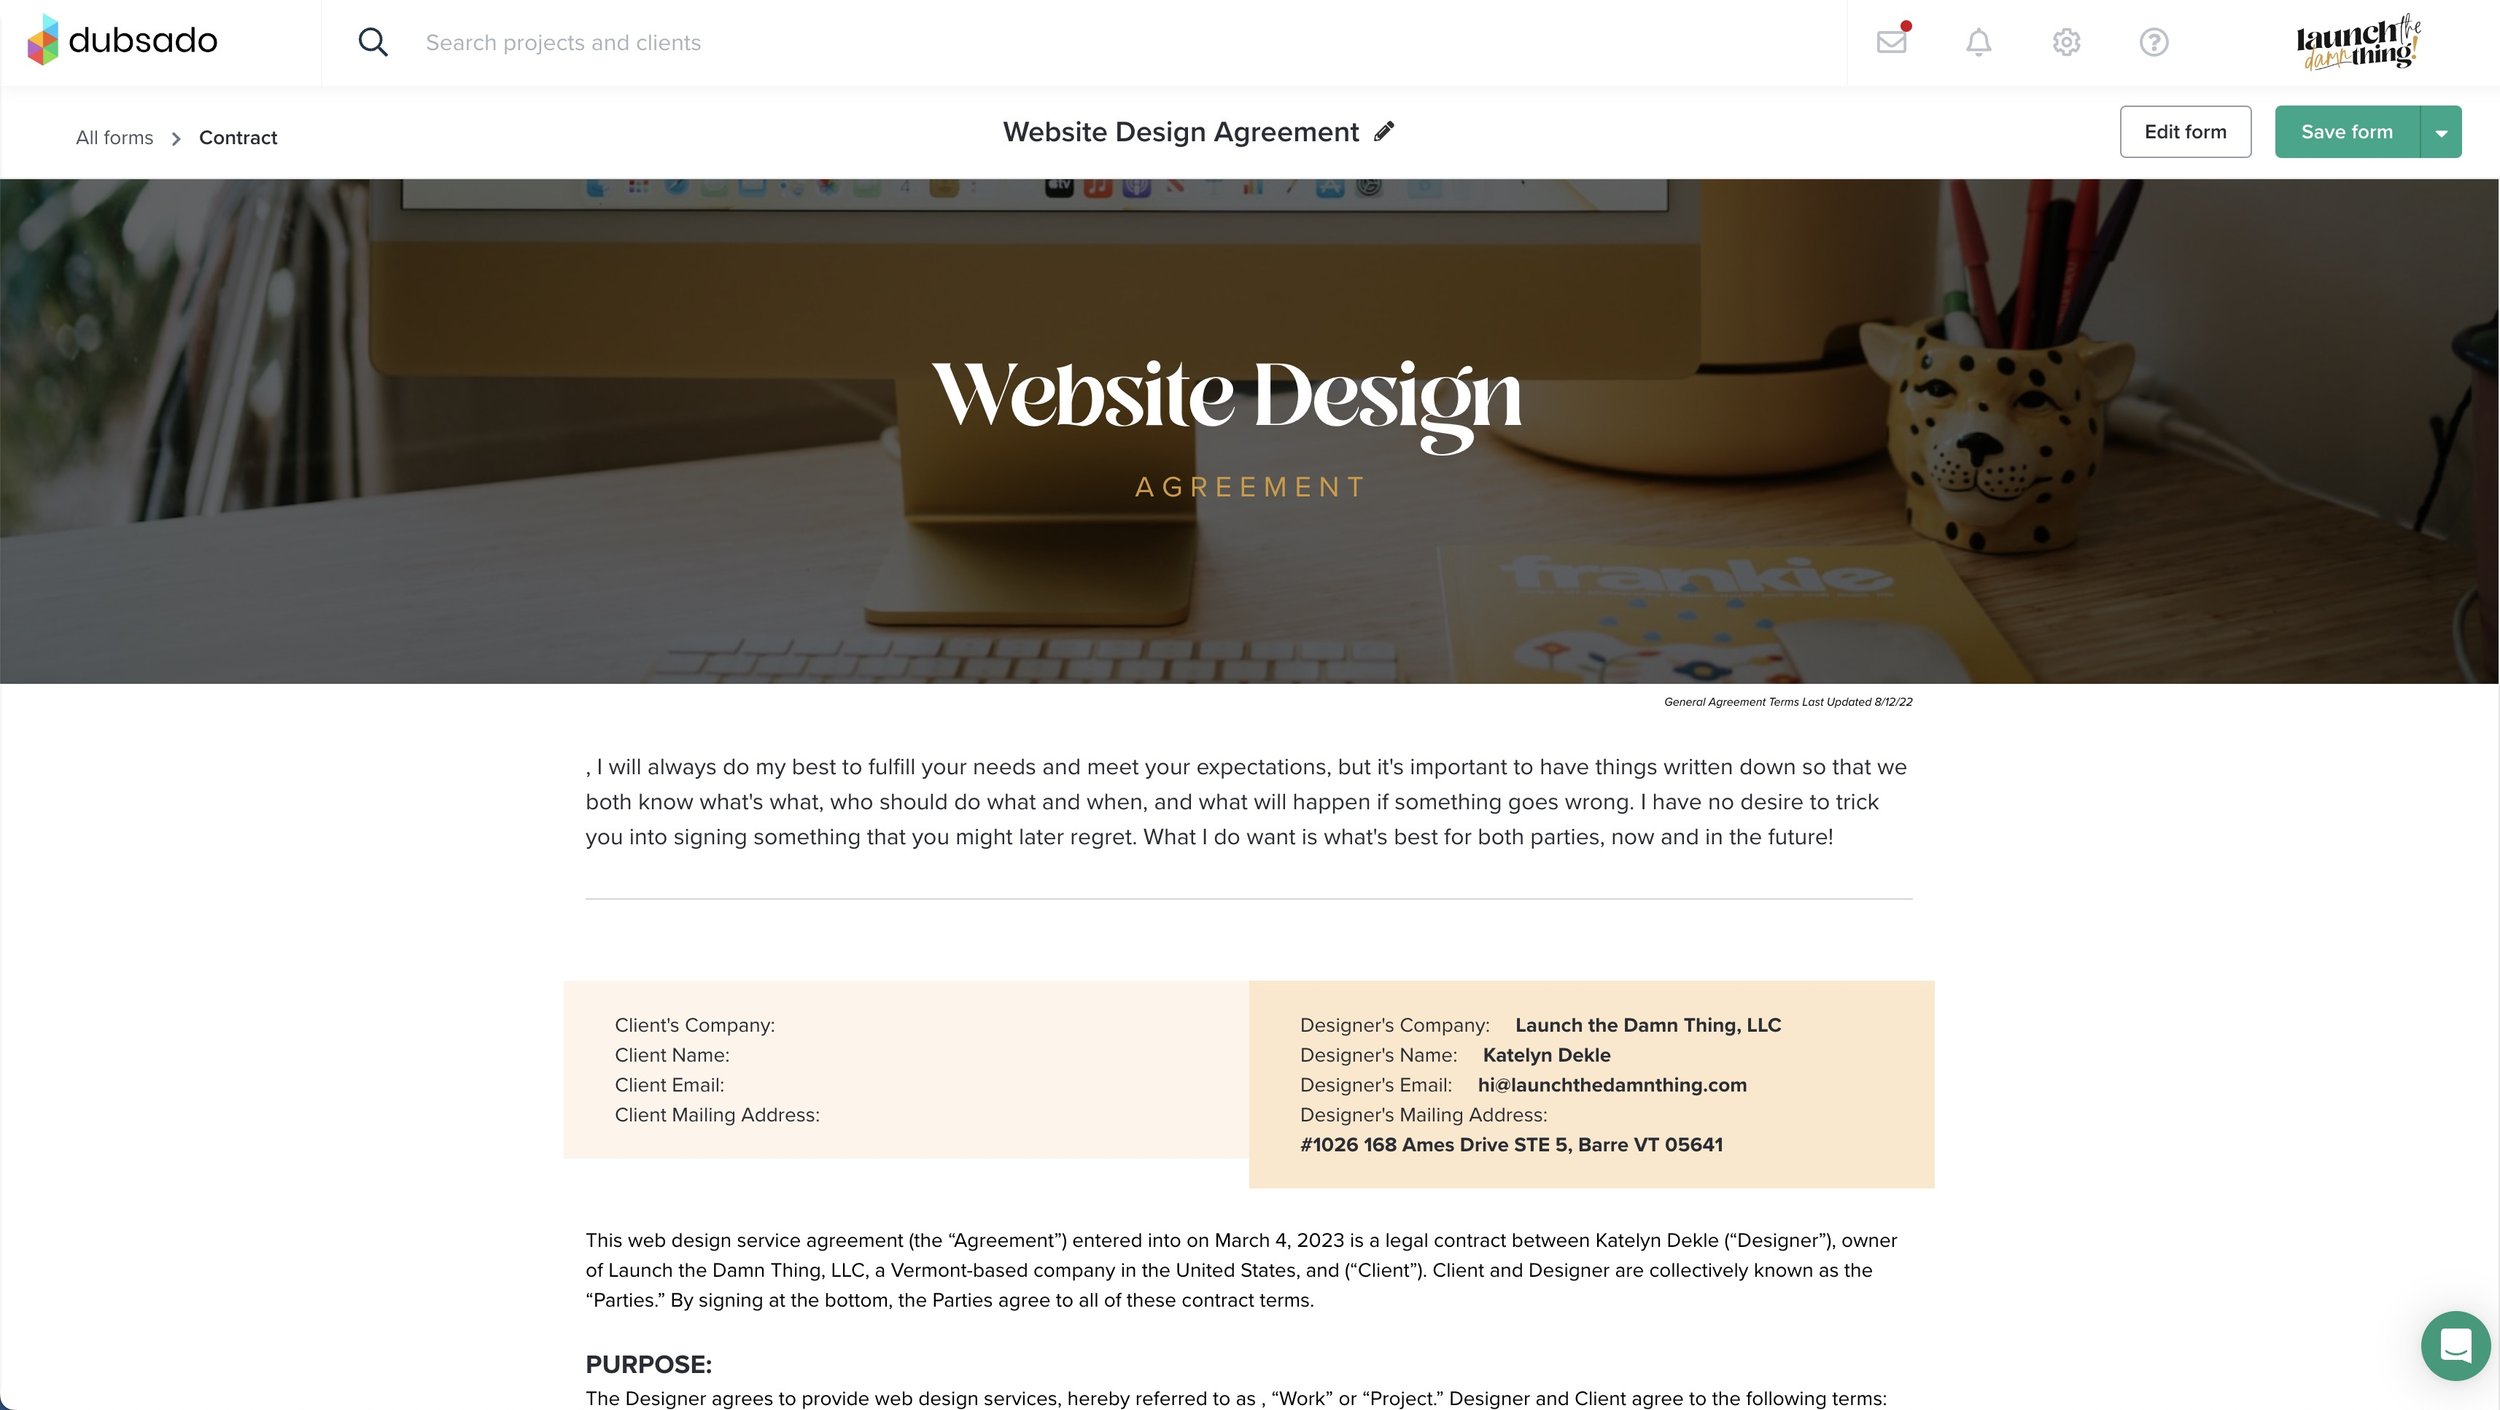
Web Design Agreement
I'm going to show you one more. The web design agreement, I have a note to myself of when I last updated it. And I always put at the top basic details. Again, these have variable fields here, so that detail will map in because they filled it out somewhere else.
Then I have the full list of my design terms. And then at the bottom, I have a container block where I have the client's signature and is slightly different color than my signature. So they know which areas are theirs.
And also a fun GIF, because I'm all about personality in my business, and then because this is usually tied to both a proposal and also an invoice, the button usually says agree and submit. The next thing that happens is they get ported over to the invoice.

📌 Pin it!
wrapping up
So that's a rundown of what you can do with Dubsado forms, there are a million other things that you can use them for too. As long as you need those forms to be related to a project or a customer that you want to manage in your CRM, you can find a way to use a Dubsado form for that thing.
They have lots of stuff coming down the pipeline, including an app and even conditional logic, at some point.
There are all kinds of shops out there that give you access to specialized designs that take it to a whole other level. I haven't used any of those myself, but they do exist. Boss Project has a shop with Dubsado templates. There are also Dub-ins and Forms & Flows.
I will link to all of those below. I'm not an affiliate; I just know that they're good resources:
reputable template shops for Dubsado forms:
But Dubsado is a very customizable CRM and I can't say that I found many other options that give you quite that much flexibility or that much design control.
And a lot of them won't let you embed video into it, which is another major perk.
So I hope that gives you some inspiration!